EasyManua.ls Logo

Yamaha Electone FE-40 - Auto Rhythm Unit; Rhythm Patterns; Rhythm Controls

Yamaha Electone FE-40
24 pages
Print Icon
To Next Page IconTo Next Page
To Previous Page IconTo Previous Page
Loading...
ji
pi
EJ
Ц
mum
mem
теме
am
2
ВНҮТНМ
РАТТЕНМ
А070
ВНҮТНМ
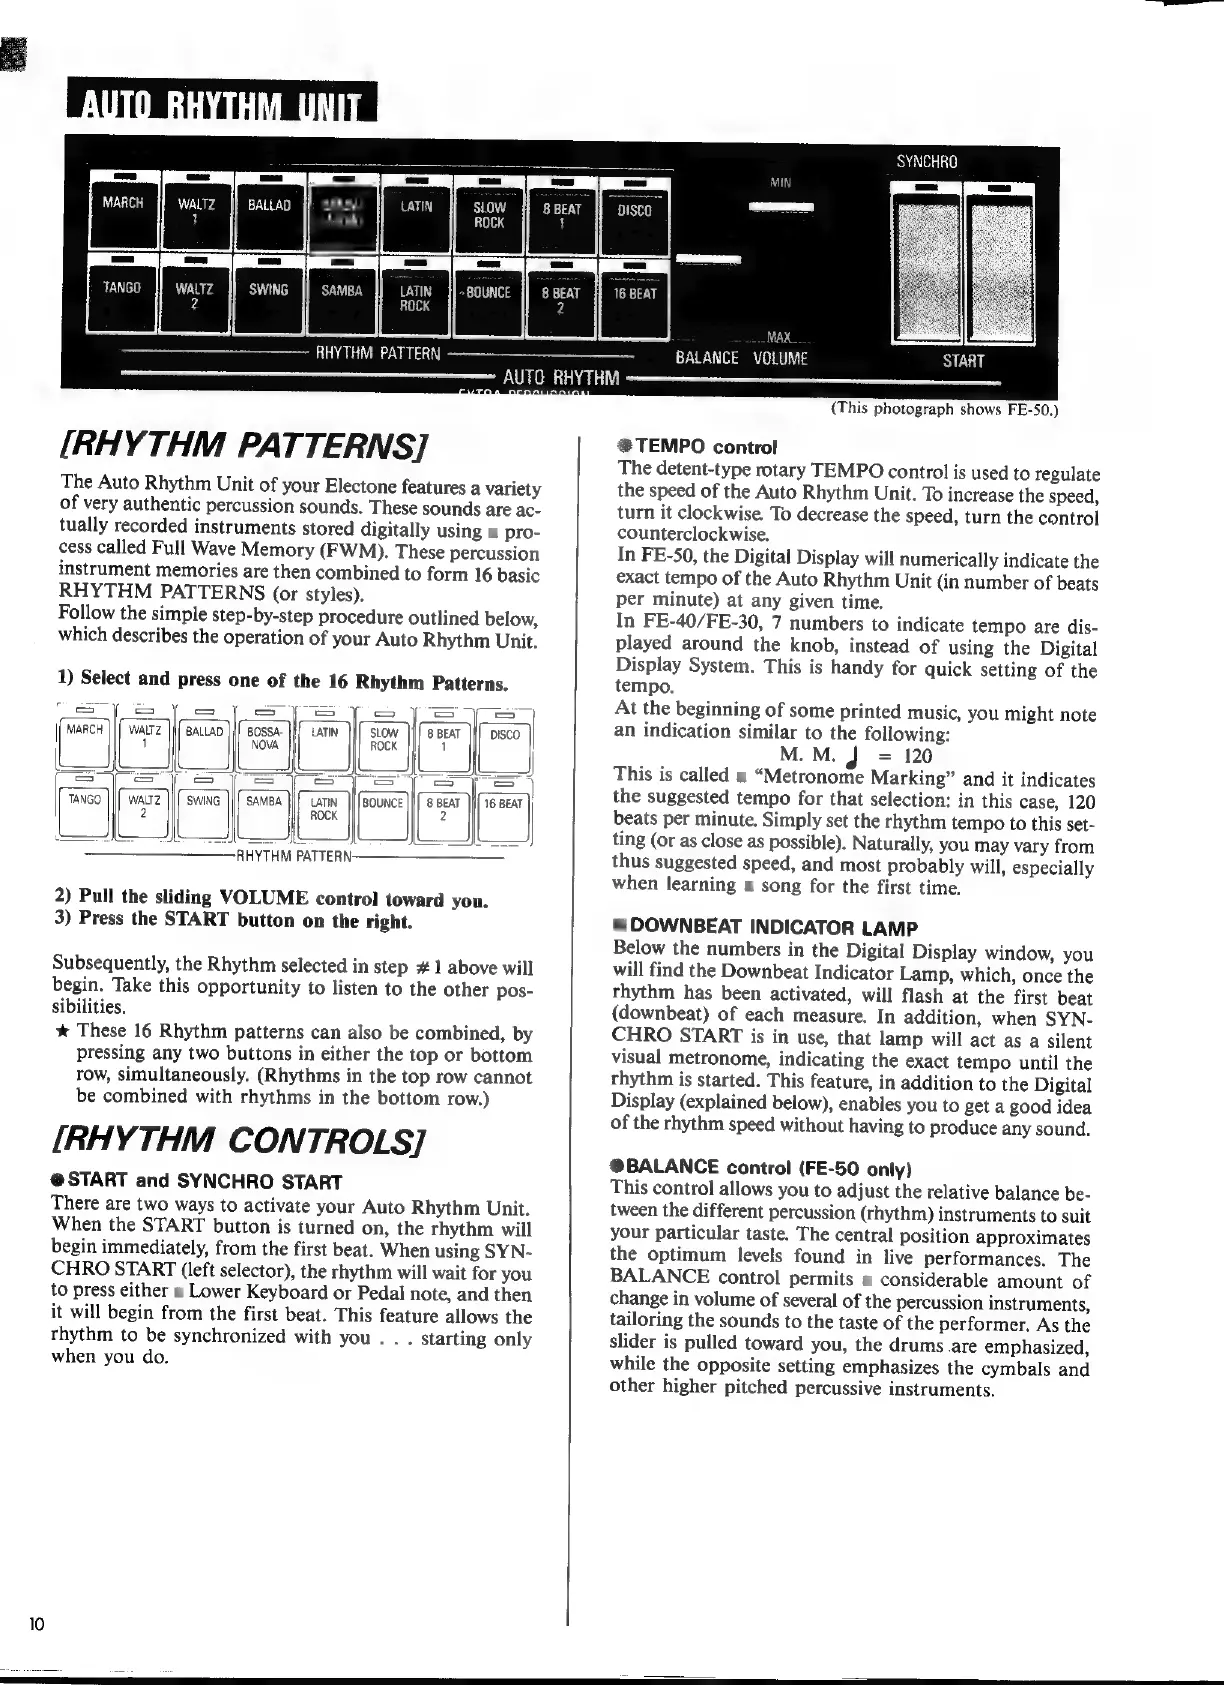
[RHYTHM
PATTERNS]
The
Auto
Rhythm
Unit
of
your
Electone
features
a
variety
of
very
authentic
percussion
sounds.
These
sounds
are
ac-
tually
recorded
instruments
stored
digitally
using
a
pro-
cess
called
Full
Wave
Memory
(FWM).
These
percussion
instrument
memories
are
then
combined
to
form
16
basic
RHYTHM
PATTERNS
(or
styles).
Follow
the
simple
step-by-step
procedure
outlined
below,
which
describes
the
operation
of
your
Auto
Rhythm
Unit.
1)
Select
and
press
one
of
the
16
Rhythm
Patterns.
((маясн
|
wa?
IN
eALLAD
III
Bossa-
|
Lamm
Wl
stow
|
8
BEAT
|l[.
Disco
|
1
NOVA
ROCK
1
IJ
JIE
БЕ
|
>
==
=
e
|
Е
WALTZ
=
SAMBA
||
атм
8
BEAT
||
16
ВЕАТ
2
ROCK
2
—
À——
C
RHYTHM
PATTERN—————
— —
—
E
BOUNCE
2)
Pull
the
sliding
VOLUME
control
toward
you.
3)
Press
the
START
button
on
the
right.
Subsequently,
the
Rhythm
selected
in
step
#1
above
will
begin.
Take
this
opportunity
to
listen
to
the
other
pos-
sibilities.
*
These
16
Rhythm
patterns
can
also
be
combined,
by
pressing
any
two
buttons
in
either
the
top
or
bottom
row,
simultaneously.
(Rhythms
in
the
top
row
cannot
be
combined
with
rhythms
in
the
bottom
row.)
[RHYTHM
CONTROLS]
Ф
ЅТАВТ
and
SYNCHRO
START
There
are
two
ways
to
activate
your
Auto
Rhythm
Unit.
When
the
START
button
is
turned
on,
the
rhythm
will
begin
immediately,
from
the
first
beat.
When
using
SYN-
CHRO
START
(left
selector),
the
rhythm
will
wait
for
you
to
press
either
a
Lower
Keyboard
or
Pedal
note,
and
then
it
will
begin
from
the
first
beat.
This
feature
allows
the
rhythm
to
be
synchronized
with
you
.
.
.
starting
only
when
you
do.
.
SYNCHRO
nce
pue
9,
IHR
(This
photograph
shows
FE-50.)
$$
TEMPO
control
The
detent-type
rotary
TEMPO
control
is
used
to
regulate
the
speed
of
the
Auto
Rhythm
Unit.
To
increase
the
speed,
turn
it
clockwise.
To
decrease
the
speed,
turn
the
control
counterclock
wise.
In
FE-50,
the
Digital
Display
will
numerically
indicate
the
exact
tempo
of
the
Auto
Rhythm
Unit
(in
number
of
beats
per
minute)
at
any
given
time.
In
FE-40/FE-30,
7
numbers
to
indicate
tempo
are
dis-
played
around
the
knob,
instead
of
using
the
Digital
Display
System.
This
is
handy
for
quick
setting
of
the
tempo.
At
the
beginning
of
some
printed
music,
you
might
note
an
indication
similar
to
the
following:
M.M.J
-
120
This
is
called
a
*Metronome
Marking"
and
it
indicates
the
suggested
tempo
for
that
selection:
in
this
case,
120
beats
per
minute.
Simply
set
the
rhythm
tempo
to
this
set-
ting
(or
as
close
as
possible).
Naturally,
you
may
vary
from
thus
suggested
speed,
and
most
probably
will,
especially
when
learning
a
song
for
the
first
time.
@
DOWNBEAT
INDICATOR
LAMP
Below
the
numbers
in
the
Digital
Display
window,
you
will
find
the
Downbeat
Indicator
Lamp,
which,
once
the
rhythm
has
been
activated,
will
flash
at
the
first
beat
(downbeat)
of
each
measure.
In
addition,
when
SYN-
CHRO
START
is
in
use,
that
lamp
will
act
as
a
silent
visual
metronome,
indicating
the
exact
tempo
until
the
rhythm
is
started.
This
feature,
in
addition
to
the
Digital
Display
(explained
below),
enables
you
to
get
a
good
idea
of
the
rhythm
speed
without
having
to
produce
any
sound.
®BALANCE
control
(FE-50
only)
This
control
allows
you
to
adjust
the
relative
balance
be-
tween
the
different
percussion
(rhythm)
instruments
to
suit
your
particular
taste.
The
central
position
approximates
the
optimum
levels
found
in
live
performances.
The
BALANCE
control
permits
a
considerable
amount
of
change
in
volume
of
several
of
the
percussion
instruments,
tailoring
the
sounds
to
the
taste
of
the
performer.
As
the
slider
is
pulled
toward
you,
the
drums
are
emphasized,
while
the
opposite
setting
emphasizes
the
cymbals
and
other
higher
pitched
percussive
instruments.