This document is an owner's manual for Yard-Man Hydrostatic Lawn Tractors, covering assembly, operation, and maintenance. It emphasizes safe operation practices and provides detailed instructions for various adjustments and servicing procedures.
Function Description
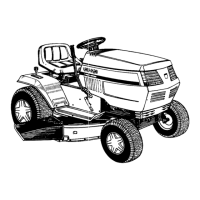
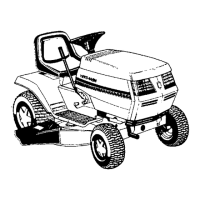
The Yard-Man Hydrostatic Lawn Tractor is designed for cutting residential grass. It features a hydrostatic transmission for infinite speed control and a cutting deck that can be raised, lowered, and engaged/disengaged. The tractor is equipped with an internal combustion engine and includes safety interlock systems to prevent accidental starting and ensure safe operation. Optional attachments like grass collectors, mulching kits, and snow throwers can extend its utility beyond basic lawn mowing.
Usage Features
The tractor's operation is controlled via an ignition switch, throttle control, choke control, hydrostatic control lever, clutch-brake pedal, and lift lever.
- Starting the Engine: The engine starts by turning the ignition key to the START position, provided the clutch-brake pedal is depressed and the lift lever is in the BLADES OFF position. The throttle should be in the FAST position, and the choke control may be used for a cold engine.
- Hydrostatic Control Lever: This lever, located on the fender, controls both the speed and direction of the tractor. Moving it forward or backward provides infinite speed control, with faster travel achieved by moving the lever farther. Pulling the lever into the neutral (N) area stops the tractor.
- Clutch-Brake Pedal: Depressing this pedal returns the drive unit to neutral and applies the brake. It must be depressed to start the engine.
- Parking Brake: To set, depress the clutch-brake pedal, pull up the parking brake knob, and release the pedal. It will remain in the raised position. To release, depress and release the clutch-brake pedal. The parking brake must be set if the operator leaves the seat with the engine running.
- Relief Valve: A hydrostatic relief valve allows the unit to be moved without the engine running. It is operated by pushing a lever forward and to the right to lock it, and pushing to the left to release it before operating the engine.
- Lift Lever: Used to raise and lower the cutting deck and to engage/disengage the blades. Pulling it all the way back and locking it disengages the blades. The lift lever must be in the BLADES OFF position when starting the engine, shifting into reverse, and if the operator leaves the seat.
- Deck Lift Indicator: Marks the position being used for the lift lever, allowing the operator to return to a desired cutting height after raising the deck.
- Cutting Height Adjustment: The deck wheels can be moved to adjust the cutting height, ensuring they are 1/4 to 1/2 inch above the ground.
- Light Switch: Operates the headlamps, which function only when the engine is running.
- Ammeter: Registers the battery's charge or discharge rate. It shows discharge when starting and charge when the engine is running in the fast position until the battery is fully charged.
- Safety Interlock System: Prevents the engine from starting unless the clutch-brake pedal is depressed and the lift lever is in the BLADES OFF position. It also shuts off the engine if the lift lever is engaged when shifting into reverse or if the operator leaves the seat without setting the parking brake.
- Slope Operation: Emphasizes mowing up and down slopes, not across, and avoiding sudden turns. A slope gauge is provided to determine safe operating inclines (not exceeding 15 degrees).
Maintenance Features
The manual provides comprehensive instructions for maintaining the lawn tractor to ensure longevity and safe operation.
- Battery Information: Detailed warnings about handling sulfuric acid, including first aid for contact with skin or eyes. Instructions for safe charging in well-ventilated areas and keeping lighted materials away from the battery due to explosive gases.
- Battery Activation and Charging: Instructions for activating the battery with fluid, followed by a slow charge using a 12-volt automotive type battery charger (not exceeding 10 amps) for a minimum of 2 hours or until fully charged. Distilled water should be added after charging, not acid.
- Battery Care and Maintenance: Check fluid level every two weeks and before/after charging, keeping it between LOWER and UPPER LEVEL lines. Only distilled water should be added.
- Battery Removal/Installation/Jump Starting: Specific instructions for disconnecting and connecting battery cables (negative first for removal, positive first for installation) and for jump-starting, emphasizing safety precautions to prevent sparking and explosions.
- Cleaning the Battery: Recommendations for cleaning the battery with a baking soda and water solution, scraping terminals with a wire brush, and coating terminals with grease or petroleum jelly to prevent corrosion.
- Chute Deflector Attachment: Instructions for attaching the chute deflector to the right side of the deck, ensuring it covers the chute opening. Operation without the deflector or grass catcher is warned against.
- Tire Pressure: Recommended operating tire pressure is approximately 12 p.s.i., with a maximum of 30 p.s.i. for seating beads. Equal pressure should be maintained on all tires.
- Deck Leveling: Instructions for measuring and adjusting the deck's level using the adjustable lift link to ensure an even cut.
- Hydrostatic Neutral Control Adjustment: Steps to ensure the tractor does not move when the engine is running, clutch is engaged, and the hydrostatic control lever is in neutral. This involves adjusting the speed selector rod and tightening nuts.
- Cutting Deck Engagement Adjustment: Procedure to ensure the deck is disengaged when the lift lever is in the BLADES OFF position or to optimize drive in cutting positions by adjusting the disengagement rod.
- Brake Adjustment: Instructions for adjusting the brake, located by the right rear wheel, to engage when the brake lever is 1/4" to 5/16" from the axle housing.
- Carburetor Adjustments: General guidance to refer to the separate engine manual for minor adjustments, emphasizing safety precautions when working with a running engine.
- Lubrication: Regular lubrication of steering gears (every 25 hours or once a season), pivot points on clutch, brake, and lift linkage (once a season), and steering shaft (once a season) with appropriate lubricants. Front wheels have grease fittings.
- Transaxle: Lubricated at the factory and does not require checking; contact a service dealer for repairs.
- Hydrostatic Transmission Cooling: Check the fan and fins for cleanliness and oil level if the transmission runs hot. Avoid high-pressure water spray for cleaning.
- Engine Maintenance: Refer to the separate engine manual for specific engine maintenance instructions, including air cleaner service (every 10 hours or more frequently in dusty conditions), spark plug cleaning/replacement (once a season), and oil changes.
- Fuel Filter: Replace when contamination or discoloration is noticed.
- Cleaning Engine and Deck: Promptly wipe off spilled fuel or oil. Keep grass, leaves, and dirt from accumulating around cooling fins or on any part of the machine. Clean the underside of the deck after each mowing.
- Wheel Adjustment: Instructions for adjusting toe-in (front wheels should toe-in 1/8 inch) by manipulating the tie rod assembly.
- Cutting Blades: Instructions for removal, sharpening (maintaining original angle and balance), and reassembly. Torque specifications for blade mounting bolts are provided.
- Belt Removal and Replacement: Detailed steps for removing and replacing the deck belt and drive belt, including safety precautions like disconnecting the spark plug wire and blocking the wheels.
- Off-Season Storage: Instructions for preparing the unit for storage longer than 30 days, including thorough cleaning, lubrication, draining fuel from the engine, fully charging the battery, and storing in a clean, dry area away from corrosive materials. Rustproofing is recommended for unventilated or metal storage sheds.
- Troubleshooting Guide: A table listing common problems, possible causes, and corrective actions for issues like the engine not cranking, engine cranking but not starting, engine smoking, excessive vibration, and poor mowing performance.