Do you have a question about the Yardworks 060-0550-6 and is the answer not in the manual?
Engine exhaust contains carbon monoxide, a colorless, odorless, poison gas.
Using an engine indoors can kill you in minutes due to carbon monoxide.
Check local authorities for towing regulations, licensing, and restrictions.
Gasoline is highly flammable and explosive; vapors can ignite.
Do not smoke, cool engine, loosen cap slowly, fill outdoors, use approved container.
Do not attempt to start a damaged engine. Ensure all parts are in place.
Ensure gasoline cap, air filter, spark plug, and fuel lines are in place.
Do not move or tip the log splitter during operation to prevent spills and accidents.
Ensure fuel valve is OFF and gasoline tank is empty for transport/servicing.
Disconnect the spark plug wire before transporting or servicing the unit.
Store away from sparks, open flames, pilot lights, and heat sources.
Do not store near furnaces, water heaters, or appliances with automatic ignitions.
Read manual, ensure authorized operators, no children/untrained adults.
Coordinate multi-person use, no riding, no cargo transport.
Hydraulic pressure, clear zone, fire compliance, intended use, splitting direction.
Be thoroughly familiar with all controls and proper use of the equipment.
Always wear safety shoes, safety glasses/goggles, and avoid loose clothing.
Ensure splitter is on a level surface and block tires for stability.
Logs for ram-type units should be cut as squarely as possible.
Use approved container, never add fuel to hot engine, fill outdoors.
Review all safety rules before starting. Failure to follow may result in injury.
Confirm all hose connections and clamps are tight before each use.
Never leave the machine unattended with the engine operating.
Never operate the machine under the influence of alcohol, drugs, or medication.
The owner must instruct all operators in safe log splitter operation.
Operate with all safety equipment in place and controls properly adjusted.
Always operate the log splitter at the manufacturer's recommended speed.
Always keep hands and feet clear of moving parts.
Place hands on log sides, never between log and splitter parts.
Never split more than one log at a time unless ram is fully extended.
Orient logs with the longest portion down and square end against the ram.
Only split logs with the grain of the wood.
Use only your hand to operate the log splitter controls.
Do not refuel the engine until it has cooled for several minutes.
Always shut off the engine while repairing or adjusting the splitter.
Clean debris from cylinder, fins, starter cover, and muffler areas.
Never store the unit indoors with fuel in the tank due to vapor risk.
Ensure all nuts and bolts are tight for safe working condition.
Read safety labels carefully as they warn of potential hazards.
Contact Technical Support for replacement if a label comes off or is hard to read.
Read Manual, Eye/Ear Protection, Footwear, Gloves.
Fire/Explosion, Open Flame, Skin Injection, Wedge/Ram Hazard.
Feet away from wedge/ram, Log loading, No body parts between.
Hot Surface, Fire Risk, Split With Grain.
Toxic Fumes, Asphyxiation, Clearance, Single Operator, No Incline.
Symbol indicating the stop or off position for controls.
Symbol indicating fuel valve is on or off.
Symbol indicating the fuel gauge is full.
Symbol indicating the fuel gauge is empty.
Steps for starting the engine, including oil check and choke operation.
Procedures for stopping the engine in normal operation and emergencies.
Technical specifications for the log splitter components.
Technical specifications for the engine.
Recommended engine oil type and capacity based on ambient temperature.
Hydraulic oil type, capacity, and recommended replacement filters.
Use regular unleaded gasoline with minimum octane 87, less than 10% ethanol.
OEM and replacement spark plug types and gap specifications.
Intake and exhaust valve clearance specifications.
Product designed for continuous operation up to 40°C, with short-term operation in wider ranges.
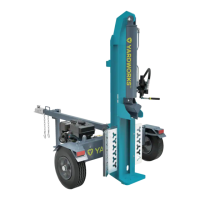
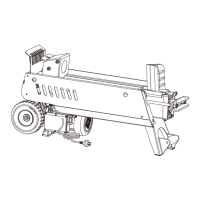
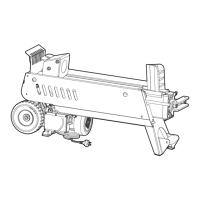
Identifies key components of the log splitter with their functions.
Identifies engine components and their functions.
Lists included accessories such as the oil funnel.
Steps for opening the shipping crate and locating hardware.
Attaching fenders to the hydraulic oil tank using specified bolts and nuts.
Standing the beam vertical and aligning pivot holes for attachment.
Connecting the clear oil hose (suction hose) to the hydraulic oil tank and pump.
Connecting the black oil inlet hose with swivel nuts.
Connecting the black oil return hose with swivel nuts.
Connecting the clear hose to the hydraulic tank and pump inlet.
Attach the large log catcher to the splitter beam on the engine side.
Attach the small log catcher to the splitter beam on the hydraulic hose side.
Steps for adding engine oil, including checking level and capacity.
Steps for adding hydraulic oil, checking level via sight glass.
Start the engine to begin purging air from the hydraulic system.
Extend and retract wedge to purge air until smooth motion is achieved.
Check the hydraulic oil level using the sight glass and add oil if needed.
Use clean unleaded gasoline, do not mix oil, add slowly, do not overfill.
Inspect hydraulic oil, hoses, fittings, tires, and engine before each use.
Do not operate the log splitter if there is any indication of damage.
Inspect engine oil level and clean/inspect spark arrestor regularly.
Ensure tires are fully inflated and in good repair.
Steps to change beam from horizontal to vertical orientation.
Reverse steps to change beam from vertical to horizontal orientation.
Check regulations, attach securely, pin support leg up, obey speed limits.
Do not overinflate tires; serious injury can result if tires explode.
Operate outdoors on a dry, level surface with adequate clearance.
Operate the log splitter only from the designated work zone.
Steps for starting the engine: fuel valve, choke, recoil cord.
Move choke lever to the 'RUN' position as the engine warms up.
Use choke for initial pulls, then move to 'RUN' to avoid flooding.
Check for level surface and adequate oil level if engine starts but does not run.
Stop engine using the switch or fuel valve for normal operation.
Wear protective gear, block tires, load logs safely, clear split wood.
Set log splitter in either horizontal or vertical position for operation.
Load logs onto the beam against the end plate, observe maximum length.
Ensure all limbs are clear of crush zones during operation.
Push control valve handle forward to split the log.
Push auto control valve handle backward to return the wedge.
Clear the split wood from the work zone after splitting.
High altitude reduces engine power, increases emissions, and can cause starting issues.
Contact Technical Support for a high altitude carburetor main jet.
Keep splitter clean, stored properly, operate on level surface, avoid extreme conditions.
Clean the spark arrester every 100 hours of operation.
Check and tighten all bolts and nuts before operating the log splitter.
The owner/operator is responsible for all periodic maintenance.
Complete all scheduled maintenance in a timely manner.
Correct any issue before operating the log splitter.
Contact Technical Support for service or parts assistance.
Keep exterior surfaces clean; use brush or air nozzle to clear debris.
Change oil when warm; remove drain bolt, allow to drain, replace plug, add new oil.
Dispose of used oil at an approved waste management facility.
Remove, clean, inspect, and adjust spark plug gap to 0.7-0.8 mm.
Ensure the spark plug gap is 0.7 - 0.8 mm (0.028 - 0.031 in.).
Wash filter in detergent, dry, saturate in oil, squeeze out excess oil.
Change hydraulic oil filter after 50/100 hours; drain oil, replace filter, lubricate gasket.
Add approximately 4 gal. of hydraulic oil, check level using sight glass.
Start engine and move wedge to purge air from hydraulic system.
Service intervals for checks, cleaning, and replacements.
Cool splitter, clean, retract wedge, wipe beam/wedge with oily rag.
Cool engine, clean, add fuel stabilizer, ensure fuel valve is OFF.
Add stabilizer, run engine, turn valve OFF, let run to starvation, change oil, lubricate cylinder.
Lists common problems, their possible causes, and solutions.
Repair or replace defective parts within two years, free of charge.
Excludes misuse, abuse, neglect, accidents, improper maintenance, and normal wear.
120-day warranty on wear parts like control valve, bearings, pump, hoses.
Call toll-free helpline for warranty service; factory does not accept unit returns.
Purchaser is responsible for transportation charges for warranty parts.
Implied warranties limited in duration; sole remedy is repair/replacement.
CPE warrants emission control system for small off-road engines.
Warranted for two years; defective emission-related parts will be repaired or replaced.
Responsible for required maintenance; CPE may deny coverage for abuse or neglect.
Applies to 1997 and later model year small off-road engines for 24 months.
Warrants engines are designed to meet EPA standards and are free from defects.
Defines warranty coverage for scheduled maintenance and inspected parts.
Lists systems covered by the emission warranty, e.g., Fuel Metering, Ignition.
Provides descriptions of parts covered under the emission warranty.
Take product to authorized dealer with proof of purchase for service.
| Brand | Yardworks |
|---|---|
| Model | 060-0550-6 |
| Category | Log Splitter |
| Language | English |