EasyManua.ls Logo

YitaHome FTPLCG-0272 - User Manual

Default Icon
28 pages
Print Icon
To Next Page IconTo Next Page
Loading...
ASSEMBLY INSTRUCTIONS
12X14 FT HARDTOP GAZEBO
FTPLCG-0271
FTPLCG-0272
FTPLCG-0273
LHHY-V 1
Question and Answer IconNeed help?

Do you have a question about the YitaHome FTPLCG-0272 and is the answer not in the manual?

Summary

General Safety and Warning Information

Essential Precautions for Safe Use and Stability

Covers ground stability, weather limits, pre-use inspection, and warranty exclusions.

Assembly Preparation and Guidelines

Step 1: Base Assembly

Attaching Legs to Base Plates

Connects vertical leg parts (A) to base plates (J) using screws (1).

Step 2: Frame Base Construction

Connecting Lower Frame Sections

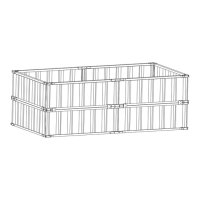
Joins base frame parts (B, B1, C, C1) using fasteners (P, 1) and ensuring correct orientation.

Step 3: Erecting Main Frame

Joining Vertical Legs and Top Horizontal Beams

Connects leg sections (A) to the assembled frame using screws (1, 2).

Step 4: Adding Top Support Beams

Installing Diagonal and Horizontal Roof Supports

Attaches roof support beams (H, H1) to the frame using screws (1).

Step 5: Installing Corner Brackets

Securing Roof Corners with Brackets

Installs corner brackets (K, K1, K2) and fasteners (3, 4) to reinforce roof corners.

Step 7: Installing Main Roof Beams

Step 8: Securing Roof Frame Joints

Step 10: Installing Roof Panels

Step 12: Connecting Upper Roof Supports

Step 17: Finalizing Roof Structure Assembly

Step 19: Attaching Side Curtains

Step 20: Attaching Side Netting

Step 21: Finalizing Side Cover Attachment

Step 22: Final Installation and Anchoring

Anchoring Gazebo for Wind Resistance

Final step to anchor gazebo using expansion screws or ground nails for stability on different surfaces.

Overview

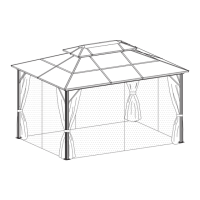
This document provides assembly instructions and important information for the YITAHOME 12x14 FT Hardtop Gazebo, model LHHY-V 1 (FTPLCG-0271, FTPLCG-0272, FTPLCG-0273).

Function Description:

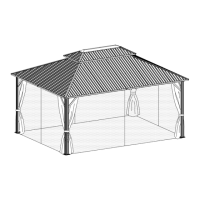
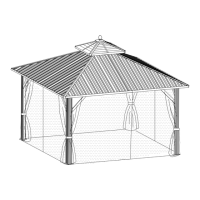
The YITAHOME 12x14 FT Hardtop Gazebo is a temporary, portable outdoor shelter designed to provide shade from sunlight and protection from rain. It features screens to block flying insects, enhancing comfort in outdoor settings. It is not intended as a permanent structure and is not designed to withstand sustained strong winds or heavy rain/snow.

Important Technical Specifications:

  • Dimensions: 12x14 feet
  • Model Numbers: LHHY-V 1, FTPLCG-0271, FTPLCG-0272, FTPLCG-0273
  • Assembly Requirements: Two or more people, a ladder, and an electric drill are recommended for assembly.
  • Stability Accessories: Ground nails, ropes, and expansion screws are crucial for stability, especially when installed on different ground types. Expansion screws are for cement surfaces, and ground nails are for grassy surfaces. All necessary accessories are included in the package.
  • Wind Resistance: Not designed for high winds. Precautions must be taken when wind speed exceeds 25 Mph.
  • Snow Load: Not designed for heavy snow accumulation. Snow must be cleared when it accumulates more than 2 inches.
  • Part Quantities (Key Components):
    • A (Main Posts): 4 pcs
    • B, B1, C, C1 (Frame Beams): 2 pcs each for B/B1/C/C1 (total 8 pcs for these types)
    • D (Roof Support Beams): 4 pcs
    • E (Roof Crossbars): 6 pcs
    • F, F1, F2 (Roof Panels): F (2 pcs), F1 (4 pcs), F2 (4 pcs)
    • G, G1, G2, G3, G4, G5, G6 (Roof Frame Components): G (2 pcs), G1 (4 pcs), G2 (4 pcs), G3 (2 pcs), G4 (2 pcs), G5 (2 pcs), G6 (2 pcs)
    • H, H1 (Corner Brackets): H (4 pcs), H1 (4 pcs)
    • K, K1, K2 (Rain Gutters/Drainage): K (4 pcs), K1 (2 pcs), K2 (2 pcs)
    • L (Central Roof Connector): 1 pc
    • M (Central Roof Panel): 1 pc
    • N, N1 (Connectors/Brackets): N (12 pcs), N1 (6 pcs)
    • P (Small Connecting Plates): 4 pcs
    • J (Base Plates): 4 pcs
    • Q, Q1, Q2, Q3, Q4 (Roof Panels/Ventilation): Q (4 pcs), Q1 (4 pcs), Q2 (4 pcs), Q3 (4 pcs), Q4 (4 pcs)
    • R1, R2, R3 (Roof Panels): R1 (4 pcs), R2 (4 pcs), R3 (2 pcs)
    • S (Netting): 4 pcs
    • T (Curtains): 4 pcs
    • U (Hooks for Curtains/Netting): 120 pcs
    • W3 (Small Brackets): 6 pcs
    • Screws: M6x16mm (136 pcs), M6x15mm (16 pcs), M5x12mm (16 pcs), ST4.8x12mm (16 pcs), M6x25mm (1 pc)
    • Other Hardware: 5 (2 pcs), 6 (1 pc), 7 (1 pc), 8 (12 pcs), 9 (1 pc), 10 (12 pcs)

Usage Features:

  • Temporary Shelter: Provides protection from sun and light rain.
  • Insect Protection: Equipped with screens to keep flying insects out.
  • Curtains and Netting: Includes both sidewall curtains (T) and netting (S) for privacy and insect control. These can be secured together or individually using hooks (U) and securing straps (1, 2, 3).
  • Installation Flexibility: Can be installed on various ground types, requiring specific stability accessories (expansion screws for cement, ground nails for grass).
  • Modular Assembly: The assembly process is broken down into 22 steps, with clear diagrams and part lists for each stage.
  • Pre-installation Film Removal: Protective films on roof panels (R1/R2/R3 and Q/Q1/Q2/Q3/Q4) must be removed before installation. These films may have side marks, but after removal, there will be no significant difference between the sides.

Maintenance Features:

  • Pre-use Inspection: Before each use, thoroughly inspect all bolts, nuts, and buckles to ensure they are completely tightened and securely fastened.
  • Weather Precautions:
    • Do not use in high winds (above 25 Mph), heavy snow (over 2 inches accumulation), or other inclement weather.
    • Clear snow accumulation exceeding 2 inches promptly.
  • Stability Accessories: Always use ground nails, ropes, and expansion screws as appropriate for your ground type to prevent collapse and potential injury or property damage. Failure to do so voids the warranty.
  • No Open Flames: Do not use candles, matches, or any open flames near the tent to prevent fire hazards.
  • Warranty Limitations: The warranty does not cover damages, losses, or injuries resulting from:
    • Improper installation.
    • Misuse of the gazebo.
    • Failure to use the recommended stability accessories.
    • Failure to clear snow.
    • Failure to take other precautionary measures.
  • Screw Tightening: During assembly, do not fully tighten screws initially to allow for better alignment. Final tightening should occur once all components are in place.
  • Professional Installation: Professional installation is highly recommended to ensure proper setup and safety.

YitaHome FTPLCG-0272 Specifications

General IconGeneral
BrandYitaHome
ModelFTPLCG-0272
CategoryOutdoor Furnishing
LanguageEnglish

Related product manuals