Interface with the sonde using KOR™
Connect sonde to computer with USB
cable and adapter
Connect sonde to handheld with
field cable
If not using cable, activate Bluetooth
wireless communication with magnet
Communication
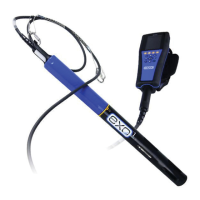
Connect Sonde to Computer
via USB Cable
1. First, install the KOR™ soware on your
computer. Follow the prompts to install
the new hardware and drivers.
2. Plug in the USB Signal Output Adapter
to the top of the sonde.
3. Plug in the small end of the USB cable to
the top of the adapter and the large end
in a standard USB port on the computer.
The USB adapter provides a hardwired
communicaons link to a PC as well as
providing power to the sonde.
via Bluetooth
®
A computer must be equipped with an
internal Bluetooth radio or use a Bluetooth
dongle to establish a wireless connecon to
the sonde.
Acvate Bluetooth by holding the included
sensor tool with magnet at the magnec
acvaon area on sonde. Once acvated,
the blue light will be on. The soware will
automacally pair the instrument to
your PC.
Troubleshooting
Establish Bluetooth link (Windows OS)
1. Check your version of Windows for the
proper method to pair a Bluetooth device
to your PC.
2. When prompted, locate the sonde from
the list. The sonde name should begin
with YSI.
3. Select “Enter the device’s pairing code,”
and click Next. Enter the code 9876.
Click “Next.”
5. Select Finish.
Discover the Sonde in KOR™
Upon startup of the soware KOR™ will
search for and discover the acvated
sonde and request to connect to it. Once
connected via Bluetooth, the blue light on
the sonde will blink.
Connect Sonde to EXO Handheld
via Field Cable
Press in the male 6-pin connector on the
cable to the top of the sonde. Press in the
female 6-pin connector on the cable to the
boom of the handheld, then screw down
the retaining collars on each end.
Install Batteries
The EXO1 and EXO3 Sondes use two (2)
D-cell alkaline baeries and the EXO2 Sonde
uses four (4) D-cell alkaline baeries as the
recommended power source. For the EXO2
s
,
and at the discreon of the user for EXO1,
EXO2, and EXO3, external power sources
may be used.
Alternavely, the sonde may use
rechargeable NiMH D-cell baeries (not
provided). We recommend a NiMH D-cell
baery with a minimum rang of 10,000
milliamp hours. However, due to variaons
in manufacturer capacity and discharge
curves, deployment life cannot be esmated
when using rechargeable baeries.
1. Remove the baery cover from
the sonde:
EXO1: Twist the blue baery cover
counter-clockwise to unscrew, li up to
remove.
Use included wrench to loosen,
if necessary.
EXO2 / EXO3: Unscrew and remove
baery cap.
Use included wrench to
loosen, if necessary.
2. Insert the baeries with negave (-)
terminals facing down toward
the probes.
3. Replace the baery cover or cap and
ghten unl snug. Do not overghten.
LED Indicators
When power is supplied to the sonde, two
indicator lights will provide status updates.
Red LED – Sonde State
0.1 Hz (10s Blink): Asleep, logging enabled
1 Hz (1s Blink): Awake
On Solid: Awake with faults
Blue LED – Bluetooth
On Solid: On, not linked
2 Hz (0.5s Blink): On, successfully linked
O: Bluetooth disabled
Remove battery cover/cap and
install batteries
EXO1
Side View
EXO2 / EXO3
Top View
item# 603794REF
dwg# A603794
Jan 2017 Rev. C
You are now ready to calibrate your
sensors and start collecting data!
YSI.com
 Loading...