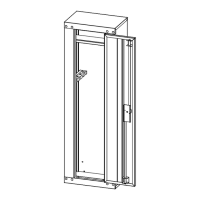
The 8-Gun Ready-to-assemble Cabinet, Product No. 175-9872-4, is a secure storage solution designed for firearms and other valuables. This cabinet is provided in a knocked-down state, requiring assembly by the user, and is specifically engineered to offer a balance of security, organization, and ease of setup.
Function Description:
The primary function of this cabinet is to provide a secure and organized storage space for up to eight firearms. It helps in preventing unauthorized access to firearms, thereby enhancing safety in homes or other environments where firearms are present. The cabinet is designed to be anchored to a floor or wall, significantly reducing the risk of tipping and ensuring stability. Its internal layout includes features for proper gun placement and additional storage for accessories.
Important Technical Specifications:
Hardware List:
- DOOR KEYS (QTY: 2 PCS): Essential for locking and unlocking the cabinet door, ensuring secure access control.
- M5X10 BOLTS (QTY: 10 PCS): Used for various assembly steps, including attaching the door and gun rests.
- QUAKEPROOF PINS (QTY: 2 PCS): Crucial for securing the cabinet to a wall or floor, preventing tipping.
- M6X11 RND (QTY: 4 PCS): Round-headed bolts used in the assembly, specifically for securing panels.
- M6X11 LCK (QTY: 8 PCS): Lock bolts used for securing panels, providing a robust connection.
- WRENCH (QTY: 1 PC): A tool provided for tightening the various bolts and nuts during assembly.
- WOOD SCREWS (QTY: 4 PCS): Used for anchoring the cabinet to wooden surfaces (floor or wall).
- WASHERS (QTY: 4 PCS): Used with wood screws to distribute pressure and provide a more secure fastening.
Parts List:
- TOP PANEL (QTY: 1 PC): The uppermost structural component of the cabinet.
- BOTTOM PANEL (QTY: 1 PC): The base structural component of the cabinet.
- SIDE PANEL - LEFT (QTY: 1 PC): The left vertical structural component.
- SIDE PANEL - RIGHT (QTY: 1 PC): The right vertical structural component.
- BACK PANEL (QTY: 1 PC): The rear structural component, providing enclosure and rigidity.
- DOOR (QTY: 1 PC): The front access panel, equipped with a locking mechanism.
- SHELF (QTY: 1 PC): An internal horizontal surface for storing accessories or smaller items.
- GUN REST (QTY: 2 PCS): Internal components designed to cradle and support the barrels of firearms, preventing them from shifting or scratching.
- SHELF EVA (QTY: 1 PC): An ethylene-vinyl acetate copolymer mat for the shelf, providing cushioning and protection for stored items.
- BOTTOM EVA (QTY: 1 PC): An ethylene-vinyl acetate copolymer mat for the bottom panel, offering cushioning and protection for the butts of firearms.
Material:
The cabinet components are primarily constructed from metal, as indicated by the use of various bolts and panels. The inclusion of EVA (ethylene-vinyl acetate copolymer) for the shelf and bottom suggests a focus on protecting firearms from scratches and impacts.
Usage Features:
Assembly Process:
The cabinet is designed for user assembly, following a clear, step-by-step instruction manual.
- STEP 1 (Side Panel - Left with Bottom Panel): The left side panel is inserted into the gaps of the bottom panel, ensuring holes are aligned.
- STEP 2 (Side Panel - Right with Bottom Panel): The right side panel is assembled with the bottom panel in the same manner as the left side.
- STEP 3 (Back Panel): The back panel is inserted between the two side panels, ensuring it aligns with the top.
- STEP 4 (Top Panel): The top panel is installed onto the side panels and back panel. A rubber mallet may be used to ensure a flush fit.
- STEP 5 (Securing Panels): M6X11 LCK bolts are inserted through the front and loosely tightened with washers and locknuts from the inside. M6X11 RND bolts are inserted through the back and fully tightened with washers and round-headed lock nuts from the inside using the provided wrench. This step ensures the structural integrity of the cabinet.
- STEP 6 (Door Installation): The door is installed onto the cabinet using M5X10 bolts. It's important to maintain a small gap (approximately 2 mm or 1/16") between the door and the cabinet for proper operation.
- STEP 7 (Anchoring): The cabinet is secured to a floor or wall using wood screws and washers. This is a critical safety step to prevent tipping.
- STEP 8 (Internal Organization - Shelf and EVA): The shelf, shelf EVA, and bottom EVA are placed inside the cabinet as shown in the instructions, providing cushioned surfaces for storage.
- STEP 9 (Gun Rests): The gun rests are installed on both side panels using M5X10 bolts, providing dedicated slots for firearms.
- STEP 10 (Quakeproof Pins): Quakeproof pins are installed through pre-drilled holes, and all nuts are checked for tightness. This further enhances the cabinet's stability and resistance to movement.
Safety Features:
- Tipping Hazard Warning: The manual prominently features a "Tipping Hazard" warning, emphasizing the danger to children and adults if the cabinet is not properly secured.
- Anchoring Instructions: Detailed instructions are provided for securing the cabinet to a floor or wall using wood screws, washers, and quakeproof pins. This is a crucial step for safety.
- Child Safety: Explicitly states that "Children should not play with or around the cabinet at any time," reinforcing the importance of keeping children away from the secured cabinet.
- Secure Access: The inclusion of door keys and a robust locking mechanism ensures that only authorized individuals can access the contents.
Organizational Features:
- Gun Rests: Two gun rests are provided to hold up to eight firearms upright and organized, preventing them from leaning against each other or the cabinet walls.
- Shelf: A dedicated shelf allows for the storage of ammunition, accessories, or other valuables, keeping them organized and easily accessible.
- EVA Mats: The shelf EVA and bottom EVA provide cushioned surfaces, protecting firearms and other stored items from scratches and damage.
Maintenance Features:
The manual does not explicitly detail ongoing maintenance features. However, based on the design and materials, general maintenance would likely involve:
- Regular Inspection: Periodically checking all bolts and fasteners to ensure they remain tight and secure, especially after initial assembly and use.
- Cleaning: Wiping down the interior and exterior surfaces with a soft, damp cloth to remove dust and debris. Avoid abrasive cleaners that could damage the finish.
- Lock Mechanism Check: Ensuring the lock mechanism operates smoothly and the keys function correctly. Lubrication with a graphite-based lubricant might be necessary if the lock becomes stiff over time.
- EVA Mat Condition: Inspecting the EVA mats for wear or damage and replacing them if necessary to maintain protection for firearms.
- Anchoring System Check: Regularly verifying that the cabinet remains securely anchored to the wall or floor, especially in areas prone to seismic activity or heavy use.
The 8-Gun Ready-to-assemble Cabinet is a practical and essential item for firearm owners who prioritize safety, organization, and compliance with storage recommendations. Its modular design allows for relatively straightforward assembly, while its robust construction and anchoring features provide peace of mind regarding security.