Do you have a question about the Zcorporation ZPrinter 450 and is the answer not in the manual?
Lists the key new features and automated capabilities of the ZPrinter 450.
Details printer dimensions, weight, compatibility, connectivity, and build volume.
Lists the necessary hardware and software specifications for the host computer.
Explains the 3DP™ technology process, layer by layer printing, and binder application.
Provides a visual workflow diagram of the 3D printing process from software to post-processing.
Defines essential terms and components used throughout the manual.
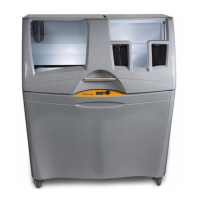
Identifies and illustrates the main physical components of the ZPrinter 450.
Illustrates and labels the various ports and components on the rear of the printer.
Shows the physical layout of the electronics box and its connectors.
Details the purpose and location of the printer's Service Station.
Describes the function of the Parking Caps for print heads.
Illustrates the carriage, print heads, and pogo pins, crucial for printing.
Describes the printer's LCD panel and control knob for operation.
Provides an overview of the printer's menu structure and navigation.
Lists and illustrates the various accessories included with the printer.
Directs users to additional resources like websites and manuals for more help.
Explains crucial factors affecting print quality: speed, strength, and accuracy.
Discusses how part orientation affects strength and the need for support.
Guides on orienting parts with hollow areas for proper powder evacuation.
Advises on supporting parts with overhangs using fixtures.
Explains optimal orientation for cylindrical features for better accuracy.
Instructions for installing the necessary ZPrint and ZEdit software.
Describes the ZEdit add-on software for color application and file correction.
Steps to launch ZPrint and open a 3D model file for printing.
Overview of the main window interface within the ZPrint software.
Guide to verifying and setting the default printer for ZPrint.
Instructions on checking and understanding default powder settings.
Steps to create and save custom powder type settings.
Overview of part transformation tools like translate, rotate, and scale.
Explains the purpose and benefits of using fixtures for part support.
Detailed steps for generating a fixture to support an entire part.
Steps to create a fixture for a specific section of a part.
Recommends using slice view and collision detection to check for build errors.
Guide on verifying build settings before initiating a print job.
Checklist for ensuring the printer and build area are clean and ready.
Step-by-step guide to initiating and monitoring a print job.
Explains the drying cycle and its importance for part strength.
Details methods for automatic and manual powder removal.
Instructions for using the Air Wand for final powder cleaning.
Guides the user on next steps after printing, emphasizing cleaning.
Steps for vacuuming loose powder from the build chamber and components.
Instructions for safely emptying the printer's debris filter.
Procedure for cleaning the parking caps to protect print heads.
Detailed steps for cleaning the service station to maintain print head health.
Explains the application of Z-Bond for strengthening and color enhancement.
Details the use of Z-Max epoxy for high-strength infiltration.
Describes the application of Paraplast X-TRA Wax for strengthening and color.
Step-by-step guide for replacing printer print heads.
Instructions on adding or replacing binder cartridges.
Steps to refill the printer's powder feeder.
Explains the importance of the build piston position for starting a print.
Notes on the printer's top cover status for starting a print.
Procedure for lubricating the fast axis bearings as prompted by ZPrint.
Procedure for lubricating the slow axis bearings as prompted by ZPrint.
Instructions for lubricating the piston screw as prompted by ZPrint.
Steps to replace the printer's waste tray when prompted.
Guide to checking and refilling the wash fluid level.
Procedure for cleaning the alignment sensor window.
Instructions for cleaning fast axis bumpers to prevent errors.
Steps for bleeding air from the binder lines when encountering specific errors.
Guidelines for preparing the printer for extended storage.
Provides contact information for service and online support resources.
| Technology | 3D Printing |
|---|---|
| Print Resolution | 600 x 540 dpi |
| Build Volume | 203 x 254 x 203 mm |
| Layer Thickness | 0.089 - 0.102 mm |
| Connectivity | USB, Ethernet |