Do you have a question about the Zebronics ZEB JUKE BAR 9102 PRO DOLBY and is the answer not in the manual?
Details immediate warnings, cautions, and user responsibilities for safe operation.
Provides essential guidelines for safe use, cleaning, installation, and operation.
Instructions for unboxing, removing packaging, and initial setup of the soundbar.
Details on non-skid rubber feet and potential interactions with furniture finishes.
Key considerations for placement, environment, and product operation.
Diagrams and labels identifying the physical parts of the soundbar and subwoofer.
Labels and numbering for all buttons on the remote control.
Detailed explanation of each button's function and operation.
Guidance for optimal placement on shelves or TV units for sound and airflow.
Instructions and warnings for securely mounting the soundbar on a wall.
Steps for turning on, switching modes, and understanding display indicators.
How to select and change the color of the LED lighting effects.
Procedure for connecting to power, turning on, and shutting down the unit.
Steps to connect and play audio wirelessly via Bluetooth.
Overview of connecting various audio sources like PC, TV, and mobile devices.
How to play music files from a USB flash drive.
Guide for connecting audio devices using an AUX cable.
Instructions for connecting and using HDMI ARC for TV audio.
Steps for connecting and using the optical audio input for TV sound.
Solutions for common problems like no sound from the soundbar.
Troubleshooting steps for audio distortion or echo effects.
Addressing issues where volume automatically decreases.
Resolving problems related to unwanted noise or interference.
Solutions for the remote control not operating the unit.
Fixing issues with connecting or maintaining Bluetooth device connections.
List of key features including connectivity, audio support, and design.
Detailed technical data including output power, driver size, and impedance.
This document serves as the user manual for the ZEB-JUKE BAR 9102 PRO DOLBY soundbar with subwoofer, providing essential information for its safe operation, setup, and maintenance.
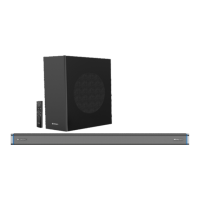
The ZEB-JUKE BAR 9102 PRO DOLBY is a soundbar system designed to enhance audio experiences, featuring a soundbar with quad drivers and a dedicated subwoofer for rich, immersive sound. It supports various input modes including Bluetooth v5.0, HDMI (ARC), Optical IN, USB, and AUX, offering versatile connectivity options for different audio sources. The system is equipped with Dolby Audio technology, ensuring high-quality sound reproduction. A remote control is included for convenient operation, allowing users to manage volume, input modes, and sound effects from a distance. The soundbar also features an LED display for clear indication of current settings and modes, along with breathing LED lights on both sides that offer customizable color effects.
To power on the soundbar, plug in the power cord, which will automatically put the device in standby mode. Then, short-press the "STANDBY" button on either the soundbar or the remote control. To turn off the soundbar, press and hold the "STANDBY" button for 2 seconds, and then unplug it from the wall outlet.
The soundbar supports multiple input modes: Bluetooth (BT), AUX, HDMI (ARC), Optical (OPT), and USB (US). After switching on, the default input mode will appear on the display. Users can change the input mode by repeatedly pressing the "INPUT" button on the soundbar or the remote control.
To connect via Bluetooth, turn on the soundbar and switch to BT mode. Activate the pairing function on your compatible device and select "ZEB-JUKE BAR 9102 PRO DOLBY" from the list of available devices. A tone will confirm successful pairing, and the LED display will remain on. If the paired device is switched off or manually disconnected, the soundbar will automatically re-enter pairing mode when the device is back within wireless range (10 meters).
When a USB flash drive is inserted, the soundbar automatically switches to USB input mode, indicated by "US" on the LED display. Ensure the USB drive contains MP3 audio files, as other file types are not supported. Music will begin playing automatically. The remote control provides playback controls for USB mode.
Connect the soundbar to your PC, laptop, smartphone, TV, or other audio devices using the provided AUX cable. Ensure both devices have AUX IN and AUX OUT terminals. Press the "STANDBY" or "INPUT" button on the remote to switch to Aux mode, which will display "AUX" on the screen. Playback is controlled directly from the connected device.
The soundbar supports HDMI (ARC) for audio return channel functionality, allowing TV audio to be played through the soundbar using a single HDMI (ARC) cable, provided the TV is ARC compliant. Connect the HDMI (ARC) connector on the soundbar to the HDMI (ARC) connector on the TV. The TV's HDMI (ARC) connector might be labeled differently; refer to your TV's user manual for details. When connected, the TV's sound output setting should be set to "external Dolby or Auto mode," and the digital audio output mode to "automatic" or "decoded output as Dolby." Press the "INPUT" or "STANDBY" button to select HDMI (ARC) mode.
For optical connection, remove the cap from the optical cable, check the plug direction, and connect the soundbar to the TV. Ensure the TV has an optical digital output. Set the TV's sound output to "Dolby or Auto mode." Select "OPTICAL" mode using the "INPUT" or "STANDBY" button on the remote or soundbar.
Adjust the master volume using the VOL+ and VOL- buttons on the remote. The remote also includes buttons for adjusting bass (BASS+ / BASS-) and treble (TR+ / TR-). EQ effects can be selected using the MUSIC/NEWS and MOVIE/3D buttons.
The soundbar features breathing LED lights on both sides. A short press of the light control key on the remote switches between different LED light effects (X1-X7 for steady colors, X8-X14 for breathing colors, X15 for monochromatic cyclic variation, X16 for respiratory circulation). A long press of the light control key turns the LED light effect on or off. Lighting adjustment (50%, 20%, 10% brightness reduction) is also available.
The soundbar can be placed horizontally on a flat surface, such as a TV unit or shelf, ensuring some space between the speaker and the wall for optimal sound and airflow. Alternatively, it can be wall-mounted. For wall mounting, make two holes on the wall matching the soundbar's wall bracket distance. Insert plastic anchors and secure screws into plastic clips, leaving some space. Then, hang the soundbar by inserting the screws into the wall mount bracket. It is recommended to install the speaker on a vertical, fast, reinforced wall area, screwing into wall studs for plaster walls. Maintain at least 25mm/1" distance between the soundbar and the TV for optimum performance.
The "PAIR" button on the remote control doubles as a RESET/PLAY button. Press and hold this button for more than 3 seconds to reset all functions (EQ, volume, high and low tuning) to manufacturer defaults.
To ensure the longevity and proper functioning of the soundbar, avoid exposing it to dripping or splashing liquids, rain, moisture, or dust. Do not place it near water sources like taps, bathtubs, washing machines, or swimming pools. Always place the unit on a dry, stable surface. Keep the unit away from direct heat sources, radiators, heaters, stoves, or other heat-producing apparatus. Avoid placing it near strong magnetic fields or on top of amplifiers or receivers. Do not install the product in areas with constant vibration or in humid/moist places.
Do not use chemical solvents to clean the unit, as this may damage the finish. Instead, wipe the unit with a clean, dry, or slightly damp cloth.
Protect the power cord from being walked on or pinched, especially at plugs, convenience receptacles, and where it exits the apparatus. If the supply cord is damaged, it must be replaced by the manufacturer, its service agent, or similarly qualified persons to avoid hazards.
Do not block any ventilation openings. Ensure there is at least 20 cm of space above and 5 cm of space on each side of the unit to allow for proper ventilation. Avoid covering the ventilation opening with items such as newspapers, table-cloths, or curtains.
For safety reasons, do not remove any covers or attempt to gain access to the inside of the product. There are no user-serviceable parts inside. Refer all servicing to qualified personnel. Do not attempt to remove any screws or open the casing of the unit. Unplug the apparatus during lightning storms or when unused for long periods.
The soundbar is equipped with non-skid rubber 'feet' to prevent movement. These feet are designed not to leave marks or stains. However, certain oil-based furniture polishes, wood preservatives, or cleaning sprays may soften the rubber, potentially leaving marks or residue. To prevent damage to furniture, it is recommended to purchase small self-adhesive felt pads and apply them to the bottom of the rubber 'feet' before placing the unit.
The manual includes a troubleshooting guide to address common issues such as no sound output, distorted sound, volume decrease, noise, remote control malfunction, and Bluetooth connectivity problems. This guide provides possible causes and corresponding solutions to help users resolve minor issues independently. For example, if there is no sound, check the input source, mute function, volume levels, and cable connections. If Bluetooth connection is poor, ensure the device is within range and away from electromagnetic interference.
| Brand | Zebronics |
|---|---|
| Model | ZEB JUKE BAR 9102 PRO DOLBY |
| Type | Soundbar |
| Channels | 2.1 |
| Bluetooth Version | 5.0 |
| Dolby Support | Yes |
| Dolby Atmos | No |
| Remote Control | Yes |
| Wall Mountable | Yes |
| LED Display | Yes |
| Audio Output Mode | Stereo |
| Connectivity | Bluetooth, AUX, USB, Optical |
| Equalizer Modes | Movie, Music, News |
| Dimensions | 900 x 70 x 75 mm |