Setting the clock
After connecting the microwave oven to the mains the display will show the inscription
“ ” and the symbol . A single sound will be heard.
1
Press and hold the Clock/Kitchen Timer button for 3 seconds to set the hour.
The display will show “ ”. If you want to change the time format to the 24-hour format,
press the Clock/Kitchen Timer button again. The display will show “ ”.
2
To set the hour in 24-hours format, turn the knob to set the hour while the display
shows “ ”.
3
Press the Clock/Kitchen Timer button. Digits will start to blink.
4
Turn the knob to set the minutes.
5
Press the Clock/Kitchen Timer button to nish setting the time. The symbol “:” will
ash, and the display will show the set time and the symbol .
The setting will last as long as the microwave oven is connected to the
mains (and the electricity supply is maintained).
In order to change the clock setting, repeat the steps 1-5.
If you press the Stop/Cancel button while setting the clock, the previous
setting will be automatically restored.
Starting the microwave oven
Having connected the appliance to an appropriate mains socket, place the food inside the
oven chamber and lock the door before you start programming the microwave oven.
Microwave cooking
Do not use the grill rack for microwave cooking! Always remove the grill
rack from the inside of the oven before microwave cooking.
1
Press the Power button to select the required microwave power level. The display will
show the inscription “ ”, and the symbols and .
2
In order to select a different microwave power level, e.g. 60%, press the Power button
until the display shows “ ”.
3
Turn the knob to set the microwave cooking time. The maximum cooking time is 95
minutes.
4
Press the Start button to start the cooking.
EXAMPLE
In order to set the cooking time for 20 minutes at the 80% microwave power, perform the
following steps:
1
Press the Power button to select the required power level. The display will show the
inscription “ ”, and the symbols , .
2
In order to select the microwave power level of 80%, press the Power button once.
The display will show “ ”.
3
Turn the knob to set the microwave cooking time for 20 minutes.
4
Press the knob to start cooking.
If you press the Stop/Cancel button when setting time or microwave power
or fail to take any actions within 30 seconds, the oven will automatically
return to the previous setting.
If you select the 0% power level, the microwave oven will not produce the
microwaves, and only the fan will be on. The 0% power level can be used to
remove unpleasant odours from the inside of the microwave oven.
Grilling
The grilling function is particularly useful in case of thin slices of meat, steaks, cutlets,
kebabs, sausages and chopped chicken. It is also useful in case of toasts and dishes
coated with breadcrumbs.
1
Press the Grill/Combi. button. The display will show inscription “ ” and the symbols
, .
2
Turn the knob to set the grilling time. The maximum grilling time is 95 minutes.
3
Press the knob to start grilling.
In order to obtain the best results of grilling, press the Stop/Cancel button
halfway through the grilling time to stop the microwave oven operation,
and then open the door and turn the food over. Close the door and press
the knob to resume grilling.
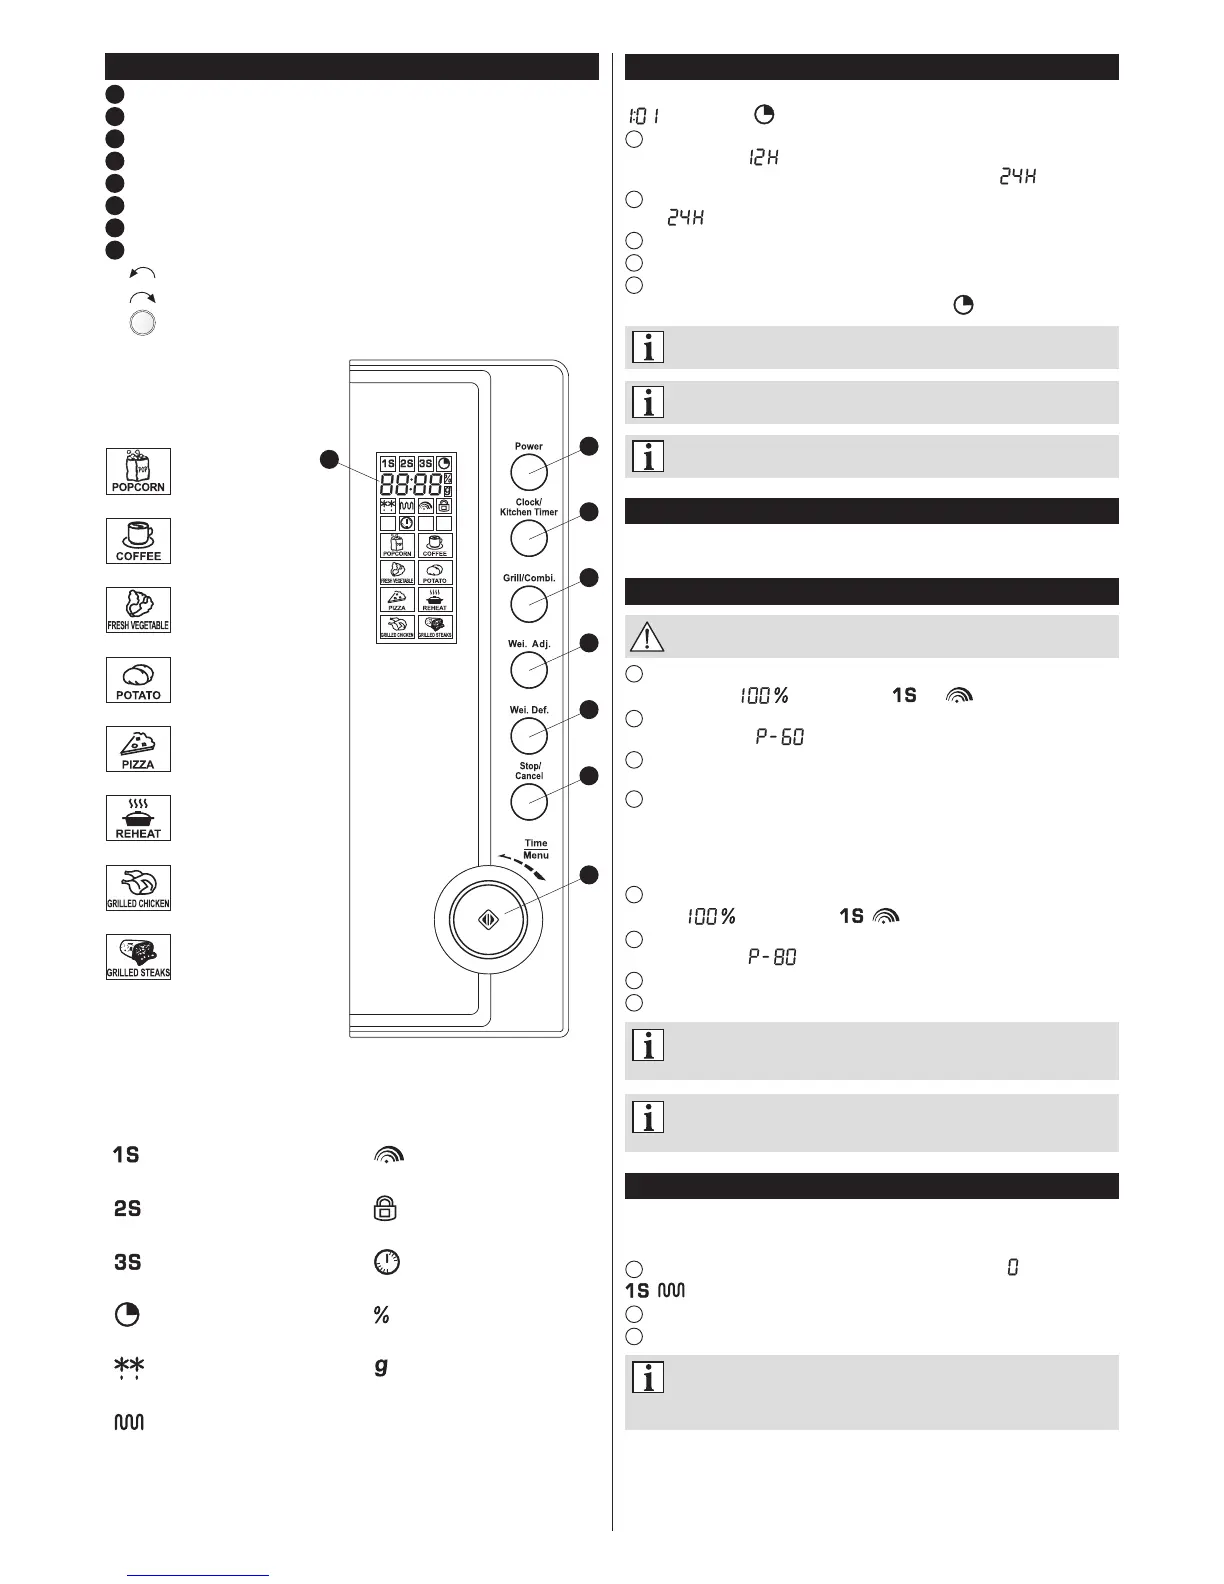
Control panel
1
Display: clock + indicators
2
Power (Checking / Setting the appliance power
3
Clock/Kitchen Timer (Clock setting / Kitchen timer
4
Grill/Combi. (Grill / Combination cooking
5
Wei. Adj. (Weight or number of servings adjustment after selecting the automatic menu)
6
Wei. Def. (Defrosting by weight)
7
Stop/Cancel (Stopping / Cancelling)
8
Knob (Quick start / Automatic menu / Programme start)
Automatic menu
Quick start
Pressing the knob will start the programme
AUTO MENU
(Automatic menu)
(Popcorn)
(Coffee)
(Fresh
vegetables)
(Potatoes)
(Pizza)
(Reheat)
(Grilled chicken)
(Grilled steaks)
First stage of multi-stage
cooking
Second stage of
multi-stage cooking
Third stage of multi-stage
cooking
Clock
Defrosting by weight
Grill
Microwaves
Child lock
Timer
Microwave power [%]
Weight [g]
DISPLAY: INDICATORS – SIGNALLING
2
3
4
5
6
7
8
1
 Loading...