Do you have a question about the Zempire Pronto Series and is the answer not in the manual?
Practice pitching your tent at home to understand the process.
Find a sheltered, flat area free from sharp objects and falling branches.
Protect tent floor with a ground sheet; peg it down correctly first.
Identify tent parts and take photos for easier packing later.
Assemble pump with pressure gauge and release valve for correct inflation.
Unroll tent, orient it, peg corners ensuring tension and flatness.
Open doors/windows but keep mesh door closed during pitching for shape.
Attach master valve to external inflation valves securely.
Inflate tube to 4 PSI, lift frame, then continue to 7-9 PSI.
Thread brow poles through sleeves and insert into webbing pockets.
Align pole bases and pegging points for a flat, taut floor.
Secure tent with pegs, angling them at 45° for stability.
Use pre-attached guy ropes, keeping them taught but not distorting shape.
Use awning poles to extend the awning for extra living space.
Open mesh door, unpeg, roll tent towards valves to expel air.
Sunlight weakens tent fabric over time; degradation is not covered by warranty.
Covers faulty materials or manufacture for 2 years from the date of sale.
Guidelines for maintaining your tent, including drying and cleaning procedures.
Advice on reducing condensation by opening vents and mesh layers.
This document describes the Zempire Pronto series of tents, focusing on their setup, usage, and maintenance.
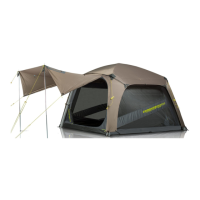
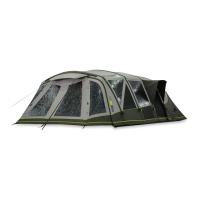
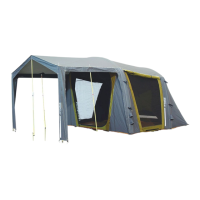
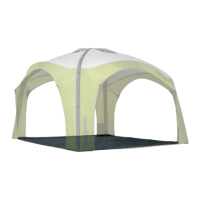
The Zempire Pronto tent is designed for personal camping use, providing shelter and living space. It features an inflatable pole system for quick setup, a pre-attached tent fly, and an integrated ground sheet system. The tent is designed to be robust enough for various outdoor conditions, offering protection from the elements.
The tent utilizes an inflatable pole system, making setup relatively straightforward. Users are advised to perform a test run at home to familiarize themselves with the process. When selecting a site, it's recommended to choose a sheltered, flat area free from sharp objects, positioning the front door away from prevailing winds. Avoiding pitching under trees is also advised to prevent damage from falling branches or sap.
A Zempire Ground Sheet is recommended for use to protect the tent floor from dirt and damage, and to facilitate faster and cleaner pack down. The ground sheet should be pegged down first, followed by the tent. It is designed to be slightly smaller than the tent floor to prevent water collection between the layers.
Upon unpacking, users should identify all components, noting that the tent fly is pre-attached. The package includes the tent fly, tent inner, two fiberglass brow poles, two awning poles (in six pieces), a pump, a pressure release valve, a pressure gauge, pegs, and pre-attached guy ropes, along with additional guy ropes.
The Zempire Double Action Pump is crucial for inflation, featuring a pressure gauge and release valve to ensure correct pole inflation. For setup, the tent should be unrolled with the floor facing down, and the front entry door located. It should be oriented correctly for the chosen site. The four corners of the tent floor should be pegged out, ensuring significant tension and a flat floor. Pegs should be angled at 45° away from the tent.
To allow air to enter during pitching, all door and window covers should be opened, but mesh doors should remain closed to maintain the tent's shape during inflation and prevent over-tightening. The external inflation valves (two of them) are on the left side of the tent, under the rain fly. Before inflating, the valve cap (A) should be removed, and the master valve (B) screwed into the threaded section. It's important to avoid cross-threading and ensure the valve is firmly tightened, with no fabric caught, which could cause leaks.
The tube should be inflated to about 4 PSI, then users should enter the tent to lift the frame until it stands on its own. Inflation should continue to 7-9 PSI. The pressure-release valve will "hiss" when 9 PSI is reached, indicating optimal pressure. Over-inflation should be avoided. In hot weather, 7 PSI is recommended to allow for expansion, while 9 PSI is suitable for cooler or windier conditions. During inflation, it may be necessary to support the center of the pole until it assumes its correct shape. Users should also ensure that the base of each pole is correctly seated on the velcro patches, as poles can shift during pitching.
Brow poles are threaded through the front and rear pole-sleeves, with their ends inserted into the webbing pocket on each side of the tent. After inflation, the base of each pole should be aligned to ensure the floor is flat and taut. Corner pegging points may need realignment. It helps to have the front door completely closed when pegging out the front of the tent.
Remaining peg loops around the tent should be pegged. Durable steel pegs are included, suitable for most conditions. However, for rocky or loose sandy locations, specialized Zempire Pegs are available for purchase. Guy ropes are pre-attached and should always be used. They should be taut but not overtightened, to avoid distorting the tent's shape.
Awning poles are included to create additional shade and living space. The six sections of poles fit together to form two poles. Both doors of the awning fly should be opened, and the poles inserted through the eyelets on the lower edge. Guy ropes should then be attached and pegged out to secure the awning.
For deflation, the mesh door should be closed, but the cover left open to allow air to escape. All guy ropes should be unpegged and rolled up to prevent tangling. Peg points, excluding the four corners, should be unpegged, cleaned, and dried before storage. The two brow poles should be removed from their sleeves and carefully broken down, avoiding overextending the internal elastic. Each master valve on the left side of the tent should be unscrewed (this may be loud) to expel all air. The four remaining corner pegs should be unpegged, cleaned, and packed.
The carry bag should be placed at the valve end of the tent. The tent should be laid out to form a clean rectangular shape, then folded in half from front to rear, and then in half again. The pump, peg bag, and awning poles should be placed on top of the folded tent, opposite the valves. The tent should then be rolled from the "non-valve side" end toward the valves. The supplied webbing straps (x2) should be used to secure the rolled tent at each end, ensuring it is firmly packed. Finally, the rolled tent should be tipped onto its side, the carry bag pulled over the tent, and the draw cord and compression straps tensioned.
To ensure longevity, guy ropes should always be out during use. The tent should never be packed away wet. If it must be taken down wet, it should be dried completely as soon as possible to prevent mildew. If mildew forms, it should be washed off with warm water and a soft brush; soap or detergents should not be used. Open flames should not be used inside the tent, as the fabric, though fire-retardant treated, is not fire-proof. All pegs and poles should be cleaned before storing.
The tent is not designed to withstand storm conditions, and it is recommended to take it down during strong winds. The tent should not be left pitched unnecessarily for extended periods, as UV light can damage the fly and shorten its lifespan.
To reduce condensation, lower vents should always be open. In humid or damp conditions, opening the waterproof door covers to expose the mesh layer will enable additional airflow. Foam swabs or non-bonded mats should not be placed directly on the tent floor, as this can cause condensation between the mat and floor, potentially leading to mildew if not dried out.
Zempire tents come with a 2-year guarantee covering faulty materials or manufacture from the date of sale, at the discretion of Flow Imports Ltd. The guarantee applies only to the original purchaser from an approved retail outlet and for reasonable personal camping use, excluding commercial or continuous residential use. Damage from normal wear and tear, accidents, acts of God, negligence (other than by Flow Imports Ltd.), failure to follow setup and care instructions, deterioration from abnormal UV exposure, insect or mildew attack, or other causes beyond Flow Imports Ltd.'s control are not covered. For redress, the tent must be returned to the purchase outlet within the guarantee period, in a clean, dry state, with proof of purchase. Transport and indirect costs are excluded. Flow Imports Ltd. reserves the right to charge for repairs outside the guarantee scope. The guarantee does not limit, modify, or exclude any legal rights, but Flow Imports Ltd. excludes implied conditions and warranties to the extent permitted by law, limiting liability to repair or replacement of goods. Proper care and storage are essential for the tent's longevity.
| Category | Tent |
|---|---|
| Brand | Zempire |
| Inner Fabric | 68D Polyester |
| Series | Pronto Series |
| Material | Polyester |
| Ventilation | multiple vents |
| UV Rating | UPF 50+ |
| Waterproof Rating | 5000mm |