Do you have a question about the Zetronix OMINI-PRO and is the answer not in the manual?
Configure alarm by pressing the switch button to turn on/off and set hour/minute.
Adjust the clock's hour and minute using the 'M' and +/- buttons.
Toggle between 24-hour and 12-hour formats, displaying AM/PM.
The Zetronix OMINI-PRO is a Bluetooth Hidden Cam Alarm Clock designed for discreet surveillance and timekeeping. This versatile device combines the functionality of an alarm clock with a hidden camera, offering both local and remote monitoring capabilities.
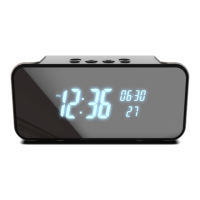
The OMINI-PRO serves primarily as a digital alarm clock, displaying the time (hours, minutes, and seconds) and an alarm time. Beyond its timekeeping functions, it integrates a hidden camera for surveillance. The device supports both local recording to a Micro SD card and remote live feed viewing via a dedicated mobile application. It also features motion detection, allowing for event-triggered recording and notifications. As a Bluetooth-enabled device, it can connect to smartphones or other media players to function as a speaker for audio playback.
The clock settings are managed through physical buttons on the device. To set the alarm, a long press on the alarm switch button toggles it on or off. Once on, a single press sets the hour, and a double press sets the minute. The "+" or "-" buttons are used to adjust the time. When the alarm sounds, it emits a drip sound for 60 seconds, which can be silenced by pressing any button. For setting the current time, the "M" button is pressed once for the hour and twice for the minute, with adjustments made using the "+" or "-" buttons. The device also allows selection between 24-hour and 12-hour systems, with AM/PM indicators for the latter.
The camera is activated by turning on the device via the ON/OFF switch. A flashing green light indicates that the camera is ready for connection.
The "Camama" app is required for camera control and viewing. For iOS devices, the app can be downloaded by scanning a QR code or by searching "Camama" in the App Store. Similarly, for Android devices, the app can be downloaded via a QR code or by searching "Camama" in Google Play.
To add the camera to the app, first connect the device to a power supply and turn it on. Then, on your smartphone, navigate to Wi-Fi settings and connect to the camera's hot-spot signal, which will appear as "Camama_XXXXX". Once connected, open the Camama app and click the "add new" button. Choose "Search in LAN," select the device ID, and save it. This establishes a point-to-point connection, allowing video viewing within a 10-15m range. If the hot-spot signal is not found, reboot the device by pressing the reset button for about 5 seconds until a "Ding" sound is heard.
For remote viewing, the camera needs to be connected to your home Wi-Fi network. In the app, go to "Settings" -> "WIFI Setting" -> "Manage Wi-Fi networks." Select your home Wi-Fi, enter the password, and click "OK." After a brief waiting period (5-10 seconds), the camera should show "online," indicating a successful Wi-Fi connection. The green light will stop flashing, confirming the connection to the router, enabling remote access to the live feed from anywhere.
The app interface for live viewing includes controls for advanced settings, night vision, contrast, brightness, and image resolution (FHD). It also provides options to view the current data rate (BPS), online status, and viewing status. Users can capture still photos, record videos, listen to audio from the camera's microphone, and speak through the camera's speaker.
Motion detection is configured within the app under "Alarm Settings." Users can activate motion detection and choose from four sensitivity levels: Low, Medium, High, and Max.
Local recording to a Micro SD card is managed under "Other Setting" in the app. Users can enable SD card recording and select from three modes: Full-time recording, Alarm recording (triggered by motion detection), and Timing Record. The camera supports both recording with and without an SD card. Without an SD card, videos are saved to the smartphone. With an SD card, recordings are saved to the card and also to the smartphone.
The Bluetooth function is activated by a long press on the Bluetooth switch. On your phone, search for "Amzcev" in the Bluetooth settings and connect to it. This allows the device to function as a Bluetooth speaker for playing music, with a range of 10-15m. Volume control is managed via the connected phone or media player.
If the camera is offline or not working, reboot the device to factory settings, then reconnect the hot-spot signal and reconfigure the Wi-Fi.
The camera supports 8GB-128GB MicroSD cards. It is crucial to use a high-speed, class 10, FAT32 formatted memory card. Cards larger than 32GB, which typically come as exFAT, must be formatted to FAT32 using the app. If the SD card is not recognized, remove and re-insert it.
Common reasons for the camera being offline include no power, router issues, weak Wi-Fi signal, or an incorrect Wi-Fi password. Ensure power is connected, the router is functioning, and the Wi-Fi password is correct. For iOS 14.0 or above users experiencing difficulty finding the device, temporarily shut off cellular data, then refresh the app.
If remote monitoring is glitchy, adjust the video resolution to a suitable level based on your internet speed.
Ensure the SD card recording function is turned on in the app and that the SD card has been formatted for first use.
To reset the password, press and hold the camera's reset button for 5 seconds until a "Ding" sound is heard. This restores the device to factory settings, requiring re-connection to Wi-Fi and setting a new password. The default password is 123456, and it is recommended to change it for security.
| Resolution Ratio | 4K/2K/1080P |
|---|---|
| Video Format | AVI |
| Frame Number | 30 |
| Motion Detection Recording | Straight line 6 meters |
| Compressed Format | H.264 |
| Visual Angle | 120 degree |
| Night Version | 5~8M |
| Recording Range | 20 ㎡ |
| Consumption | 2A/5V |
| Storage Temperature | -20-80 degree centigrade |
| Operating Temperature | -10-60 degree centigrade |
| Operation Humidity | 15-85%RH |
| Memory Card Type | TF card |
| Player Software | Mainstream player |
| Mobile Phone Operating System | Android/iOS |