Do you have a question about the Zigo Leader and is the answer not in the manual?
Explains safety symbols, warnings, cautions, and notes within the manual.
Covers recommended child ages for modes and general safety practices for operation.
Details specific safety rules for children, including restraint harness use and avoiding hazards.
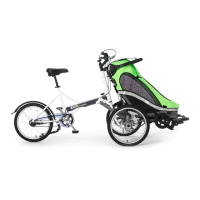
Outlines safety for operating in Carrier Bicycle and Trailer modes, including test rides and turning.
Provides safety instructions for using the ChildPod® independently in various modes.
Details safety considerations when using the Zigo® in Cycle Mode.
Explains safe procedures for connecting and disconnecting the Cycle and ChildPod®.
Instructions for registering the product via mail or online and keeping serial numbers.
Steps to assemble the Zigo® Cycle component, including installing the front wheel and handlebar.
Guide for assembling the ChildPod®, including installing wheels, flag, and repositioning the pushbar.
Steps to prepare the ChildPod® and Cycle for coupling into Carrier Bicycle Mode.
Detailed instructions on how to physically connect the Cycle and ChildPod® components.
Steps to convert the assembled Carrier Bicycle back into its ChildPod® component.
Procedures for separating the Cycle from the ChildPod®.
Instructions for reassembling the Cycle after uncoupling.
Instructions for setting up the ChildPod® after uncoupling.
Details on the Zigo® restraint system, including harness height and securing children.
Information on sunshades, viewports, and other climate protection accessories.
Explains various storage options, including wheel storage and pockets.
Discusses components subject to wear and factors affecting longevity.
Guidance on cleaning fabric, mechanisms, tires, and long-term storage practices.
Covers seasonal upkeep, LeaderLink® connections, braking, and steering system maintenance.
Instructions for converting the ChildPod® to Jogger Mode using the Jogger Kit.
Instructions for converting the ChildPod® to Trailer Mode using the Trailer Kit.
Details on attaching and installing the Mesh Screen and Drizzle Guard covers.
Instructions for installing the Zigo® Rain Cover for heavier rain protection.
Instructions for installing the rear rack and storing the front wheel.
Guide on how to expand the restraint system to accommodate two children.
| Brakes | Disc Brakes |
|---|---|
| Frame Material | Aluminum |
| Foldable | No |
| Type | Cargo |
| Suspension | Front |
| Wheel Size | 20 inches |