READY
StudScan DeepScan
1. INSTALLATION DER BATTERIE
Drücken Sie auf den unteren
Teil der Batterieabdeckung und
öffnen Sie das Batteriefach.
Legen Sie eine neue 9V Batterie
ein, so dass die Pole der Batterie,
Positiv (+) und Negativ (-) dem
abgedrucktem Hinweis (-)
und (+) auf der Rückseite des
Gerätes entsprechen.
Balkenortungs- und
Erkennungsgeräte von Zircon mit
LCD-Anzeigen verbrauchen viel Batteriestrom.
Für eine optimale Leistung empfiehlt es sich, diese
Geräte mit neuen, erst vor kurzem gekauften
Batterien zu benutzen.
Falls Sie mit Ihrem Gerät Probleme haben, ersetzen Sie
bitte Ihre alten Batterien mit neuen Batterien. Wenden
Sie sich an Ihren Zircon-Händler oder schicken Sie eine
E-Mail an techsupport@zircon.com.
2. BEDIENUNGSHINEISE
Um optimale Scan-Ergebnisse zu erzielen:
• Halten Sie das Gerät stets gerade und in vertikaler
Position, so dass es parallel zu den Balken liegt, und
machen Sie keine drehenden Bewegungen.
• Halten Sie das Gerät flach an die Wand, streifen Sie
damit langsam entlang der Wand und kippen Sie es
nicht während Sie die Oberfläche scannen.
• Achten Sie darauf, dass Ihre andere Hand bzw.
anderer Teil Ihres Körpers nicht die Oberfläche,
die Sie scannen, berührt.
• Je nach Lage und Tiefe der spannungsführenden
Leitungen oder Rohre unter der Wandoberfläche,
könnte das Gerät diese auch w
ie Balken orten. Gehen
Sie bitte mit äußerster Vorsicht vor, wenn Nägel
angebracht werden, bzw. Schneid-/Bohrarbeiten an
den Wänden oder Decken ausgeführt werden sollen,
hinter denen sich Leitungen und Rohre befinden.
• Beachten Sie stets, dass Holzbalken und
Metallverstrebungen üblicherweise im Abstand
von 40 oder 60 cm liegen und ca. 38-45 mm breit sind.
Kleinere Abstandsergebnisse oder
eine andere Breite, können auf ein anderes
Objekt als einen Balken/Metallverstrebung/
geschützte Leitung hinweisen.
Bei Erhalt ungleichmäßiger Messergebnisse, könnte
die Ursache Feuchtigkeit sein, als auch Feuchtigkeit
innerhalb der Wand/Trockenwand oder der Wandbelag
Sie vermuten
Stromleitungen,
können sie jedoch
nicht orten.
Die Fläche, bei der
Stromleitungen
angezeigt werden,
ist größer als
die tatsächliche
Stromleitung.
• Geschütze Leitungen sind möglicherweise hinter
metallischen Wandbelagen, querliegenden
Sperrholzplatten, bzw. anderen dichten und
massiven Materialien, oder in einem Isolierrohr.
• Die Leitungen sind nicht spannungsführend.
• Leitungen tiefer als 50 mm unter der Oberfläche
werden möglicherweise nicht geortet.
• Strom kann auf einer Trockenbauwand bis zu
30 cm auf jeder Seite der eigentlichen
elektrischen Leitung geortet werden.
Die Zielanzeigesäulen
blinken und ein
Dauerton ertönt.
• Der Scan-Vorgang ist über einem
strukturdichten/massiven Teil der Wand
gestartet worden oder direkt über einem Balken.
• Das Gerät wurde nicht flach gegen die Wand
gehalten.
• Das Gerät wurde während des
Scannens
gekippt oder von der Wand abgehoben. (All
diese Faktoren haben Einfluss auf die richtige
Kalibrierung.)
• Die (Wand-) Oberfläche ist zu strukturdicht bzw.
massiv oder zu feucht.
• Schalten Sie das Gerät ab, bewegen Sie es 7–8 cm, schalten
Sie es wieder ein, und beginnen Sie erneut.
• Legen Sie auf rauen Oberflächen ein Stück dünne Pappe auf
die Wand und scannen Sie darüber. Lassen Sie das Gerät so
auf der Oberfläche langsam gleiten und scannen Sie weiter.
• Während der Kalibrierung und des Scannens halten Sie bitte
Ihre Hand mindestens 15 cm im Abstand vom Gerät.
• Halten Sie das Gerät stets parallel zum Balken. Halten Sie
es stets aufrecht und bewegen Sie es zum Balken hin.
• Falls das Gerät auf einer frisch tapezierten oder gemalten
Wand verwenden möchten, warten Sie bis der Belag
trocken ist, und versuchen Sie es erneut.
Lokalisierung von
Balken im StudScan
Modus nicht möglich.
Die mittleren (inneren)
Zielanzeigesäulen leuchten
nicht auf oder blinken im
StudScan-Modus.
• Die Wand ist besonders strukturdicht
bzw. massiv.
• Schalten Sie auf den DeepScan
®
Modus um, um einen
Balken zu orten.
• Gehen Sie davon aus die Balkenkanten geortet zu
haben, wenn die angezeigten Doppelstreifen nahe dem
Balkenmittelpunkt
im Display erscheinen.
Das Symbol READY
erscheint, aber
das Gerät zeigt
keine weitere Scan-
Aktivität an.
• Das Gerät ist nicht flach gegen die Wand gehalten.
• Falls dies im DeepScan
®
Modus vorkommt
(DeepScan
®
Funktion ist eingestellt), wurde
möglicherweise direkt über einem Balken
kalibriert.
• Halten Sie das Gerät so an die Wand, dass die zwei
Filsstreifen auf der Gerätunterseite direkten Kontakt mit der
Wand haben.
• Rekalibrieren Sie das Gerät an einer anderen Stelle der
Wand und beginnen Sie erneut.
Kann im DeepScan
®
Modus keine Balken
orten.
• Die Kalibrierung ist direkt über einem Balken
erfolgt. (Die Funktion Fehlerkorrektur ist im
DeepScan
®
Modus nicht möglich, da dieser
Modus über die zweifache Empfindlichkeit des
StudScan Modus verfügt.)
• Sie halten das Gerät wie eine Fernbedienung
und zielen auf die Wand.
• Bewegen Sie das Gerät 7–8 cm weg und kalibrieren
Sie erneut.
• Halten Sie das Gerät so an die Wand, dass die zwei
Filsstreifen auf der Gerätunterseite direkten Kontakt mit der
Wand haben.
Ortet neben Balken
auch andere Objekte.
• Elektrische Leitungen oder Metall- bzw.
Plastikrohre sind in der Nähe des Balkens
oder Abstandslos direkt unter der
Wandoberfläche.
• Suchen Sie nach weiteren Balken, mit gleichen Abständen
auf jeder Seite zwischen 30, 40, oder 60 cm oder nach dem
gleichen Balken an verschiedenen Stellen direkt über oder
unter der Fläche, die zuerst gescannt wurde.
• Gehen Sie mit äußerster Vorsicht vor, wenn sich Sperrholz,
bzw. dickes Holz hinter einer Trockenbauwand oder
massiven Wand befindet.
• Falls eine Steckdose mit Schalter im Scanbereich liegt,
achten Sie darauf, dass während des Scannens der Schalter
der Steckdose an ist. Achten Sie beim Scannen in jedem
Fall darauf, dass Sie vorher den Strom ausgeschaltet haben.
Schalten Sie den Strom stets aus, wenn in der Nähe von
elektrischen Leitungen Nägel angebracht werden, bzw.
Schneid-/Bohrarbeiten an den Wänden oder Decken
ausgeführt werden sollen.
• Um die Ortung einzugrenzen, schalten Sie das Gerät aus
und dann wieder ein, und fahren Sie fort von der Stelle aus,
die Ihnen vorher als Grenzstelle zu einer Leitung angezeigt
wurde. Beginnen Sie erneut.
Schalten Sie den Strom stets aus, wenn in der Nähe von
elektrischen Leitungen Nägel angebracht werden, bzw.
Schneid-/Bohrarbeiten an den Wänden oder Decken
ausgeführt werden sollen.
Mögliche Ursachen
Lösungen
Situation
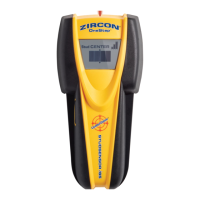
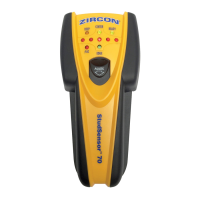
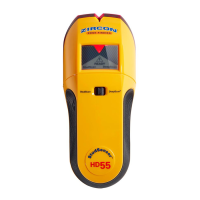
StudSensor
™
HD
55
Kantenortungsgerät
Kantenortungsschlitz
Zielpunktstrahler
SpotLite
®
Lichtsignalanzeige
WireWarning
®
-Alarmanzeige für
spannungsführende
Leitungen
Anzeige für
StudScan-Modus
(Balken scannen)
Ein-/Aus-Taste
READY
Anzeige
Zielobjektanzeige
Anzeige für
DeepScan
®
-
Modus
(Tiefenscannen)
Modus-
Auswahltaste
6. HILFREICHE HINWEISE (siehe auch Anweisungen in Punkt 2, BEDIENUNGSHINEISE)
Das Kantenortungsgerät StudSensor
™
HD
55 verfügt über zwei Betriebsarten:
• StudScan/Ortung von Balken:
Findet die Kanten von Holz und
Metallverstrebungen bis zu einer
Tiefe von 19 mm.
• DeepScan
®
/ Tiefenscannen:
Findet die Kanten von Holz und
Metallverstrebungen bis zu einer
Tiefe von 38 mm.
Die Funktion WireWarning
®
ist
automatisch eingestellt. Damit werden
in den Betriebsarten StudScan und
DeepScan
®
spannungsführende
Leitungen aufgespürt und angezeigt.
Sobald eine Stromleitung erfasst ist,
erscheint auf dem Display das
Symbol für Stromwarnung (Blitz in
einem Dreieck).
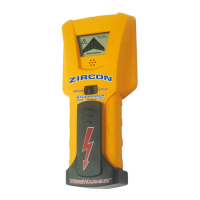
Batteriefach
Registerkarte
If you’re receiving erratic scanning results, it may be
a result of humidity, moisture within the wall cavity
or drywall, or recently applied paint or wallpaper
that hasn’t fully dried. While the moisture may not
always be visible, it will interfere with tool’s sensors.
Please allow a few days for the wall to dry out.
Do not rely exclusively
on the detector to locate
items behind the scanned surface. Use other
information sources to help locate items before
penetrating the surface. Such additional sources
include construction plans, visible points of
entry of pipes and wiring into walls, such as in
a basement, and in standard 40 and 60 cm stud
spacing practices.
Always turn off the power when working near
electrical wires.
WORKING WITH DIFFERENT MATERIALS
StudSensor
™
HD
55 is for use on dry interior walls only.
Note: Sensing depth and accuracy can vary due
to moisture, content of materials, wall texture,
and paint.
StudSensor
™
HD
55 can scan effectively through most
sheet materials, including:
• Bare wood flooring (in DeepScan
®
mode)
• Linoleum on wood base
• Gypsum drywall over plywood sheathing
• Wallpapered walls (if dry)
• Textured ceilings if uniform thickness (place
a thin
piece of cardboard on ceiling and scan over it to
avoid damage to texturing)
StudSensor
™
HD
55 is not designed to scan materials
such as:
• Ceramic floor tile
• Carpeting and padding
• Wallpaper with metallic fibres
• Freshly painted walls that are still damp (may take
one week or longer to dry after application)
• Lath and plaster walls
• Foil covered insulation board
• Glass or any other dense material
1. INSTALLING THE BATTERY
Push in the battery door tab at the bottom of the tool
and open the door.
Insert a new 9V battery,
matching the positive (+) and
negative (-) terminals
to the icons printed on
the back. Snap the battery
into place and replace the door.
Zircon stud finders and
detectors, particularly those
with LCD screens, require and consume a great deal
of current from batteries.
For optimal performance, brand-new, recently
purchased alkaline batteries are strongly
recommended for use in these tools.
If you are experiencing any trouble with your tool,
please replace the battery in your tool with a brand-
new one, or contact your Zircon dealer or e-mail at
techsupport@zircon.com.
2. OPERATING TIPS
For optimum scanning results:
• Hold the tool straight up and down, parallel to the
studs, and do not rotate the tool.
• Keep tool flat against the wall and do not rock,
tilt, or press hard when slowly sliding across the
surface being scanned.
• Avoid placing your other hand, or any other part of
your body, on the surface being scanned.
• Depending on the proximity of electrical wiring or
pipes to the wall surface, the scanner may detect
them in the same manner as
studs. Caution should
always be used when nailing, cutting, or drilling
in walls, floors, and ceilings that may contain
these items.
• To avoid surprises, remember that studs or joists
are normally spaced 40 or 60 cm apart and are
38-45 mm in width. Anything closer together or
a different width may not be a stud, joist,
or firebreak.
3. SELECTING THE MODE
Move selector switch to the desired mode:
StudScan for finding wood or metal studs or
DeepScan
®
for finding studs behind walls more
than 19 mm thick.
Unit will remain off if Power button is not pressed.
4. FINDING A STUD
Always scan for studs with the scanner placed flat
against the wall. Move the mode switch to StudScan,
place the tool flat against the wall, then press and
hold the Power button. Wait for beep to confirm
calibration has completed before moving scanner.
Continue to hold the
Power button, then slowly
slide unit horizontally
across the wall, left or
right. As you begin to
approach a stud, the
outer Target Indication
bars will begin to turn on.
When the full Target
Indication bars are first
displayed across the
display, the SpotLite
®
Pointer and Target
Spotlight shine, and a
steady tone sounds, you
have located the edge of
the stud. Mark this spot.
Without releasing Power
button, continue scanning
beyond marked spot until
some Target Indication
bars turn off. Slide unit in
reverse direction to locate
other edge of stud.
You suspect electrical
wires, but do not
detect any.
Area of voltage
detection appears much
larger than actual wire
(AC only).
• Wires may be shielded behind
metallic wall coverings, plywood
shearwall, or other dense material,
or in conduit.
• The wires may not be live.
• Wires deeper than 50 mm from
surface may not be detected.
• Voltage detection can spread
on drywall as much as 30 cm
from each side of an actual
electrical wire.
Target Indication bars
flash and the unit
beeps continuously.
• Scan began on dense part of wall
or over a stud.
• Unit not flat against wall.
• Unit tilted or lifted during scan.
(All these factors affect proper
calibration.)
• Scanning surface is too dense or
too wet for unit to operate.
• Turn unit off, move over 7–8 cm, press Power button,
and start again.
• On rough surfaces, place a thin piece of cardboard on
wall, scanning over it to help slide unit more smoothly.
• Keep hand at least 15 cm from unit while you calibrate
and scan. Hold unit with thumb and index finger no
higher than handgrips. Be careful not to move your
fingers after calibration.
• Always hold unit parallel to the stud and move it
perpendicular to the stud you´re trying to locate.
• If you are using unit on a recently taped, painted, or
wallpapered wall, allow time to dry and try again.
Unable to detect studs
in
StudScan mode.
Middle (inner) Target
Indication bars turn on or
flash in StudScan mode.
• Wall is particularly thick or dense. • Switch to DeepScan
®
mode to locate the stud.
• Interpret the pair of LCD bars closest to the centre as
stud edge.
The READY icon
turns on but, when
scanning, unit doesn´t
do anything else.
• Unit may not be flat against the wall.
• If it is in the DeepScan
®
mode
(DeepScan
®
is lit), you may have
calibrated over a stud.
• Hold unit so two Velcro
®
strips on the back make
contact with wall.
• Recalibrate unit in a different place and re-scan area.
Working in DeepScan
®
mode and can´t
detect studs.
• You may have calibrated over a
stud. (The error condition is disabled
in DeepScan
®
mode because it is
twice as sensitive as StudScan.)
• You may be holding the unit like a
TV remote, aiming it at the wall.
• Move unit over 7–8 cm and recalibrate.
• Hold unit so two Velcro
®
strips on the back make
contact with wall.
Detects other objects
besides studs.
• Electrical wiring and metal or plastic
pipes may be near or touching back
surface of wall.
• Check for other studs equally
spaced to either side
30, 40, or 60 cm apart or for the same stud at several
places directly above or below the first scan area.
• Use extra caution if the area has plywood, thick wood
backing behind drywall, or thicker-than-normal walls.
• If a switch controls an outlet, make sure it is ON
for detection, but turned off when working near
electrical wires.
Always turn off power when cutting, nailing,
or drilling near electrical wires.
• To narrow detection, turn unit off and on again at the
edge of where wire was detected and scan again.
Always turn off power when cutting, nailing,
or drilling near electrical wires.
Probable Causes
Solutions
Situation
Mark this second
spot. Centre of stud
is midway between
the two marks.
5. WIREWARNING
®
DETECTION
WireWarning
®
detection works continuously in
StudScan and DeepScan
®
modes. When live AC
voltage is detected, the WireWarning
®
indicator
will appear on the display. If scanning begins over
a live AC wire, the WireWarning
®
indicator will
flash continuously. Use extreme caution in these
circumstances or whenever live AC is present.
Electrical field locators may
not detect live AC wires if
moisture is present in the wall, or if wires are
more than 50 mm from the scanned surface,
in plastic conduit or behind a plywood shear
wall or metallic wall covering.
DO NOT ASSUME THERE ARE
NO LIVE ELECTRICAL WIRES
IN THE WALL. DO NOT TAKE ACTIONS THAT
COULD BE DANGEROUS IF THE WALL CONTAINS
A LIVE ELECTRICAL WIRE. ALWAYS TURN OFF THE
ELECTRICAL POWER, GAS, AND WATER SUPPLIES
BEFORE PE
NETRATING A SURFACE. FAILURE TO
FOLLOW THESE INSTRUCTIONS MAY RESULT IN
ELECTRIC SHOCK, FIRE, AND/OR SERIOUS INJURY
OR PROPERTY DAMAGE.
StudSensor
™
HD
55
Stud Finder
DeepScan, SpotLite, StudSensor, WireWarning, and Zircon are registered trademarks or trademarks of Zircon Corporation.
Visit www.ZirconEurope.com for the most current instructions.
6. HELPFUL HINTS (See also number 2, OPERATING TIPS)
The StudSensor
™
HD
55 features two
scanning modes:
• StudScan: Locates the edges
of wood and metal studs up to
19 mm deep
• DeepScan
®
: Locates the edges
of wood and metal studs up to
38 mm deep
WireWarning
®
detection automatically
detects and alerts the user to live AC
wires in StudScan and DeepScan
®
modes. When AC voltage is detected,
the AC WireWarning
®
icon will be
displayed on screen.
LIMITED 2 YEAR WARRANTY
Zircon Corporation, (“Zircon”) warrants this product to be
free from defects in materials and workmanship for two years
from the date of purchase. Any in-warranty defective product
returned to the place of purchase with proof of purchase date
will be replaced at retailer´s option. This warranty is limited
to the electronic circuitry and original case of the product and
specifically excludes damage caused by abuse, unreasonable
use or neglect. This warranty is in lieu of all other warranties,
express or implied, and no other representations or claims of
any nature shall bind or obligate Zircon. Any implied warranties
applicable to this product are limited to the two year period
following its purchase.
IN NO EVENT WILL ZIRCON BE LIABLE FOR ANY SPECIAL,
INCIDENTAL OR CONSEQUENTIAL DAMAGES
RESULTING FROM
POSSESSION, USE OR MALFUNCTION OF THIS PRODUCT.
www.ZirconEurope.com
E-mail: info@zircon.com
© 2015 Zircon Corporation • P/N 67788 • Rev A 11/15
GB
DE
z. B. Tapete wurde neu angebracht und ist noch nicht
vollständig trocken. Die Feuchtigkeit ist nicht immer
sichtbar, sie wirkt sich jedoch auf die Sensoren des
Scanners aus. Bitte achten Sie darauf, dass die Wand
trocken ist und scannen Sie erneut.
Gehen Sie nicht pauschal
davon aus, dass der
Scanner alle Objekte hinter einer Wand lokalisiert.
Überprüfen Sie die Wand auch anhand anderer
Informationsquellen, um Objekte hinter der Wand
zu orten, bevor Sie die Wandoberfläche brechen
bzw. bohren, etc. Solche zusätzlichen Quellen
beinhalten Baupläne, sichtbare Stellen an der
Wand für Eingänge von Rohren und Leitungen,
wie sie z. B. in Kellern vorzufinden sind, und in
Standard, zwischen 40 und 60 cm, handelsüblichen
Abstandsflächen von Balken.
Schalten Sie stets den Strom aus, wenn Sie in der
Nähe von elektrischen Kabeln scannen.
MIT UNTERSCHIEDLICHEN MATERIALIEN ARBEITEN
Der StudSensor
™
HD
55 ist nur zum Gebrauch auf
Innenraumwänden geeignet.
Wichtig: Die Messtiefe und die Genauigkeit können
je nach Feuchtigkeitsgehalt der Materialien, der
Wandstruktur und der Farbe variieren.
Der StudSensor
™
HD
55 kann praktisch auf den meisten
Wand-, Decken-, und Bodenbelägen eingesetzt werden,
unter anderem:
• Reine Holzböden (mit der Betriebsart DeepScan
®
)
• Linoleum Parkett auf Holz
• Vergipste Trockenbauwände auf Sperrholzplatten
• (trockene) Tapezierte Wände
• Strukturdecken mit
einheitlicher Wandtiefe (legen Sie
ein Stück dünner Pappe auf die Strukturdecke, um eine
ebene Oberfläche zu schaffen und scannen Sie über die
Pappe, um die Strukturdecke nicht zu beschädigen)
Der StudSensor
™
HD
55 ist nicht für das Scannen auf
folgenden Materialien geeignet:
• Keramikbodenplatten
• Teppich und Polster
• Tapeten mit Metallfasern
• Frisch gestrichene, noch feuchte Wände
(gegebenenfalls dauert es eine Woche oder länger bis
der Belag trocken ist)
• Latten und Verputz
• Folienüberzogene Dämmplatte
• Glas oder andere dichte Materialien
3. BETRIEBSART AUSWÄHLEN
Stellen Sie den Betriebswahlschalter auf den
gewünschten Modus ein: StudScan (Balken scannen),
um Holzbalken/Metallverstrebungen zu orten; oder
DeepScan
®
(TiefenScannen), um über 19 mm hinaus
zu scannen, bei dicken Wänden.
Das Gerät bleibt ausgeschaltet solange die Ein/Aus-Taste
nicht gedrückt wird.
4. EINEN HOLZBALKEN ORTEN
Ein Scanvorgang funktioniert nur wenn Sie das Gerät
stets flach entlang der Wand bewegen. Schalten Sie
zuerst mit der Modus-Auswahltaste den StudScan Modus
ein, legen Sie den Scanner flach an die Wand, wobei
Sie gleichzeitig die Ein/Aus-Taste drücken und gedrückt
halten. Bitte bewegen Sie das Gerät nicht,
bis die Kalibrierung abgeschlossen ist.
Halten Sie weiterhin die Ein/
Aus-Taste gedrückt und
bewegen Sie das Gerät
langsam horizontal nach
links oder rechts entlang
der Wand. Sobald ein
naher Balken aufgespürt
wird, leuchten die
Zielanzeigesäulen auf.
Sobald alle
Zielanzeigesäulen sowie
der SpotLite
®
-Zeiger und
der Zielpunktstrahler
aufleuchten und ein
Dauerton ertönt, haben Sie
die Balkenkante geortet.
Markieren Sie diese Stelle.
Halten Sie weiterhin die
Ein/Austaste gedrückt
und scannen Sie über die
markierte Stelle hinaus, bis
die Zielanzeigesäulen nicht
mehr aufleuchten. Bewegen
Sie das Gerät nun in die
entgegengesetzte Richtung,
um die andere Balkenkante
zu finden.
Markieren Sie diese zweite
Kante. Die Kantenmitte
befindet sich genau
zwischen den zwei
Markierungen.
5. ORTUNG VON
SPANNUNGSFÜHRENDEN
LEITUNGEN MIT
WIREWARNING
®
Die kontinuierliche Funktion WireWarning
®
ist stets
in beiden Betriebsarten StudScan sowie DeepScan
®
eingestellt. Sobald eine spannungsführende Leitung
erkannt wird, leuchtet auf dem Gerät das entsprechende
Symbol in Form eines Blitzpfeils auf. Falls der Start
des Scan-Vorgangs über
einer spannungsführenden
Leitung erfolgt, wird die
WireWarning
®
-Alarmanzeige
kontinuierlich aufleuchten.
Gehen Sie bitte bei solchen
Bedingungen oder dort
wo spannungsführende
Stromleitungen vorhanden sind, mit äußerster
Vorsicht vor.
Ortungsgeräte, die ein
spannungsgeladenes
Umfeld scannen, können möglicherweise nicht
spannungsführende Leitungen orten, wenn die
Wand feucht ist, oder wenn die Leitungen tiefer als
50 mm von der abgescannten Oberfläche liegen,
bzw. in einem Plastikrohr, hinter einer Scherwand
oder metallischer Wandverkleidung.
GEHEN SIE NICHT DAVON
AUS, DASS SICH KEINE
SPANNUNGSFÜHRENDE LEITUNG HINTER DER
WAND BEFINDET. FÜHREN SIE KEINE ARBEITEN
DURCH, DIE GEFÄHRLICH SEIN KÖNNTEN, WENN
SICH SPANNUNGSFÜHRENDE LEITUNGEN IN DER
WAND BEFINDEN. SCHALTEN SIE STETS DEN STROM
AUS, SOWIE DIE GAS- UND WASSERVERSORGUNG,
BEVOR SIE EINE WANDOBERFLÄCHE BRECHEN,
BZW. BOHREN, ETC. DIE NICHT-BEACHTUNG DIESER
ANWEISUNGEN KANN ZU STROMSCHLAG, FEUER,
UND/ODER ZU ERNSTHAFTEN VERLETZUNGEN ODER
ZU SACHSCHADEN FÜHREN.
WARNHINWEIS
WARNING
WARNING
WARNING
WARNHINWEIS
WARNHINWEIS
DeepScan, SpotLite, StudSensor, WireWarning, und Zircon sind registrierte Warenzeichen oder Warenzeichen der Zircon Corporation.
EINGESCHRÄNKTE 2-JÄHRIGE GARANTIE
Zircon Corporation, (“Zircon”) garantiert für 2 Jahre ab Kaufdatum,
dass dieses Produkt keine Material- und Verarbeitungsmängel
aufweist. Jedes defekte Produkt kann, mit dem entsprechenden
beigefügten Nachweis zum Kaufdatum, innerhalb der Garantiefrist
beim Händler retourniert werden. Der Händler hat das Optionsrecht
das Gerät zu ersetzen. Diese Garantie beschränkt sich ausschließlich
auf die elektronische Schaltungstechnik und das Original-
Gehäuse des Gerätes und schließt ausdrücklich alle Schäden aus,
die durch Missbrauch, falschen Gebrauch oder Nachlässigkeit
verursacht wurden. Diese Garantie tritt an Stelle von allen anderen
Gewährleistungen, ob direkt oder indirekt, dementsprechend bleibt
Zircon frei von anderen Vertretungen oder Forderungen jeglicher Art
verbindlich oder verpflichtend. Jegliche indirekte Gewährleistungen,
die für dieses Produkt zutreffen, beschränken sich auf die 2-jährige
Garantiefrist nach dem Erwerb.
IN KEINEM FALLE IST ZIRCON HAFTBAR FÜR JEGLICHE SPEZIELLE,
BEGLEITENDE ODER FOLGESCHÄDEN, DIE DURCH DEN BESITZ,
DIE VERWENDUNG ODER FEHLFUNKTION DIESES PRODUKTS
ENTSTEHEN.
www.ZirconEurope.com
E-mail: info@zircon.com
© 2015 Zircon Corporation • P/N 67788 • Rev A 11/15
Aktualisierte Bedienungsanleitungen finden
Sie unter www.ZirconEurope.com.
StudScan
StudScan
StudScan
StudScan
StudScan
StudScan
StudScan
StudScan
ZirconCorporation ZirconTV
ZirconTools
|
ZirconToolPro
ZirconTools
ZirconCorporation ZirconTV
ZirconTools
|
ZirconToolPro ZirconTools
READY
StudScan DeepScan
Stud Edge Groove
SpotLite
®
Pointer
WireWarning
®
Detection
Indicator
StudScan
Mode
On/Off
Switch
READY Icon
Target
Indication
Bars
Target
Spotlight
DeepScan
®
Mode
Mode Switch
Battery
Door Tab