ZOOKA Sports Corporation www.zooka.com 8659 154 th Ave NE Redmond, WA 98052 Ph: 1-877-854-9319
AL-1 BASEBALL
AUTOLOADER
AUTOMATICALLY LOADING BALLS
1. Adjust the pitching speed and aim point by manually
loading balls while the autoloader is OFF.
2. Make sure that the tripod knobs are clamped firmly so
that the aim point will not wander while pitching.
3. Load the ramp with a stack of balls. Place the balls in
line on the ramp, rather than rolling them down the ramp.
4. To begin throwing balls automatically without delay, just turn the autoloader ON.
To insert a 10 second delay before loading the first ball, press the enter button just before turning the autoloader ON.
For pitch speeds below about 55 mph, pitches will be delivered approximately every 6.5 seconds.
At higher pitch speeds, the pitch interval will be somewhat longer to allow for the longer pumping time required.
5. To stop feeding balls, turn the autoloader switch OFF right after a ball is fed.
6. To adjust the speed or aim point while using the autoloader, turn the autoloader OFF,
adjust the machine, and turn the autoloader back ON.
EMERGENCY SHUT-DOWN
Press the orange button on the pitching machine keypad to turn the pitching machine off.
This will safely abort any pitch in progress.
INTRODUCTION The Zooka Autoloader automatically loads
real baseballs, pitching machine dimple balls, or tennis balls
into Zooka baseball pitching machines. Capacity is 16 baseballs
or 18 tennis balls. The autoloader is useful for solo batting
practice or for tennis practice. It allows the pitching machine
operator to collect balls or work with hitters at home plate during
a pitching session. The autoloader is only for use at pitch angles
between horizontal and 20 degrees. It cannot be used for fly
balls at higher angles.
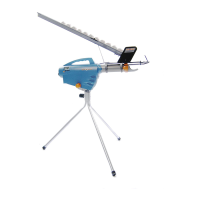
MOUNTING THE AUTOLOADER ON THE MACHINE
1. Turn the pitching machine OFF.
2. Place the pitching machine on the tripod with the barrel
approximately horizontal. Tighten all three tripod and
pitching machine knobs firmly.
3. Open the autoloader barrel clamps by unscrewing one end.
4. Place the autoloader on the barrel of the pitching machine.
The front clamp must be right up against the orange optics
collar, as shown in the figure at the right.
5. Verify that the drop gate operates freely in front of the barrel
and rises completely out of the way of the barrel
when no ball is on the gate.
6. Tighten the clamps firmly around the barrel and recheck the
action of the drop gate.
7. Plug the cable from the autoloader into the rear panel of the
pitching machine.
MANUAL OPERATION (with the autoloader attached).
1. Turn the switch on the autoloader to OFF.
2. Turn the pitching machine ON in the usual way.
3. Adjust the pitching speed and aim point as desired.
4. Place a ball on the drop gate at the front of the machine as
shown in the figure at the right.
5. The gate will drop down and load a ball into the pitching
machine, initiating a throw.