WARRANTY
NEED SOME HELP?
ask@getzooz.com
www.support.getzooz.com
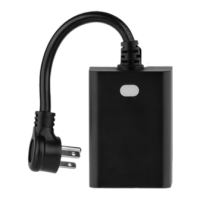
OUTDOOR PLUG
ZEN05
www.getzooz.com
USER MANUAL
Ÿ Z-Wave™ on/off control of lights and small appliances
Ÿ IP65 rated for outdoor use
Ÿ Easy set-up and angled plug for better outlet fit
Ÿ S2 authenticated security and SmartStart
Ÿ Supports OTA firmware updates
Ÿ ETL listed for compliance with North American safety
standards
Ÿ Model Number: ZEN05
Ÿ Z-Wave™ Signal Frequency: 908.42 MHz
Ÿ Power: 110 VAC, 60 Hz
Ÿ Maximum Load: 15 A, 150 W LED bulbs, 1000 W
incandescent, 1/3 hp motor
Ÿ Range: Up to 300 feet line of sight
Ÿ Installation and Use: Indoor or outdoor
Ÿ IP Rating: 65
Ÿ Dimensions: 2.25” x 3.25” x 1.5”
Ÿ Cord Length: 6.5”
FEATURES
SPECIFICATIONS
CAUTION
This is an electrical device - please use caution when
installing and operating the Outdoor Plug. Remote
control of appliances may result in unintentional or
automated activation of power. Do NOT use this Z-
Wave device to control electric heaters or other ™
appliances which produce the risk of fire, burns, or
electrical shock when unattended.
INSTALLATION
Plug the Outdoor Plug into any standard grounded
110 V receptacle. Do NOT connect any devices to the
plug at this point. Click the Z-Wave™ button to see if
the LED indicator comes on and off. If the LED
indicator doesn’t light up at all, please try a different
receptacle. If it’s still off, please get in touch with our
support team: ask@getzooz.com
Ÿ This product should be installed indoors upon completion of
any building renovations.
Ÿ Prior to installation, the device should be stored in a dry, dust-
and-mold-proof place.
Ÿ Do not install the device in a place with direct sun exposure,
high temperature, or humidity.
Ÿ Keep away from chemicals, water, and dust.
Ÿ Ensure the device is never close to any heat source or open
flame to prevent fire.
Ÿ Ensure the device is connected to an electric power source that
does not exceed the maximum load power.
Ÿ No part of the device may be replaced or repaired by the user.
WARNING
BEFORE YOU PLUG ANYTHING IN
Make sure the load you are about to connect
does NOT exceed 15 A in power. This Outdoor Plug
can hold up to 15 A in total.
Connecting heavy duty equipment to this
Outdoor Plug will DAMAGE the device and may
cause the connected appliance to malfunction.
Do NOT plug washers, dryers, refrigerators, or
motors over 1/3 hp to this Outdoor Plug.
Z-WAVE CONTROL™
1. ADD DEVICE to your hub
Initiate inclusion (pairing) in the app (or
web interface). Not sure how? Scan the QR
code below for instructions dedicated to your hub or
visit www.support.getzooz.com for more details.
If you’re using an S2 hub, it will ask you to enter the
DSK PIN or scan the QR code printed on the side of the
plug’s outlet to complete SmartStart inclusion.
While the hub is looking for new devices, click the Z-
Wave™ button 3 times as quickly as possible. The LED
indicator will start flashing blue to confirm inclusion
mode and turn green for 1 second once inclusion is
completed.
1. Bring the Outdoor Plug within direct range of your Z-
Wave™ gateway (hub).
2. Put the Z-Wave™ hub into exclusion mode (not sure
how to do that? ask@getzooz.com).
3. Press and release the Z-Wave™ button 3 times
quickly.
4. Your hub will confirm exclusion and the Outdoor Plug
will disappear from your controller's device list.
EXCLUSION (REMOVING / UNPAIRING DEVICE)
FACTORY RESET
TROUBLESHOOTING
The Outdoor Plug won’t add to your hub? Try this:
1. Initiate EXCLUSION in your hub and click the Z-
Wave button 3 times as quickly as possible. Then ™
try adding it again aer it successfully excludes (this
works as a reset and can be tried even if the plug was
never connected to your hub in the past).
2. Click the Z-Wave™ button 4-5 times quickly when
adding it or try adding it in a non-secure mode.
3. Bring the Outdoor Plug closer to your hub, it may be
out of range.
4. Double-check if the device is powered.
5. Get more troubleshooting tips for your hub at
www.support.getzooz.com
When your network’s primary controller is missing or
otherwise inoperable, you may need to reset the device
to factory settings manually. In order to complete the
process, make sure the plug is powered, then click the
Z-Wave™ button twice and hold it the third time for
10 seconds. The LED indicator will flash green 3 times
to confirm a successful reset.
NOTE: All previously recorded activity and custom
settings will be erased from the device’s memory.
The Outdoor Plug supports Group 1 for Lifeline
communication and Group 2 with up to 5 devices for
basic on/off control. This device will send a Basic Set
command to Group 2 whenever it changes its on/off
status.
Please note that not all Z-Wave systems give users ™
access to direct association settings so if you’re note
sure where to find it, please get in touch with our
support and we’ll be happy to help.
2. PLUG the ZEN05 into a receptacle
PAGE 1 PAGE 2
This product can be included and operated in any Z-Wave ™
network with other Z-Wave certified devices from other ™
manufacturers and/or other applications. All non-battery
operated nodes within the network will act as repeaters
regardless of vendor to increase reliability of the network.
This product features the latest Security 2 (S2) framework to
remove smart home network hacking risks. This device is
equipped with a unique authentification code for trusted
wireless communication.
This is an ETL certified device. ETL, just like UL, is a Nationally
Recognized Testing Laboratory. The ETL mark is proof of
product compliance to North American safety standards.
S2
Z-WAVE™
BUTTON
QR / PIN CODE
Scan the code printed on the
device for SmartStart pairing
and NOT the QR codes below
which link to hub specific
instructions.
SmartThings Hubitat Home Assistant
SmartStart enabled products can be added into a Z-
Wave™ network by scanning the Z-Wave™ QR Code
present on the product with a controller providing
SmartStart inclusion.
Choose your hub and scan the QR code with your
phone’s camera. Then click on the link to access the
step-by-step pairing instructions.
ASSOCIATION
This product is covered under a 12-month limited
warranty and extended 5-year warranty once registered.
To read the full warranty policy, register your product, or
file a claim, please visit www.getzooz.com/warranty