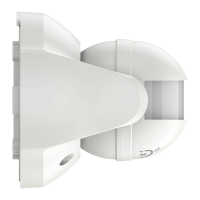
OUTDOOR MOTION SENSOR
ZSE29 VER. 2.0
www.getzooz.com
USER MANUAL
Ÿ Quick and reliable motion alerts to Z-Wave hub
Ÿ Outdoor ready housing (avoid direct sun on lens)
Ÿ Set motion time-out and lux trigger at the sensor
Ÿ Auto-inclusion for easy set-up
Ÿ The latest S2 security and Z-Wave Plus chip
Ÿ Powered by common batteries or Micro USB
Ÿ Built-in tamper switch for extra security
Ÿ Model Number: ZSE29 VER. 2.0
Ÿ Z-Wave Signal Frequency: 908.42 MHz
Ÿ Power: 3 x AA (1.5 V) batteries / Micro USB
Ÿ Motion Detection: up to 30 feet
Ÿ Operating Temperature: -4 – 104 F
Ÿ Warm-up time: 1 minute
Ÿ Range: Up to 130 feet line of sight
Ÿ Installation and Use: Indoor / Outdoor
FEATURES
SPECIFICATIONS
INSTALLATION
1. CHOOSE POWER SOURCE
You can use 3 standard AA batteries to power the
sensor. They’ll last up to a year depending on traffic,
weather condition, and general quality of the batteries.
OR you can use the optional USB port and not worry
about batteries at all.
2. INSTALL BATTERIES / USB ADAPTER BOARD
Unscrew the 2 front screws with a phillips screw-driver
to open the back cover.
If you’re using batteries, insert them in following
orientation marks.
PAGE 1
S2
OR
1. Locate the USB entry
way and carefully break
the safety tab off.
If using the optional
USB port, follow
these steps:
2. Insert the USB
adapter board into
the battery slot.
3. Position the USB port
cable in the entry way
securely.
Z-WAVE CONTROL
3. TEST THE SENSOR
Once the device is powered, the LED indicator will turn
on for 1 minute (warm-up time). If it doesn’t go on at
all, please try fresh batteries. DON’T close the back
cover until you test the sensor with your Z-Wave hub.
USER MANUAL
1. ADD DEVICE to your hub (AUTO INCLUSION)
MANUAL INCLUSION
Initiate inclusion (pairing) in the app (or web
interface). Not sure how? ask@getzooz.com
If you’re using an S2 hub, it may ask you
to enter the DSK key printed on the
back cover sticker to complete se-
cure inclusion.
1. Bring the sensor within direct range of your Z-Wave
gateway (hub).
2. Put the Z-Wave hub into exclusion mode (not sure
how to do that? ask@getzooz.com).
3. Press and release the tamper switch 3 times quickly.
4. Your hub will confirm exclusion and the sensor will
disappear from your controller's device list.
EXCLUSION (REMOVING / UNPAIRING DEVICE)
FACTORY RESET
TROUBLESHOOTING
The sensor won’t add to your system? Try this:
1. Initiate EXCLUSION and click the tamper switch 3
times quickly.
2. Click the tamper switch 4-5 times quickly when
adding it or try adding it in a non-secure mode.
3. Bring the sensor closer to your hub, it may be out of
range.
4. Double-check if the device is powered.
5. Get troubleshooting tips for your hub at
www.support.getzooz.com
When your network’s primary controller is missing or
otherwise inoperable, you may need to reset the device
to factory settings manually. In order to complete the
process, make sure the sensor is powered, then click
the tamper switch 5 times firmly, then within 3
seconds, click it another 5 times. The LED indicator
will flash to indicate successful reset. The sensor will
then enter auto-inclusion mode for 4 minutes.
NOTE: All previously recorded activity and custom
settings will be erased from the device’s memory.
2. POWER the sensor
Insert the batteries or the USB
adapter board. The LED indicator
will start blinking and the sensor
will join the network automatically.
Put your Z-Wave hub into inclusion mode and click the
tamper switch 3 times quickly.
TAMPER SWITCH
WAKE-UP MODE
The sensor’s wake-up interval is set to 4 hours by default to
save battery life. Use the Wake Up Command Class to adjust
the interval (in seconds, working in 600s intervals, with 600 as
min and 86400 as max values). Take out and re-insert the
batteries to wake the sensor up manually. During wake-up,
the sensor turns the Z-Wave radio on for 10 seconds to
receive communication from the hub. Long wake-up interval
will not affect how oen the sensor reports motion to your
hub.
PAGE 2
The Outdoor Motion Sensor supports Group 1 with 1
Controller node for lifeline communication and Group 2
with up 4 for PIR Control to devices . This device will
send to Group 1a Notification Report and BASIC_SET
command to Group 2 ever it detects motion. when
ASSOCIATION
Get step-by-step instructions
for adding the sensor to
SmartThings, Vera, and
other hubs at
www.support.getzooz.com
Firmware 2.01