Do you have a question about the ZWO ASIAIR Mini and is the answer not in the manual?
Describes icon meanings for Forbid, Attention, Tips, and Further Reading.
Recommends watching video then reading this for installation and basic setup.
Recommends reading for detailed product information.
Minimum system requirements before October 1, 2022.
Minimum system requirements from October 1, 2022.
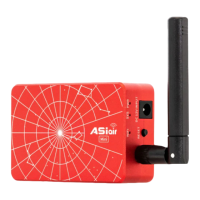
Describes ASIAIR Mini as a smart Wi-Fi device with rich features.
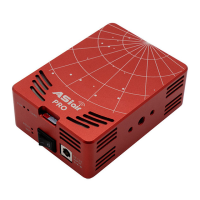
Details the physical construction, design, and mounting options of ASIAIR Mini.
Outlines initial setup steps and pre-installed components before first use.
Introduces the app's main screen and initial interface.
Overview of essential configuration options for the ASIAIR app.
Section detailing the guiding functionality within the app.
Describes the controls for managing the telescope mount via the app.
Lists extra utilities and features available within the ASIAIR app.
A guide to help users begin astrophotography with ASIAIR.
Explains the feature for real-time stacking of multiple images.
Details the feature for automated shooting sequences.
Instructions on how to transfer images from ASIAIR to a PC.
Process for updating ASIAIR firmware and the mobile application.
Steps to restore the ASIAIR operating system on the SD card.
Important safety guidelines and operational requirements for ASIAIR.
Legal notices, usage warnings, and limitations of liability.
Information regarding warranty service and maintenance.
Visual representation of ASIAIR Mini ports and their functions.
Explains the function and states of the Power, System, and Wi-Fi LEDs.
Illustrates connecting cameras and accessories via USB ports.
Details how to connect the power supply to ASIAIR Mini.
Steps to connect your mobile device to the ASIAIR Wi-Fi network.
Using RS232-USB adapters for connecting various equatorial mounts.
Connecting equatorial mounts directly to ASIAIR via USB.
Using an EQDir cable for connecting EQMod compatible mounts.
Displays device status, network, and connection details.
Icons for accessing various settings like ASIAIR, Camera, and Telescope settings.
Buttons for switching between main functions like Preview, Focus, and Guiding.
Displays current working status, camera info, resolution, and temperature.
Shows available tools like Histogram, Guiding, and Crosshair for current mode.
Customizing Wi-Fi hotspot name, password, and network modes.
Switching between connected devices and safe shutdown procedures.
Connecting ASIAIR to a home area network for remote control.
Details shown in the ASIAIR box, including serial number and CPU temperature.
Setting up the main camera and inputting the scope's focal length.
Adjusting camera gain and managing cooling functions.
Connecting and configuring the guide camera.
Setting guide scope focal length, gain, and calibration step.
Selecting the mount model and connection method.
Synchronizing geographic location and time with the mount.
Selecting and configuring the filter wheel and its positions.
Process to recalibrate the filter wheel positions.
Adjusting focuser parameters like steps, backlash, and position.
Shows internal eMMC and external storage usage.
Preview, export, and delete captured images.
Displays software version and provides an option for submitting feedback.
Access to experimental options and firmware reset functionality.
How to access the guiding interface from other modes.
Controls for the guiding graph display and camera settings.
Understanding the star movement graph during calibration.
How to update the real-time image during guiding.
Process to start mount calibration for guiding.
Button to end the guiding process.
Fine-tuning RA/DEC aggregation for guiding graph stability.
Using the celestial library to select shooting targets.
Commanding the mount to move to a selected celestial target.
Adjusting mount direction and speed for composition.
Displays image statistics and allows automated stretch operations.
Enabling the guiding floating window for monitoring.
Analyzes images to determine mount pointing position and for Polar Alignment.
Creates a crosshair for accurate image centering.
Annotates stars and shows their sizes after capturing an image.
Accessing the ZWO EAF focuser controls.
Overview of the deep space field shooting process.
Steps to focus the main camera and guidescopes.
Ensuring the main camera and mount are correctly connected.
Taking test images to ensure focus and correct downloading.
Completing calibration using onscreen prompts for polar alignment.
Selecting a target and initiating the GoTo command.
How GoTo automatically centers the image using plate solve.
Selecting a target and adjusting image composition for stacking.
Choosing exposure length and optionally saving individual frames.
Creating a shooting plan with exposure times and calibration frames.
Initiating the shooting plan and options for modification.
Process for transferring images from TF card or USB disk.
Procedure for updating ASIAIR firmware and app.
Steps to restore the ASIAIR OS if it becomes unresponsive.
Operating temperature and weather conditions.
Ensuring correct power supply and SD card insertion.
Warnings regarding product suitability, operation, and safety.
Details on warranty service, maintenance, and liability.
Device compliance with FCC rules for digital devices.
Device compliance with Industry Canada's license-exempt RSSs.
The ASIAIR Mini is a smart Wi-Fi device designed to simplify astrophotography. It integrates a power management module, extensive USB connectivity, and a telescope mounting foot, all controlled via the ASIAIR App. This third-generation ASIAIR device, first released in July 2018, aims to provide a seamless and user-friendly experience for both beginners and experienced astrophotographers.
The ASIAIR Mini serves as a central hub for controlling various astronomical equipment, including cameras, mounts, filter wheels, and focusers. It enables users to perform a wide range of astrophotography tasks directly from a mobile device (iOS or Android) via the ASIAIR App. Key functions include:
The ASIAIR Mini is designed for ease of use and portability, with several features enhancing its operational experience:
The ASIAIR Mini includes features and recommendations to ensure its longevity and optimal performance:
| Power Consumption | 5W |
|---|---|
| Operating System | Linux |
| Processor | Quad-core ARM Cortex-A53 |
| RAM | 1 GB |
| Supported Protocols | ASCOM, INDI |
| Wi-Fi | 802.11b/g/n 2.4GHz/5GHz |
| Storage | MicroSD card slot, supports up to 256 GB |
| Network | Wi-Fi and Ethernet |
| Software | ASIAIR app |
| Power Input | 5 V / 2 A |
| USB Ports | 1 x USB 3.0, 1 x USB 2.0 |