EasyManua.ls Logo

2gig Technologies 2GIG-STZ-1 - User Manual

2gig Technologies 2GIG-STZ-1
2 pages
Print Icon
To Next Page IconTo Next Page
Loading...
Z-WAVE PLUS V2 THERMOSTAT QUICK START GUIDE
2GIG-STZ-1
Copyright © 2020 Nortek Security & Control
Congratulations on your purchase of the 2GIG Thermostat. Its easy to install.
Lets get started.
1. Remove Existing Thermostat
TURN OFF POWER and remove the existing thermostat to expose the wiring terminals.
TAKE A PICTURE of the old thermostat wiring. This will allow reinstallation of the old thermostat if
necessary and help with troubleshooting.
C
RG
W
Y
C
R
G
W
Y
LABEL THE WIRES TO MATCH
THE OLD THERMOSTAT TERMINAL
MARKINGS. LABELS NOT INCLUDED.Existing Thermostat Terminals
TAKE A PICTURE!
2. Preparation for Installing Thermostat
Open the back panel as shown. Feed the wires from the wall through the access hole. Mount the back
panel to wall with anchors and Phillips screws (provided).
Back Panel
Body (with PCB)
Use thumbs to grip and pull
to separate Back Panel
Y2 Y1 G RC RH C AUX/E O/B HUM– HUM+
Y2 Y1 G RC RH C W1 W2 W3 HUM– HUM+
Anchors (2)
Provided
Phillips Screws (2) Provided
Feed wires through access
4. Mounting the Thermostat to Wall
Mount the thermostat body/front panel onto the wall mounted base by pressing in place until it snaps
all around the edges.
Body/Front Panel
Back Panel
(Mounted to Wall)
Terminal Block
Snap Together
Front Panel
Back
Panel
HUM- HUM+W3W2W1CRHRCGY1Y2
HUM- HUM+O/BAUX/ECRHRCGY1Y2
WCR
GY
Standard
Reference
Standard
Terminals
(Labeled Wires)
3. Connect the Wires
Connect the wires to proper terminals based on your system setup (see instruction manual for details).
5. Install Batteries
If the thermostat is going to be battery operated, open front panel and install four (4) AA batteries into
the battery compartment.
NOTE: Please do not install batteries if powering through C wire.
Back Panel/Body
(Attached to Wall)
Front Panel
Z-Wave QR Code
Battery
Compartment
Front Panel
Back
Panel
Snap Together
Use Fingernails
at Indents on
top of the Case
Back Panel/
Body on Wall
Front Panel to Battery
Compartment
Question and Answer IconNeed help?

Do you have a question about the 2gig Technologies 2GIG-STZ-1 and is the answer not in the manual?

Summary

Remove Existing Thermostat

Prepare for Thermostat Removal

Photograph existing wiring and label wires before removing the old thermostat.

Prepare Thermostat for Installation

Mount Back Panel

Open back panel, feed wires through hole, and mount back panel to wall with hardware.

Connect Thermostat Wires

Wire Terminal Connection

Connect wires to the appropriate terminals based on system setup instructions.

Mount Thermostat to Wall

Attach Thermostat Body

Mount the thermostat body/front panel onto the wall base until it snaps securely.

Install Batteries

Battery Installation

Install four AA batteries if not using C wire for power.

Z-Wave Plus Installation

Initiate Z-Wave Pairing

Set Z-Wave controller to Include mode and follow prompts to add thermostat as a node.

Navigate Thermostat Menu

Wake thermostat, hold MODE to access menu, use arrows to scroll and FAN to select.

Confirm Z-Wave Connection

Confirm pairing by touching YES when prompted and then FAN to add to network.

Z-Wave Connection Status

Monitor display for 'WAIT' then 'SUCCESS' or 'TIMEOUT'; repeat if connection fails.

Set System Mode

Select System Mode

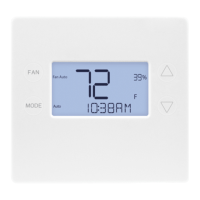
Use the MODE button to cycle through and select system modes (Off, Heat, Cool, Auto, Heat-E).

Set Temperature Setpoint

Adjust Heating;Cooling Setpoint

Use MODE to switch between Heat/Cool setpoints and arrows to adjust temperature.

Overview

The 2GIG-STZ-1 is a Z-Wave Plus V2 Thermostat designed for residential HVAC systems. It offers smart control over heating and cooling, integrating with Z-Wave networks for remote management and automation.

Function Description:

The thermostat's primary function is to regulate the temperature in a home by controlling the HVAC system. It supports various system modes including Off, Heat, Cool, Auto, and Heat-E (for heat pump systems). Users can set desired temperature setpoints for heating and cooling, which the thermostat then maintains. As a Z-Wave Plus V2 device, it can be included as a node in a Z-Wave network, allowing for remote control and integration with other smart home devices and scenes via a primary Z-Wave controller. This enables features like scheduling, energy management, and status monitoring from a smartphone or other connected devices.

Installation:

Installation begins with removing the existing thermostat and documenting its wiring by taking a picture. The back panel of the 2GIG-STZ-1 is then mounted to the wall using provided anchors and Phillips screws, with wires fed through an access hole. Wires are connected to the appropriate terminals based on the HVAC system setup (Y, G, R, C, W, W1, W2, W3, AUX/E, O/B, HUM-, HUM+). Once wiring is complete, the thermostat body/front panel snaps onto the mounted base. The device can be powered either by the C-wire from the HVAC system or by four (4) AA batteries. If using the C-wire, batteries should not be installed.

Usage Features:

  • Touch-Sensitive Interface: The thermostat features touch-sensitive buttons for navigation and setting adjustments. These include ▲▼ buttons for changing values, a FAN button for selection, and a MODE button for cycling through system modes and menu options.
  • System Modes:
    • Off: Turns off the HVAC system.
    • Heat: Activates heating only.
    • Cool: Activates cooling only.
    • Auto: Automatically switches between heating and cooling to maintain setpoints.
    • Heat-E: Disables the compressor and uses auxiliary heater for heating (specific to heat pump systems).
  • Temperature Setpoint Adjustment: Users can adjust heating and cooling setpoints using the ▲▼ buttons. A single press changes the setpoint by one degree, while holding the button ramps the setpoint up or down quickly.
  • Z-Wave Inclusion: The thermostat can be easily added to a Z-Wave network. This involves setting the primary Z-Wave controller to "Include," "Add," or "Install" mode, then navigating to the "ZWAVE" option on the thermostat's menu and touching FAN (Select). The thermostat will prompt for confirmation (YES) and then attempt to connect, displaying "WAIT" and then "SUCCESS" upon successful connection. If connection fails, "TIMEOUT" will be displayed, and the process can be repeated.
  • Status Display Line: Menu choices and status messages are displayed on the thermostat's screen, providing clear feedback to the user.
  • Battery Operation: For systems without a C-wire, the thermostat can operate on four AA batteries, providing flexibility in installation.

Maintenance Features:

  • Battery Replacement: If operating on batteries, the front panel can be opened to access the battery compartment for replacement.
  • Troubleshooting: The initial step of taking a picture of the old thermostat's wiring is crucial for troubleshooting during installation or if reinstallation of the old thermostat becomes necessary. The Z-Wave connection status ("WAIT," "SUCCESS," "TIMEOUT") provides feedback for network integration issues.

Important Technical Specifications (Derived from context):

  • Model: 2GIG-STZ-1
  • Wireless Technology: Z-Wave Plus V2
  • Power Source: C-wire (HVAC system) or 4x AA batteries
  • Control Type: Touch-sensitive buttons
  • Supported HVAC Systems: Standard (Y, G, R, C, W), Heat Pump (AUX/E, O/B), Humidification (HUM-, HUM+)
  • Temperature Control Range: Adjustable via setpoints
  • Connectivity: Z-Wave network integration for remote control and automation.

The 2GIG-STZ-1 thermostat is designed for ease of installation and user-friendly operation, offering modern smart home capabilities through its Z-Wave Plus V2 integration.

2gig Technologies 2GIG-STZ-1 Specifications

General IconGeneral
Brand2gig Technologies
Model2GIG-STZ-1
CategoryThermostat
LanguageEnglish

Related product manuals