6 7
Step 4: Learn How to Doodle in 3D
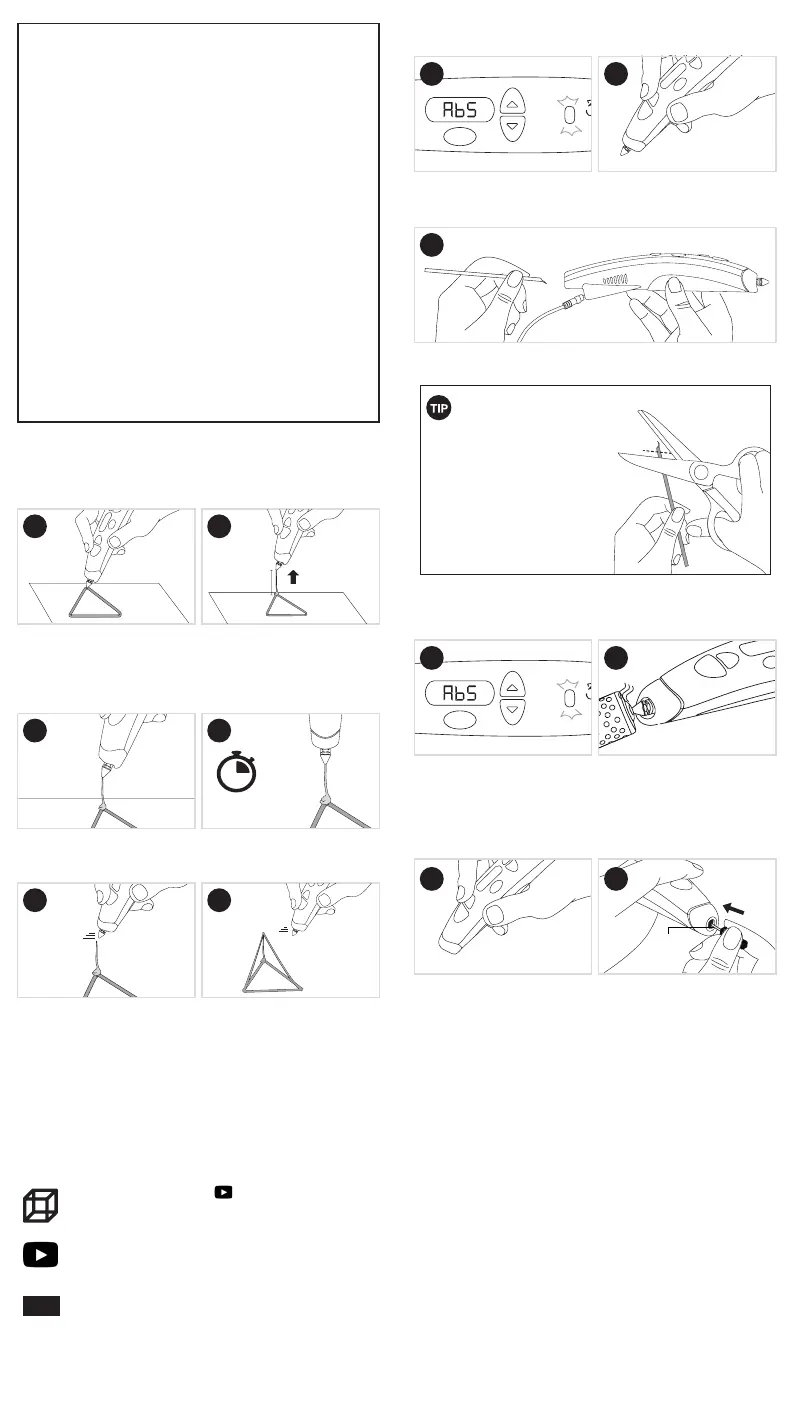
Use the 3Doodler PRO+ to transform your triangle into
pyramid!
With the triangle at on the
page, extrude Filament onto one
corner of the triangle until you
have a small blob. Make sure
it is anchored onto the triangle
before moving to the next step.
Click the Feed Button to stop
extrusion, BUT DO NOT MOVE
THE PEN YET.
Pull the pen away. The line will
remain vertical.
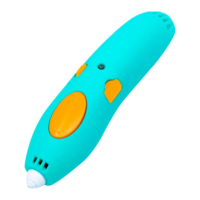
With the pen extruding, lift the
Nozzle up o of the paper in a
straight line for 1.5 inches above
the center of the triangle.
Wait a few seconds with the pen
still connected to the top of your
Filament’s line.
Repeat twice from the two
remaining corners of the triangle.
Please Doodle here:
Well done! You just Doodled in the air! This is a crucial
stepping stone to making all kinds of three dimensional
objects with your 3Doodler PRO+.
YouTube videos: Cube
https://www.youtube.com/watch?v=vL6gLsCYfO8
For more videos visit:
https://www.youtube.com/3Doodler
Resources for further inspiration and
guidance:
https://www.3Doodler.com/resources
MORE
1
3
5
2
4
6
1.5 in
5-6
secs
Unblocking
Tool
Step 6: Unblocking Filaments
STEP 7: Custom Mode
Note: You do not have to use custom mode.
If you do choose to use Custom Mode, please use the
recommended temperature settings on page 4. To use
custom mode, select CUS in the menu, then use the
Navigation Buttons to select your desired temperature,
and click the Enter Button. After this, you can select your
preferred speed.
Note that Custom Mode is not programmed for specic
laments like in the pre-set temperature modes, so it is
possible that a custom setting will not produce the desired
outcome. You may need to modify the Custom Mode
settings until you achieve the results you’re aiming for.
Example: If you are using PLA and set the pen to 170ºC and
speed 1, that will cause diculty in extruding.
Example: If you are using FLEXY set to 240ºC and speed 10,
you may cause the pen to lose heat too fast and extrusion will
stop until the internal temperature can get hot enough again.
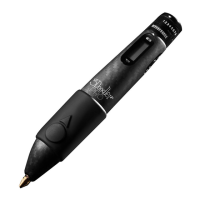
Ensure the pen’s temperature
is set to ABS, and that the Blue
Light is on.
With the nozzle removed, click
the reverse button to engage the
reverse feature.
Once the Filament stops reversing, it is safe to remove it from the pen
by gently pulling on the back of the strand.
Turn the pen on and set it to
the temperature of the lament
being used.
Remove the nozzle using the
socket located on the end of the
nozzle storage case.
*IMPORTANT: Only remove
and replace the Nozzle with
the pen turned on and fully
heated.
After removing a Filament
strand from the 3Doodler PRO+,
cut and remove the melted end
of your strand before reinserting
it into the 3Doodler PRO+ .
This will reduce blockages and
clogging issues.
ALWAYS remove strands from
the 3Doodler PRO+ when the
pen is idle.
Click the Reverse Button once. The
Light will start ashing to signal
that the Filament is reversing.
Next, while the pen is in reverse,
insert the unblocking tool through
the nozzle-end of the pen to
push any remaining lament out
through the feed port.
Step 5: Reverse and Remove Filament
SNIP THOSE ENDS!
BLUE
Light
BLUE
Light
1
3
2
1
3
2
4