10 11
SECTION 4: TOOLS
(PROVIDED IN BOX)
Before showing you how to troubleshoot issues with
your 3Doodler PRO+ pen, we want to introduce you to
the tools provided in your box:
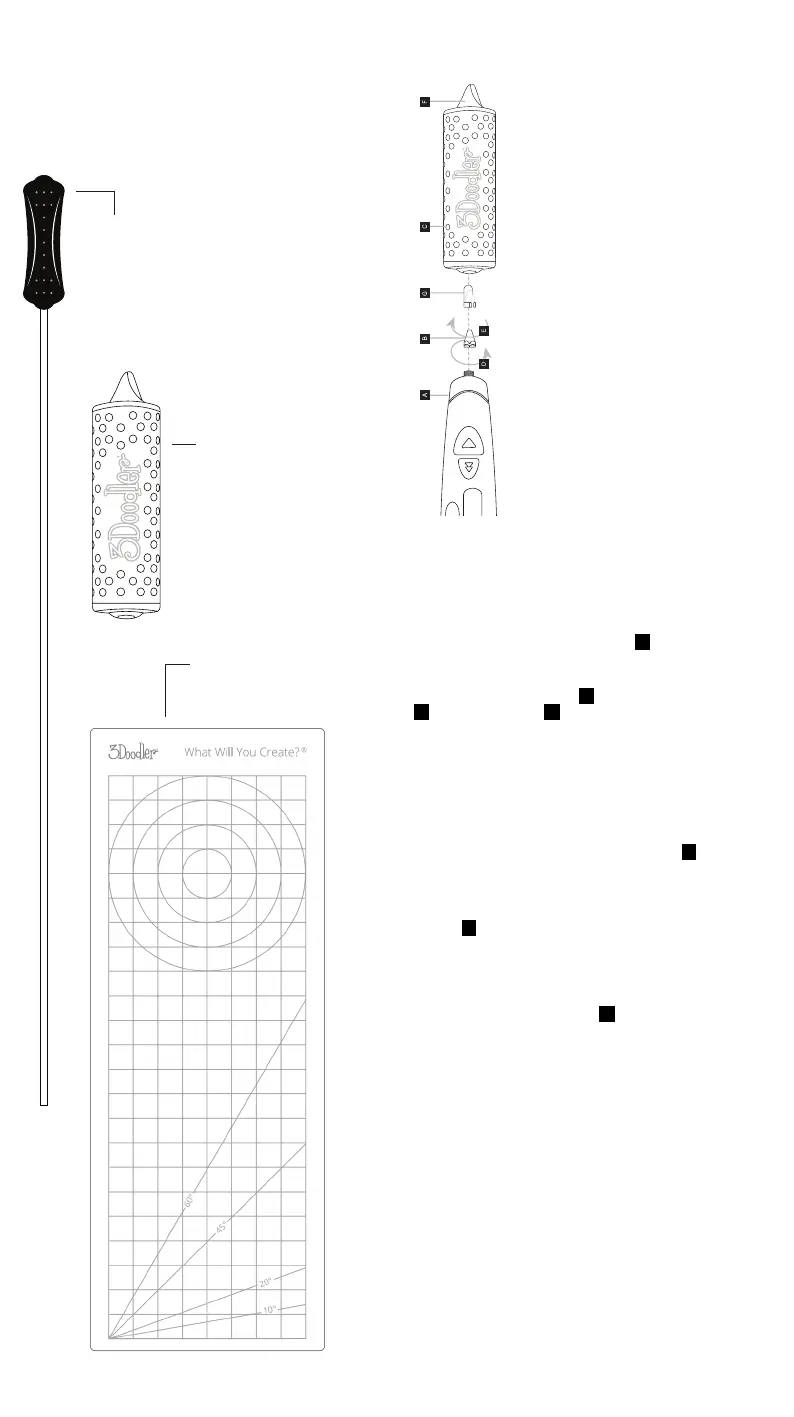
Unblocking Tool
Can be inserted through the Feed Port or the Nozzle-end
of the pen (see instructions for proper removal of the
Nozzle in order to use the Unblocking Tool through the
Nozzle-end). When inserted through the Nozzle-end,
the Unblocking Tool will push short strands of Filament
out through the Feed Port. When inserted through the
Feed Port, it will help push lament forward through the
Nozzle during extrusion.
Nozzle Set
Includes a variety of nozzles, and
the case is used for tightening
and removing each Nozzle.
Do not remove or replace the
Nozzles when pen is cold.
Do not overtighten the Nozzles,
as you may break your pen.
Mini DoodlePad
The DoodlePad is a transparent
Doodling surface that can be
used alone, or as an overlay.
The grid lines on the DoodlePad
allow for more precise Doodling.
TheDoodlePad is compatible with
PLA, ABS, and Nylon lament,
and you can use WOOD lament
on the backside only, not on
the front. It is NOT compatible
with FLEXY, Bronze, Copper, or
3Doodler Start laments.
SECTION 5: NOZZLE SET
MANUAL
IMPORTANT NOTES
Read all instructions and warnings
prior to using this product. Improper
use may result in product damage,
excess heat, toxic fumes, re or
explosion, damages for which you, and
not the manufacturer are responsible.
• Always ensure the 3Doodler PRO+ pen
is set to the proper target temperature
before removing or replacing the
nozzle. Attempting to remove or replace
the nozzle when the 3Doodler PRO+ is
cool will irreparably damage the pen
and void the warranty.
• Do not use excessive force when
removing or screwing on a nozzle.
Excessive force will damage your
3Doodler PRO+ pen.
• While it is normal for there to be
lament inside the nozzle itself, ensure
that the exterior of the nozzle is clean
when removing or replacing it. This
will prevent the nozzle from becoming
stuck inside the removal tool.
• Clean the nozzle while it is hot using a
thick cloth or a folded up tissue, taking
caution to protect your ngers from
touching the hot nozzle. Note that
touching the nozzle can cause burns if
touched directly!
SWAPPING NOZZLES
Step 1: Plug in your 3Doodler PRO+ A , and set the power
switch to ON. Select the ABS setting, then select any speed,
and wait for the light to turn Blue .
Step 2: Remove the nozzle B by turning the nozzle tool
C counter-clockwise D . Do not touch the nozzle, as it is
extremely hot!
Step 3: Insert the new nozzle into the nozzle tool with
the screw/base facing outwards. It is okay for there to be
residual lament inside the nozzle.
Step 4: If the pen has gone to sleep, press the feed button
so that the pen heats up again. Once the pen is hot again
and reaches the target temperature, screw the nozzle onto
the pen by turning the nozzle tool clockwise E . Make sure
the nozzle is screwed on rmly, but don’t force it!
Step 5: You’re ready to start Doodling!
Step 6: When you’re done, don’t forget to store your
nozzles F !
USING THE SMOOTHING TOOL
Step 1: While the 3Doodler PRO+ is unplugged and
cool, slide the Smoothing Tool G onto the nozzle of the
3Doodler PRO+ .
Step 2: Turn on the 3Doodler PRO+, selecting the
temperature setting appropriate to the lament that you
are extruding.
Step 3: Use the Smoothing Tool to:
• Smooth out rough spots or edges
• Remove excess lament from your Doodles
• Create contours or textures
Step 4: Turn o the 3Doodler PRO+ and allow it to cool
(for approximately ve minutes) before removing the
Smoothing Tool.

 Loading...