1778-8125-3042-2-E
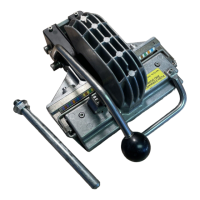
8.7 Install an index strip into the splicing rig and pull
the “T” bar to the upright position. Use the 3mm
hex wrench to insert and lightly-tighten the four (4)
screws on the handle side of the “T” bar to secure
the blade assembly and stuffer.
8.8 Pull the handle down to stop and up to release three
(3) times to seat the blade assembly and stuffer.
While the “T” bar is in the fully engaged down
position, use the 3mm hex wrench to securely
tighten all six (6) screws.
8.9 Engage the handle into the retaining clip, pull
the “T” bar up, and place into the open position.
Examine the index strip. Slight knife cuts of uniform
depth should be visible on the cutting ledge, but
not contacting the cathedral windows. If cut is not
positioned correctly repeat steps 8.1–8.9.