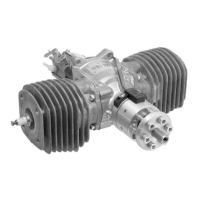
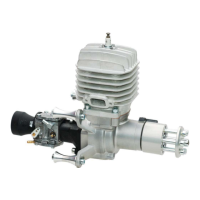
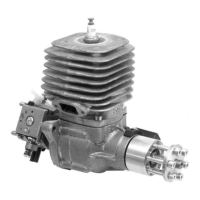
The 3W 48iB2 / CS - 56i B2 / CS Engine is a high-quality model airplane engine designed and produced by 3W. These engines are known for their precision, high torque at low RPM, excellent running characteristics, long life, and significant power output. They come with a 36-month conditional warranty.
Function Description:
The 3W engines are designed to power model airplanes, ranging from single to six cylinders. They are two-stroke engines suitable for gasoline and diesel fuel. The engine's design emphasizes reliability, performance, and ease of use for model aircraft enthusiasts. The engine operates by converting fuel into mechanical energy to drive a propeller, providing thrust for the aircraft.
Important Technical Specifications:
The manual provides specifications for both the 48iB2/QS and 56iB2/QS models.
- Cylinder capacity:
- 48iB2/QS: 42.5 ccm / 2.55 cu.in
- 56iB2/QS: 57.00 ccm / 3.48 cu.in
- Power / Puissance:
- 48iB2/QS: 4.0 HP / CV; 2.92 kW
- 56iB2/QS: 5.5 HP / CV; 4.0 kW
- Bore dia. / Alesage:
- 48iB2/QS: 44 mm / 1.73 in
- 56iB2/QS: 36 mm / 1.42 in
- Stroke / Course:
- 48iB2/QS: 28 mm / 1.10 in
- 56iB2/QS: 28 mm / 1.14 in
- Speed range / Vitesse de rotation: 1400 - 8500 min-1 / rpm
- Weight / Poids incl. ignition: 1850g / 4.08 lbs for both models
- Crankshaft / Vilebrequin: 3 Ball bearings / 3 Roulement à billes
- Connection rod / Bielle: Needle bearings on both ends / Roulement à aiguille aux deux cotés
- Gasoline-Version: 1:50 - 1:80 Mix, full syntethic oil, high Octane unleaded fuel (98 Octane is recommended)
- IIS - Ignition / V.cc allumage: 6,0 V
- Propeller / Hélice:
- 48iB2/QS: 20x10; 21x12; 22x10 (2-bladed / à 2 pales), 19x10; 20x8 (3-bladed / à 3 pales)
- 56iB2/QS: 20 x 12; 22 x 10 (2-bladed / à 2 pales), 20 x 10; 21 x 10; 19 x 12 (3-bladed / à 3 pales)
Ignition System (IIS - Ignition System 4.4):
This intelligent ignition system with microprocessor-controlled auto timing is designed for easy starting and optimal engine operation. It uses a high-precision RPM check by two magnets built into the hub of the engine. The hall sensor transmits signals to the microprocessor, which programs the engine characteristics.
- Operating voltage: 6 V NiCAD / 7.4 V LiPo (cannot be connected without voltage regulator)
- Suggested battery capacity: 1700 mAh (one cylinder), 2400 mAh (two cylinder)
- Open - circuit current: 18 mA (one cylinder), 18 mA (two cylinder)
- Current - consumption:
- One cylinder: 20-100 mA (0 rpm), 700-950 mA (1000 rpm), 1000-1200 mA (10,000 rpm)
- Two cylinder: 20-100 mA (0 rpm), 800-1000 mA (1000 rpm), 900-1300 mA (10,000 rpm)
- Ignition Voltage: > 20 KV
- RPM max: 12,000 rpm
- Magnet red (North Pole): upper dead point
- Magnet green (South Pole): 55° before upper dead point
- The 4 delivered rubber mounts have to be used for installation, ensuring a one-millimeter gap underneath the box.
Usage Features:
- Engine Installation: The engine should be mounted on a motor box that allows for proper airflow over and away from the cylinders. A quadrilateral shape is recommended for the motor box to provide the best circulation of air. The motor box must be stiff enough to prevent engine vibration and have a solid firewall. For engines up to 106cc, 1/4" aircraft plywood is recommended, and for engines in the 150cc class, 3/8" aircraft plywood. Composite motor boxes are also suitable. The engine should be mounted with high tensile bolts, and spacers may be needed to adjust the engine's position relative to the fuselage.
- Engine Cooling: Proper cooling is vital. An air-cooled engine requires an appropriately sized air intake. The exhaust air outlet should be four times the size of the cool air intake. Baffling is recommended to direct cooling air over the cylinders and ensure efficient heat dissipation.
- Engine in Pusher Operation: When engines are used in pusher configuration, cooling is critical. A good cooling system layout depends on the actual location (position) of the engine in the fuselage.
- Operating Temperature: The normal operating temperature range is 176-212 Fahrenheit (80-100 Celsius). If the temperature rises above 230 degrees Fahrenheit, the engine is overheated, potentially damaging ball bearings, needle bearings, and leading to a seized piston or pistons.
- Rear Induction: Carburetors, whether front or rear, require a steady supply of fresh air. An air scoop is recommended for rear carburetors to prevent damage from gasoline sprays from the carburetor. Use a thin epoxy or other appropriate fuel-proofing method.
- Ignition: Use 3W-recommended electronic ignition modules. Ensure a 1/16" gap between the ignition module and the mounting surface to prevent overheating. The red cable is positive (+), and ignition timing is factory set.
- Canister Mufflers: A flexible support bracket is required to mount the canister(s). The location for this bracket should be at the canister's center of gravity. 3W canisters have a reinforcement ring at this location.
- Propellers: Only use 3W-approved propeller brands and sizes. Propeller blades must be of the same length and flat (max difference of 1/64" in blade height). Propeller tips must have an identical shape, especially for 3 or 4 blade propellers. Propellers must be drilled from the rear using a drill press. A drill guide is recommended. All prop bolts must be hand-tightened easily, otherwise, the propeller is not drilled correctly, which can lead to sheared bolts. Propeller balancing is critical for engine health. Always stay behind the line of the rotating propeller when the engine is running.
- Carburetor Settings: Engines are test-run and pre-adjusted at the factory. Basic settings are: highspeed needle H: 1 1/4, low speed needle L: 1 1/2. Do not remove the carburetor spring as it helps keep the butterfly aligned.
- Carburetor Linkage: Use a metal bracket to extend the carburetor pushrod horn. Solder the arm in place. A soft pushrod for the throttle is not recommended. Use a metal or carbon fiber pushrod with a plastic ball joint or plastic clevis at each end.
- Engine Break-In:
- Use a 2-stroke petroleum-based oil (preferably ashless) that helps break in the engine.
- Use a mixture of 32-1 or even 30-1.
- Use this fuel mixture for approximately 2-3 hours of run time.
- Use a high Octane unleaded fuel (98 Octane is ideal).
- The initial break-in should be done on a test stand for approximately one hour. Do not run the engine at full throttle for more than ten seconds during this test stand break-in.
- Another method for break-in is to set the engine between 2000-2500 rpm and let it run for 4 hours. Ensure adequate cooling.
- After initial break-in, use high-grade fully synthetic 2-stroke oil, and the oil manufacturer's recommended gas to oil mixture. 3W recommends using 3W 2-stroke oil in Germany, or other high-grade 2-stroke oils that perform well.
- The engine needs 12-20 hours running time for the break-in process to be 100% complete.
- Additional Installation Notes:
- Maintain a minimum 4" separation between anything attached to the receiver and all things related to the ignition (i.e., the ignition itself, and its wires, battery, and switch).
- Use a plastic spiral sheath to protect the ignition cables.
- Never remove the sparkplug cap by using a mechanical aid like pliers. Only remove the cap by hand using a twist/pull movement.
- The spark plug cap must be firmly seated to the sparkplug.
- Use only 3W-recommended ignition on/off switches. 6 volts is required for ignition.
- Use a high-quality throttle servo for reliable and accurate carburetor operation.
- Never fill the fuel tank via the carburetor fuel line.
- Use the same I.D. for tank ventilation and the carburetor fuel line.
- Use small plastic cable ties on all fuel line to fitting connections.
- Cut the fuel line in the fuel tank in half and join with a brass tube to prevent folding and cutting off fuel supply.
- Soldered DUBRO barbs on the ends of brass tubing are highly recommended.
- Starting Procedure:
- Ensure the entire manual is read and understood.
- Use a rubber stick to start the engine. Never use hands or fingers!
- Ensure receiver batteries are charged and the receiver is on.
- Ensure ignition battery(s) are charged.
- Ensure transmitter is on, and throttle is set to low.
- Ensure plane is properly and safely anchored.
- Close the choke(s).
- Switch on the ignition.
- Flip the propeller until the engine "pops" (starts and stops quickly).
- Wait for the propeller to stop spinning, turn off the ignition, and open the choke(s).
- Switch the ignition back on.
- Flip the propeller again until the engine starts.
- Warm-up the engine for at least 20 seconds.
- Due to high power and torque, it is not recommended to open the throttle abruptly.
- Precision Tuning of the Carburetor:
- A tachometer is highly recommended for tuning.
- Tune the engine for maximum power with the high needle (H).
- Richen the high needle (H) until the motor runs 100-200 RPM less than the maximum RPM.
- Tune the low needle (L) until the idle RPM remains constant.
- If the idle RPM drops until the engine stops, the low needle (L) is too rich.
- If the idle RPM is too high, the low needle (L) is too lean.
- Check the transition with a quick throttle advance. The engine should not sound strained at any time. It should sound like it is making quick steady power, without any hesitation.
- An optimally tuned engine will feel a bit rich after a cold start. It will start to run right after it has warmed up for approximately one minute.
Maintenance Features:
- Limited Warranty: A 36-month warranty from the date of purchase covers replacement of defective parts due to faulty material or manufacturing. The warranty is voided by non-compliance with installation or operation instructions, mishandling, or unsuitable spare parts. Keep the original receipt and warranty certificate.
- Safe Operation: Any alteration, modification, or addition to the engine not recommended by 3W will void the warranty immediately.
- Warning! Failing to follow instructions can lead to unsafe conditions and damaged equipment. Examples include:
- Unbalanced propellers can damage ball bearings, needle bearings, or break the crankshaft.
- Incorrectly drilled propellers can lead to sheared propeller bolts, accidents, and crashes.
- Loose propeller bolts can also lead to sheared propeller bolts, accidents, and crashes. Check these bolts before starting the engine.
- Flipping the prop with your hand or fingers can lead to serious accidents! Always use a rubber stick to start the engine!
- Important Safety Reminders:
- The plane secure can lead to serious accidents. Depending on its size, one, two, or more helpers may be needed to secure the model.
- Always tell your helpers to be ready for the model to start at full power.
- These engines have a high power output.
- Do not put fingers or any other body parts into the rotating propeller.
- Never tune the carburetor whilst the engine is running! Stop the engine.
- Make sure no gasoline is splashed into the hot muffler(s).
- Only 3W mufflers or mufflers authorized by 3W with an acceptance (test) number should be used.
- Only 3W-ignition systems should be used for proper operation.
- Unauthorized products or failing to follow instructions will void the warranty immediately.
- Pilots Check List:
- Check propeller bolts for tightness.
- Check that the spinner is firmly attached.
- Check the propeller for possible damage.
- Check to be sure you have the throttle position at idle.
- Check all batteries.
- Check servo functions.
- Check to see that the ignition switch is OFF.
- Check pressure (6-8 bar) system of retract (if applicable).
- Check all linkages for play.
- Check your wheels for possible damage and easy running.
- Check the wing mounting for tight fit and proper attachment.
- Check the canopy for tight fit and proper attachment.
- When starting the engine, one person (minimum) has to hold the model.
- Trouble Shooting:
- Engine is flooded: Remove the spark plug; turn the engine to a position where the fuel runs out.
- Engine starts after being choked but then stops soon after: The low needle on the carburetor is probably too lean. Go back to the recommended settings and adjust your carburetor. This may also indicate a dirty carburetor or faulty ignition.
- Engine runs rough and is vibrating strongly: Balance the propeller. Check the ignition timing. Check your plumbing for air/fuel leaks. Check your spark plug for carbon and check the spark plug gap. Check the motor mount to be sure it is rigid. Check to make sure the engine is mounted on a level surface so that the crankcase is free of tension. Check the engine and propeller bolts.
- Engine doesn't reach a normal RPM at full throttle: Check the carburetor settings. Check to see if the propeller is too large. Verify that you have the correct muffler system. Check to see if the engine is overheating. Check the ignition timing. Check the spark plug for defect. Verify you have the correct gasoline, oil, and have mixed them with the correct ratio.