Do you have a question about the 4M Green Science Potato Clock and is the answer not in the manual?
Read all instructions before starting the experiment or activity.
Adult supervision and assistance are necessary at all times during the activity.
This kit and its finished product are intended for children aged 8 and up.
Kit contains small parts that pose a choking hazard; keep away from children under 3.
Metal parts may have sharp edges; adult assistance is required during assembly.
Do not connect parts to AC sockets or batteries to avoid electric shock/short circuit.
LCD may temporarily lose function due to static discharge; reset to resume.
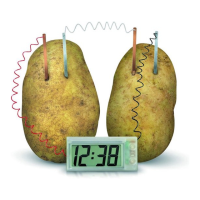
Connect copper and zinc plates with a wire to form a connection pair.
Connect the LCD clock's black wire to zinc and red wire to copper plate.
Insert metal plates into potatoes, ensuring they do not touch each other.
Step-by-step guide to setting the clock's time, date, and minute.
Learn how to view the current time, date, and seconds on the display.
Steps to resolve a weak display, including checking connections and plates.
Use sandpaper to remove rust from metal plates to improve conductivity.
Adjust metal plate distance to improve conduction, ensuring they don't touch.
Verify all connection points and correct polarity for proper function.
Check for touching metal plates or wires that can cause short circuits.
This document describes the "Green Science Potato Clock," a kit designed to demonstrate how to generate electricity using potatoes or other natural materials. It functions as a digital clock powered by an electrochemical cell created from metal strips and potatoes.
The Potato Clock operates as a digital timepiece, displaying the current time, date, and seconds. Its primary function is to illustrate the principles of electrochemistry by using common household items to generate enough electricity to power a low-voltage device. The clock itself is a digital LCD display with wires for connection. The power source is created by inserting copper and zinc strips (electrodes) into potatoes (electrolytes), forming a simple battery. Two potatoes are typically required to generate sufficient voltage to run the clock. The chemical reaction between the metals and the potato's internal particles produces an electric current, which then flows through the connecting wires to power the clock.
Assembly and Setup:
Clock Operation:
Experimentation: The kit encourages further experimentation beyond potatoes. Users can try different liquids like salt water, fruit juices (lemon, orange, tomato), or other fruits and vegetables to power the clock. This allows for exploration of various electrolytes and their effectiveness in generating electricity.
Troubleshooting Weak Display: If the potato clock produces a weak display, several steps can be taken:
General Care and Safety:
| Product Name | 4M Green Science Potato Clock |
|---|---|
| Category | Science Education products |
| Age Range | 8 years and up |
| Batteries Required | No |
| Manufacturer Recommended Age | 8 years and up |
| Contents | wires, transparent tapes, copper and zinc strips, and detailed instructions |
| Power Source | Potato |