A. SAFETY MESSAGES
1. Adult assistance and supervision are required at all times. 2. This kit is intended for children over the age of 5. 3. This kit and its
finished product contain small parts which may cause choking if misused. Keep away from children under 3 years old. 4. Do not grab
humans, animals or any objects that could break.
B. CONTENTS
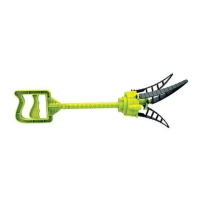
Part A: Handle x 1, Part B: Shaft x 1, Part C: Grip x 1, Part D: Hub x 1, Part E: Gripper arm x 3, Part F: Trigger x 1, Part G: End cap x 1,
Part H: Collar x 1, Part I: Washer screw x 1, Part J: Screws x 4. Also required but not included in the kit: small crosshead screwdriver.
C. ASSEMBLY
CHOKING HAZARD - Small parts.
Not for children under 3 years.
TO PARENTS: PLEASE READ THROUGH THESE
INSTRUCTIONS BEFORE PROVIDING GUIDANCE
TO YOUR CHILDREN.
PLEASE SCAN THE QR CODE TO VIEW MULTI-LANGUAGE INSTRUCTIONS
1. Slide the end of the shaft (B) that has a pin on it into the hub (D), lining up the flat side on the shaft with the flat edge inside the hub.
2. Slide the end cap (G) along the shaft onto the hub. Make sure you line up the wide ridge on the end cap with the wide slot on the hub.
Secure the cap and the shaft by the washer screw (I).
3. Clip the trigger (F) onto the end of the shaft.
4. Put the handle (A) in place under the shaft.
2x2R
Content
Assembly
x4
x3
A B C
D FE HG I
J
A
B
D
F
G
I
1 2
3
4
2x2R
Content
Assembly
x4
x3
A B C
D FE HG I
J
A
B
D
F
G
I
1 2
3
4