Do you have a question about the 510 DESIGN Laurel and is the answer not in the manual?
Assemble the Leg Metal Frame (P3) to the Support Rail (P2) with specified bolts, lock washers, and flat washers.
Attach the Stretcher (P4) to the Leg Metal Frame (P3) and Support Rail (P2) using bolts, lock washers, and flat washers.
Insert Plastic Caps (H6) into the designated holes for the bolts (H2).
Assemble the metal frame to the Top Frame (P1) using specified bolts, lock washers, and flat washers.
Turn the table upright and adjust levelers to ensure stability. Check all hardware.
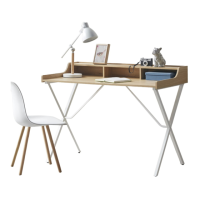
This document provides assembly instructions for the Laurel Desk, a piece of furniture designed for general use, likely as a workspace or study area. The desk is characterized by its metal frame construction, offering a sturdy and stable design.
The Laurel Desk serves as a functional surface for various activities, such as working, studying, or holding items. Its design incorporates a top frame for the primary work surface, supported by a metal leg frame and stretcher components that provide structural integrity. The desk is intended for indoor use and requires assembly by the user.
The desk requires a multi-step assembly process, designed to be straightforward but emphasizing the importance of following instructions carefully.
Leveling: The desk includes levelers on each leg. Users are instructed to adjust these levelers (up or down) to ensure the desk is stable and level on uneven surfaces. This feature is crucial for preventing wobbling and ensuring a comfortable user experience.
A critical maintenance feature highlighted in the manual is the need for periodic inspection and re-tightening of bolts. The instructions state: "BOLTS MAY LOOSEN DURING NORMAL EVERYDAY USE. THEY SHOULD BE PERIODICALLY INSPECTED AND RE-TIGHTENED TO PREVENT DAMAGE OR INJURY. ALWAYS CHECK TO ENSURE THAT ALL HARDWARE IS KEPT TIGHTENED." This emphasizes the importance of routine maintenance to ensure the desk remains stable, safe, and durable over time. The use of lock washers (H3) in the design also contributes to maintaining bolt tightness, but regular manual checks are still recommended.
The assembly instructions recommend assembling the desk on a flat, soft surface such as carpet or cloth. While primarily an assembly tip, this also implies a general care recommendation to prevent scratching the desk's finish during handling or movement, contributing to its aesthetic longevity.
In summary, the Laurel Desk is a user-assembled furniture item with a metal frame, designed for stability and functionality. Its key features include a detailed assembly process, integrated leveling capabilities, and a strong emphasis on safety and ongoing maintenance through regular hardware checks.
| Brand | 510 DESIGN |
|---|---|
| Model | Laurel |
| Category | Indoor Furnishing |
| Language | English |