EasyManua.ls Logo

510 DESIGN ZEUS User Manual

510 DESIGN ZEUS
6 pages
To Next Page IconTo Next Page
Page #1 background imageLoading...
Page #1 background image
Page 1 of 6
Description
QTY
Parts List
Item
P1
P2
Side Panel (Left)
1
ASSEMBLY INSTRUCTIONS
Description: ZEUS ACCENT BENCH
Pre-assembly:
Take out all parts and hardware from box.
Do not discard any content until assembly is complete to avoid accidentally discarding small parts or hardware.
Important safety instructions:
Please read carefully all instructions before assembly.
For your safety and ease, assembly by two or more adults is recommended.
Keep instructions for future use.
Side Panel (Right)
P3
Top Panel
P4
Bottom Panel
P5
Base Panel
P6
Vertical Panel
Back Panel
P7
Base Support Panel
P8
Cushion
P9
2
1
1
1
1
1
1
1
Question and Answer IconNeed help?

Do you have a question about the 510 DESIGN ZEUS and is the answer not in the manual?

510 DESIGN ZEUS Specifications

General IconGeneral
Brand510 DESIGN
ModelZEUS
CategoryIndoor Furnishing
LanguageEnglish

Summary

Important Information

Safety Instructions

Essential safety guidelines to follow before and during assembly for user protection and proper product handling.

Pre-Assembly Checks

Steps to prepare for assembly, including verifying parts and ensuring no components are misplaced or discarded prematurely.

Parts Identification

List of all components included in the package, detailing item codes, descriptions, and quantities for verification.

Assembly Guide

Hardware and Tools

Details of all hardware components, extra hardware, and necessary tools required for the assembly process.

Step 1: Base Panel Preparation

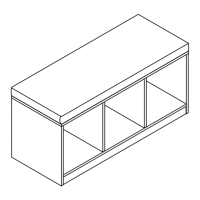
Assemble the unit on a flat, soft surface and insert dowels into the designated panel holes.

Step 2: Attaching Vertical Panels

Secure the vertical panels to the bottom panel using screws and the provided Allen wrench.

Step 3: Installing Back Panel

Attach the back panel to the assembled structure using screws.

Step 4: Adding Support and Base Panels

Attach the base support panel and the base panel to the unit.

Step 5: Securing Side Panels

Attach the left and right side panels to the assembly using screws.

Step 6: Attaching Top Panel

Install the top panel onto the assembled unit using screws.

Step 7: Attaching Legs

Secure the legs to the bottom of the assembled unit by tapping them in with a hammer.

Step 8: Final Touches

Apply stickers to cover visible screws for a clean finish.

Step 9: Cushion Installation

Fix the cushion onto the assembled bench structure.

Related product manuals