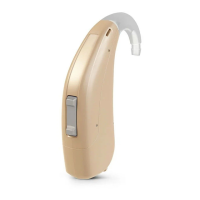
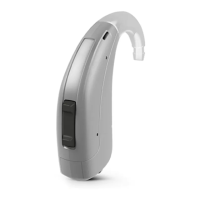
This document serves as a user guide for A&M XTM XP/P A4, STF XP/P T3, and STF P T1 hearing instruments. These are Behind-The-Ear (BTE) models designed to deliver sound into the ear via a tube. The instruments are not intended for children under 3 years of age or persons with a developmental age under 3 years. The hearing instruments come with pre-configured sound profiles, which are set by a Hearing Care Professional.
Function Description
The primary function of these devices is to amplify sound for individuals with hearing impairment. Sound is captured by microphone openings, processed, and then delivered into the ear canal through an ear piece and tube. The devices are designed for daily wear to help users adjust to them and receive maximum benefit.
Important Technical Specifications
- Instrument Type: BTE (Behind-The-Ear) models.
- Sound Delivery: Via a tube into the ear.
- Sound Profiles: Pre-configured and set by a Hearing Care Professional.
- Battery Types: Supports battery sizes 13 and 675.
- Controls: Features a rocker switch for volume adjustment.
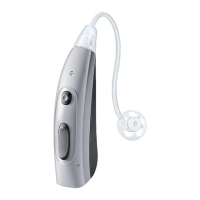
- Microphones: XTM P A4 models include a second microphone.
- Side Markers: Red marker for the right ear, blue marker for the left ear.
Usage Features
Getting Started:
It is recommended to familiarize yourself with the controls and their location on the instrument before wearing them.
Components and Names:
The hearing instruments consist of several key components:
- Ear piece: The part that fits into the ear canal.
- Adapter for ear piece: Connects the ear piece to the tube.
- Tube for earhook: Carries sound from the hearing instrument to the ear piece.
- Earhook: Sits over the top of the ear.
- Microphone openings: Capture sound from the environment.
- Second microphone (XTM P A4 only): Enhances sound capture for specific models.
- Rocker switch (control): Used for manual volume adjustment.
- Battery compartment (on/off switch): Houses the battery and serves as the on/off mechanism.
Battery Usage:
- Low Battery Indication: Sound becomes weaker or an alert signal is heard.
- Battery Size: Users should consult their Hearing Care Professional for recommended battery sizes (13 or 675).
- Handling Tips:
- Always use the correct battery size.
- Remove batteries if not using the instruments for several days.
- Always carry spare batteries.
- Remove empty batteries immediately and dispose of them according to local recycling rules.
- Replacing Batteries:
- Open the battery compartment.
- Push the old battery out.
- If the new battery has a protective film, remove it only when ready to use.
- Insert the new battery with the "+" symbol facing up.
- Carefully close the battery compartment. Do not force it if resistance is felt, as this indicates incorrect insertion.
Daily Use:
- Turning On/Off:
- Turning off: Open the battery compartment fully.
- Turning on: Close the battery compartment. The instruments will turn on after a short delay, allowing insertion into the ears without feedback whistling.
- Inserting the Hearing Instruments:
- Hold the tube close to the ear piece.
- Carefully push the ear piece into the ear canal.
- Twist it slightly until it sits well. Open and close your mouth to avoid air accumulation.
- Lift the hearing instrument and slide it over the top of your ear.
- Caution: Insert the ear piece carefully and not too deeply to avoid injury.
- Tips: Using the right hand for the right instrument and left hand for the left instrument can be helpful. If insertion is difficult, gently pull the earlobe downwards to open the ear canal.
- Removing the Hearing Instruments:
- Lift the hearing instrument and slide it over the top of your ear.
- Hold the tube close to the ear piece and pull the ear piece out carefully.
- Caution: In rare cases, the ear piece may remain in the ear. If this happens, seek removal by a medical professional.
- Adjusting Volume:
- The instruments automatically adjust volume to the listening situation.
- For manual adjustment, briefly press the rocker switch.
- Signal tones indicate volume changes. Different tones are heard at maximum/minimum levels and for the default volume level (depending on instrument type).
Signal Tones:
The device provides various signal tones for different situations:
- Volume up
- Volume down
- Maximum volume reached
- Minimum volume reached
- Default volume level (not for XTM XP A4, XTM P A4)
- Startup melody (not for STF P T1)
- Battery low
Maintenance Features
General Maintenance and Care:
- Drying and Storage:
- Dry hearing instruments overnight.
- Consult a Hearing Care Professional for recommended drying products.
- For long periods of non-use, store instruments with open battery compartments and removed batteries in a drying system to prevent moisture damage.
- Cleaning:
- Clean daily with a soft, dry tissue.
- Never use running water or immerse devices in water.
- Never apply pressure while cleaning.
- Consult a Hearing Care Professional for recommended cleaning products, special care sets, or further advice.
Ear Pieces and Tubes Maintenance:
- Cerumen Accumulation: Cerumen (ear wax) can accumulate and affect sound quality. Clean ear pieces daily.
- Standard Ear Pieces:
- Exchange approximately every three to six months, or sooner if cracks or changes are noticed.
- Ask a Hearing Care Professional to clean or exchange tubes as needed.
- Custom-Made Ear Pieces:
- Ask a Hearing Care Professional to clean or exchange ear pieces and tubes as needed.
- Cleaning Ear Pieces:
- Clean upon removal with a soft and dry tissue to prevent cerumen from drying and hardening.
- Never use running water or immerse the ear piece in water.
- Exchanging Standard Ear Pieces:
- Pull off the used ear piece and plug on the new ear piece. This applies to XTM P A4, XTM XP A4, STF P T3, STF XP T3, and STF P T1 models, with specific visual instructions provided for each type.
Professional Maintenance:
- A Hearing Care Professional can perform thorough professional cleaning and maintenance.
- Custom-made ear pieces and wax filters should be exchanged as needed by the professional.
- Users should ask their Hearing Care Professional for individual recommendations on maintenance intervals and support.
Troubleshooting:
The guide provides solutions for common problems:
- Sound is weak: Increase volume, replace empty battery, clean or exchange ear piece.
- Hearing instrument emits whistling sounds: Reinsert ear piece securely, check tube/adapter/ear piece connections, decrease volume, clean or exchange ear piece.
- Sound is distorted: Decrease volume, replace empty battery, clean or exchange ear piece.
- Hearing instrument emits signal tones: Replace empty battery.
- Hearing instrument does not work: Turn on instrument, gently close battery compartment, replace empty battery, ensure battery is inserted correctly, wait for power-on delay to complete.
- For further problems, users should consult their Hearing Care Professional.