1. FEATURES
2. UNIQUE FEATURES
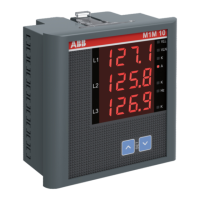
M1M 10
L1 L2 L3
L1 L2 L3
L1
Warning! Installation by person with
electrotechnical expertise only.
6.1. Star connection (3E) 3 phase 4 wire system
6.2. Delta connection (2E) 3 phase 3 wire system
6. WIRING DIAGRAM
6.3. Single phase connection
Note: Wiring should be in accordance with the National Electrical Code and/or
the Canadian Electrical Code, Part I.
For DC AUX Voltage, +/-ve can be connected anyway.
3. KEY FUNCTIONS
ABB India Limited
88/3, 88/6, Basavanahalli,
Nelamangala Taluk,
Bengaluru - 562123
Karnataka INDIA
www.abb.com
Contact us
STAR (Wye)/ DELTA/1 phase programmable
Universal Auxiliary (80 - 300 VAC / DC) supply
PT ratio / CT ratio programmable including CT secondary
User configurable (editable) password
Simultaneous sampling of Volts & Amps
True RMS measurement
Universal Voltage Input (50 - 550 VAC) and
Current Secondary (0.05 to 6A)
Optional Programmable relay output maximum 2
(up to 6 threshold parameters) and tripping time up to180
seconds.
3 row, 4 digit display for better readability.
Auto-scaling of kilo & mega, decimal point.
Compact size and weight
KILO – ON
Kilo
Direct reading
KILO – OFF
Voltage line to line
VLL - ON
Voltage line to Neutral
VLN - On
Amps
A - ON
Frequency
Hz - ON
4. LED INDICATIONS
Enabling auto scrolling: Press UP key continuously for 5 seconds or until
display shows EnbL Auto.Sc for upward scrolling. Press Down key
continuously for 5 seconds or until display shows EnbL Auto.Sc for
downward scrolling.
Disabling auto scrolling: Press any key (UP/DOWN), display show dSbL
Auto.Sc and returns to normal mode.
5. ENABLING AND DISABLING
10
Press DOWN key
Row 1: xxxx
(415.0 -default
/factory set)
Row 2: P. Pri(PT Primary)
7. CONFIGURE (SETUP MODE)
To configure the setup parameters through front panel, the following
steps can be followed.
1
6
Press UP & DOWN
keys together to enter
SETUP
Press DOWN key
Row 1: 0000
with first digit
“0” blinking
Row 2:SEtP (SETUP)
Press UP key
3
Display
will prompt to . Press
UP key to change to
Press UP key
4
SETUP MODE
CLEAR MODE (Only 1310)
2
Press DOWN key
to decrement the first digit
to “9” sequentially come
to digit “1”
Row 1: 1000
with first digit
“1” blinking
Row 2:SEtP (SETUP)
Press DOWN key to
decrement the first digit
to ‘9’ sequentially
come to digit ‘.1’
Option: YES/NO
“Y” for clearing. “n” for not
clearing
Row 2: Display
will prompt to . Press
DOWN key to change to
5
Press UP key
Row 1 : xxxx
Row 2 : xxxx
Row 3 : xxxx
8
9
Press UP key to select
STAR/DELTA/1. PHASE
Press UP key to accept
the selected mode
Row 1: StAr/
dELt/ 1.Phase
Row 2: ELEm
Options can be changed
by pressing DOWN key.
Row 1: StAr/
dELt/ 1.Phase
Row 2: ELEm
selected system blinks
Selected system
stabilizes
7
Press UP key four times
to accept the password.
Row 1: StAr
Row 2: ELEm
(ELEMENT)
Defines the power
system configuration.
Options: STAR /DELTA/
SINGLE PHASE
Default password
‘1000’.
11
12
Press UP key to set
the PT primary value
Press UP key to accept
the edited value for
first digit.
Row 1: First
digit blinks.Edit
the digit using DOWN key.
Row 2 : P. Pri (PT Primary)
Row 1: Second
digit blinking,
can be edited using DOWN key.
Press UP key to accept the
edited value. Continue the
same method till fourth digit.
Row 2 : P. Pri (PT Primary)
Program Range for PT
Primary : 100V to 999kV
Comment: If value set is
above the limit, display
returns to maximum
PT Pri value.
13
Press UP key.
Row 1:Decimal
point blinking.
Can be set at appropriate
location using DOWN key.
Ascertain the correct scale
(Kilo/Mega) is selected by
Letter K/M. Press UP key to
accept the edited value.
Row 2 : P. Pri (PT Primary)
E.g.: To set 11.00kV
Set first four digits(1100)as
explained above keep
pressing DOWN key to
place decimal point at
appropriate location.
Letter K/M will indicate
the Kilo/Mega.
16
17
Press DOWN key
Press DOWN key
Row 1: xxxx
(5.000-default/
factory set)
Repeat steps 7 to 13 to
change the settings.
Row 2: C. Pri (CT Primary)
Row 1: xxxx
(5.000 –default
/ factory set)
Row 2: C.SEC
(CT Secondary).
Program Range for CT
Primary 0.5A to 99kA
Range: 0.5A to 6A
Repeat steps 7 to 13.
14
15
Press UP key.
Press DOWN key
Row 1:Decimal
point blinking.
Can be set at appropriate
location using DOWN key.
Ascertain the correct scale
(Kilo/Mega) is selected by
Letter K/M. Press UP key to
accept the edited value.
Row 2 : P. Pri (PT Primary)
Row 1: xxxx
(415.0 -default
/factory set)
Row 2: P.SEC
(PT Secondary).
Follow the procedure as
described in steps 7 to 13.
E.g.: To set 11.00kV
Set first four digits(1100)as
explained above keep
pressing DOWN key to
place decimal point at
appropriate location.
Letter K/M will indicate
the Kilo/Mega.
Range: 50V to 550V
If value set is above the
limit, display returns to
the maximum PT
sec value.
Input: 1A/5A / 300V L-N 50/60Hz
Input: 1A/5A / 300V L-N 50/60Hz
Input: 1A/5A / 300V L-N 50/60Hz