EasyManua.ls Logo

Abrams TORNADO 3 - User Manual

Abrams TORNADO 3
8 pages
Print Icon
To Next Page IconTo Next Page
Loading...
ABRAMS INSTALLATION MANUAL
INSTALLATION AND CONFIGURATION MANUAL
FOR TORNADO 3 LOW FREQUENCY SIREN SYSTEM
TORNADO 3 LOW FREQUENCY SIREN
MODEL#: TORNADO 3
V.1.4
WWW.ABRAMSMFG.COM
IMPORTANT! PLEASE READ THROUGH ALL
PROVIDED INSTRUCTIONS AND ANY LISTED
WARNINGS IN REGARDS TO PRODUCT USE.
Question and Answer IconNeed help?

Do you have a question about the Abrams TORNADO 3 and is the answer not in the manual?

Summary

Brief Introduction to Tornado 3 Siren

Tornado 3 Siren Dimension Drawings

Tornado Amplifier Dimensions

Provides detailed measurements for the Tornado amplifier unit.

Tornado Speaker Dimensions

Provides detailed measurements for the Tornado speaker unit.

Tornado 3 Siren Wiring and Functions

Wiring Instructions and Connections

Explains how to connect the siren system's wires to the vehicle battery terminals.

Tornado 3 Siren Installation Instructions

Speaker Bracket Mounting

Guides on drilling and mounting speaker brackets securely onto the vehicle.

Loudspeaker Positioning and Wiring

Details on adjusting speaker angles and connecting multiple speakers in parallel.

Amplifier Installation Procedure

Tornado 3 Siren Functional Specifications

Adjustable Tone Duration Settings

Explains tone duration selection via timer and LED indicator patterns.

Important Operational Considerations

Safety Warnings for Installers and Users

Overview

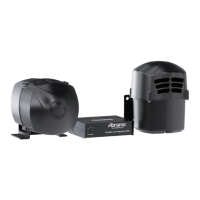
The Abrams Tornado 3 Low Frequency Siren System is an infrasound alarm designed to enhance vehicle safety in high-traffic areas and busy intersections by allowing drivers and pedestrians to "feel" sound waves. This system is engineered to penetrate solid materials more effectively than traditional audible alarms, providing a distinct advantage in alerting those in the vicinity.

Function Description:

The Tornado 3 system operates as a low-frequency alarm, generating tones within the infrasound range, which is below the typical human hearing threshold but can be felt. This unique characteristic allows the sound waves to travel through obstacles, making the warning more impactful in complex urban environments. The system comprises a Tornado Amplifier and two Tornado Speakers, working in conjunction to produce the low-frequency output. The amplifier is equipped with an adjustable timer, allowing the user to set the duration of the alarm tones from 8 to 64 seconds. Once activated, the amplifier will produce tones for the determined period and automatically cease when the duration is reached. The panel features three LED indicators that display the currently selected time setting, with solid circles indicating an active LED and hollow circles indicating an inactive LED.

Important Technical Specifications:

  • Working Voltage: DC12V/24V
  • Standby Current: ≤5mA
  • No-load Current: ≤12mA
  • Power Amplifier Current: 8A±1A
  • Output Voltage: AC29V±1V
  • Frequency Range: 180Hz-500Hz
  • Impedance: 11Ω (Siren), 2Ω (Speaker in parallel)
  • Working Environment Temperature: -40°C to +55°C
  • Working Temperature: -40°C to +65°C
  • Relative Humidity: 20% - 93% (at 40°C)
  • Atmospheric Pressure: 86kPa - 106kPa
  • Working Humidity: 35% - 80%

Usage Features:

The system's primary usage feature is its ability to generate low-frequency tones that are felt rather than just heard, providing a more effective warning in situations where traditional sirens might be less impactful. The adjustable timer allows for customization of the alarm duration, making it adaptable to various operational needs. The LED indicators on the amplifier panel provide clear visual feedback on the selected alarm duration.

Wiring and Installation:

  • Amplifier Wiring:
    • Red Wire: Positive battery terminal
    • Black Wire: Negative battery terminal
    • Brown Wire: Loudspeaker Positive
    • Brown/White Wire: Loudspeaker Negative
    • White Wire: Activation Switch +
    • Blue Wire: Voltage Detection Input
    • Gray Wire: Common Line Input
  • Speaker Connection: The two speakers must be connected in parallel phases for optimal efficiency.
  • Mounting:
    • Speakers: Requires drilling four Ø8.5 holes in the vehicle to match the speaker bracket. The support bracket is mounted to the speaker using supplied M8x30 screws. The loudspeaker position can be adjusted.
    • Amplifier: Installed using an outer hexagon bolt M6x10 (steel) (304) and flat round head self-tapping screw ST5x16 (white) for bracket mounting holes.
  • Safety Precautions:
    • Ensure proper installation by individuals with a good understanding of automotive electronics.
    • Avoid staring directly into high-intensity LEDs to prevent momentary blindness or eye damage.
    • Do not install the product or route wires in the air bag deployment area.
    • When drilling, ensure no vehicle components are damaged. Deburr holes and install grommets.
    • Connect the product ground wire directly to the negative (-) battery post for optimum efficiency.
    • Do not activate or control the device in hazardous driving situations.
    • Disconnect all power when moving the low-frequency alarm system; hot-plugging is not allowed.
    • Amplifier and speakers must be matched for proper operation.
    • Do not connect to the car battery until all parts are installed and no short circuit.
    • Take protective measures to avoid sparks when connecting to the battery.
    • Ensure the ground wire is connected to the negative.
    • Keep the speaker port clear of any obstacles to avoid sound reduction.
    • Do not install the speaker where it may interfere with airbag sensor operation.
    • The low frequency is an efficient infrasound and cannot be activated continuously.

Maintenance Features:

  • Regular Inspection: Inspect and operate the product regularly to confirm proper operation and mounting condition.
  • Cleaning: Do not use a pressure washer to clean the product.
  • Storage: It is recommended to store these instructions in a safe place for future reference during maintenance or reinstallation.
  • Environmental Considerations: Keep the product in a ventilated, dry position to avoid damage from moisture, direct sunlight, etc. Avoid magnetic field interference by keeping it away from other electronic products like on-board DVDs or air conditioners.
  • Power Disconnection: Power must be turned off before installing or servicing the amplifier and speaker.
  • User Manual Adherence: Confirm that connections, power supply, and other aspects of the low-frequency alarm system meet the requirements outlined in the user manual.

Warranty:

The Abrams Tornado 3 Low Frequency Siren System comes with a 5-year limited warranty from the date of purchase or delivery. The warranty covers units demonstrated to be defective within this period and will be replaced. Improper installation, use of inappropriate wiring, circuit protection, abuse, unusual use, accidents, or destruction of the product are not covered. Abrams is not liable for consequential, indirect, or special damages.

Abrams TORNADO 3 Specifications

General IconGeneral
BrandAbrams
ModelTORNADO 3
CategorySecurity System
LanguageEnglish

Related product manuals