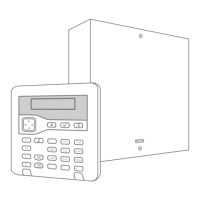
1. Wählen Sie einen Montageort aus:
Die Zentrale muss wie folgt platziert werden:
- Innerhalb des geschützten Bereichs (aber nicht in einer Ein- oder Ausgangszone).
- Außerhalb der Sichtweite potenzieller Eindringlinge.
- Aufrecht (Batterie unten) an einer Wand oder einer anderen achen Oberäche
(um Manipulationsversuche von hinten zu verhindern).
2. Entfernen Sie den Deckel der Zentrale:
- Lösen Sie die Schrauben an der Vorderseite des Deckels und heben Sie ihn ab
3. Montieren Sie die Zentrale:
- Montieren Sie die Zentrale mit Hilfe der drei Befestigungslöcher und mindestens 40mm langen 4mm Schrauben.
Verwenden Sie die vorgesehenen Befestigungsbohrungen
4. Schließen Sie alle Kabelgebundenen Geräte an:
- Schließen Sie alle verdrahteten Komponenten außer der Batterie an
5. Schließen Sie die Batterie an:
- Setzen Sie einen Akku in die linke untere Ecke der Zentrale ein
- Schließen Sie die Batteriekabel an die Batterie an (rot an den Pluspol und schwarz an den Minuspol)
- Verbinden Sie das Kabel mit der Leiterplatte
- Hinweis: Durch das Anschließen der Batterie wird das System nicht gestartet
6. Schließen Sie das Netzkabel an:
- Warnung: Stellen Sie sicher, dass die Stromversorgung unterbrochen und isoliert ist!
- Schließen Sie das Netzkabel an die Klemmleiste an und bringen Sie eine Zugentlastung an
- Schalten Sie das Gerät erst ein, wenn der Deckel wieder montiert ist
7. Den Deckel wieder anbringen, das System einschalten und kongurieren:
- Gehen Sie durch die Eingabeauorderung zur Erstkonguration und richten Sie das System ein.
1. Select a mounting location:
The control panel must be placed as follows:
- Inside the protected area (but not in an entry or exit zone).
- Out of sight of potential intruders.
- Upright (battery down) on a wall or other at surface (to prevent tampering attempts from behind).
2. Remove the cover of the control panel:
- Unscrew the screws on the front of the cover and li it o.
3. Mount the control panel:
- Mount the control panel using the three mounting holes and at least 40mm long 4mm screws. Use the mounting holes provided
4. Connect all wired components:
- Connect all wired components except the battery.
5. Connect the battery:
- Insert a battery into the lower le corner of the control panel
- Connect the battery cables to the battery (red to the positive terminal and black to the negative terminal)
- Connect the cable to the circuit board
- Note: Connecting the battery will not start the system.
6. Connect the mains cable:
- Warning: make sure the power supply is disconnected and isolated!
- Connect the mains cable to the terminal strip and t a strain relief
- Do not switch on the unit until the cover has been retted
7. Replace the cover, switch on the system and congure it:
- Go through the initial conguration prompt and set up the system.
- For more information, refer to the installation manual. This is available for download at www.abus.com.
Montageanleitung
Assembly instruction • Instructions de montage • Monteringsvejledning •
Montering af alarmcentralen • Montagehandleiding • Istruzioni di montaggio
 Loading...