EasyManua.ls Logo

Accu-Chek Insight - User Manual

Accu-Chek Insight
6 pages
Print Icon
To Next Page IconTo Next Page
Loading...
Accu-Chek Insight Insulin Pump
Insulin is delivered from a cartridge held inside the pump. The pump is
pre-programmed to deliver insulin continuously (basal insulin) to keep the blood glucose
constant. When any carbohydrates are eaten the carbohydrate amount needs to be entered
into the handset by the user/carer. The handset will then advise an additional amount of
insulin to be delivered (bolus insulin).
Navigating the pump and handset
The pump (figure 1
) is attached to a thin flexible tube the infusion set - which is inserted
into the skin of the abdomen or buttock via a fine needle called a cannula. The cannula is
held in place by an adhesive dressing. The pump itself can be operated independently or by
using the handset (
figure 2), which communicates with the pump via Bluetooth®.
Figure 1
Question and Answer IconNeed help?

Do you have a question about the Accu-Chek Insight and is the answer not in the manual?

Summary

Navigating the Pump and Handset

Button Functions

Details the functions of various keys on the pump's interface, including navigation and action buttons.

Status Screen

Pump Status

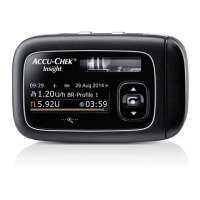
Indicates if the insulin pump is currently running or stopped.

Communication Icon

Shows that the handset and pump are communicating.

Basal Icon

Denotes an active basal rate profile or temporary basal rate.

Basal Rate

Displays the basal rate in units per hour or percentage of active profile time.

Bolus Type Icon

Indicates the type of bolus that is currently active.

Bolus Insulin Remaining

Shows the amount of bolus insulin still active.

Bolus Time Remaining

Indicates the remaining time for extended or multiwave boluses.

Bolus Progress Bar

Visually represents the amount and duration of an active bolus.

Cartridge Level

Shows the number of units of insulin remaining in the cartridge.

Pump Battery Level

Displays the remaining charge of the pump's battery.

How to Use the Accu-Chek Insight Pump to Give Insulin at School

Carbohydrates

Setting the number of carbohydrates consumed to calculate insulin dosage.

Meal Time

Selecting the time the meal was consumed for record-keeping.

Health Events

Option to select specific health events as advised by a healthcare professional.

Note

Optional feature to add notes to the record, useful for parents.

How to Set Temporary Basal Rates

Exercise and Snacks

Guidance on using temporary basal rates during exercise and for snacks.

Pump Removal for Sports

Recommendation to remove the pump during high-impact sports.

Stopping the Pump

Suspend Insulin Delivery

Procedure to stop all basal and bolus insulin delivery.

Resume Insulin Delivery

Procedure to restart basal and bolus insulin delivery.

Warnings and Errors

Information on audible alarms, warning messages, and error codes.

Troubleshooting Messages

Warnings

Details common warnings like low cartridge or battery, and invalid time/date.

Maintenance Messages

Explains maintenance alerts such as cartridge empty, battery dead, or occlusion.

Errors

Lists error codes like mechanical or electronic errors requiring support.

Overview

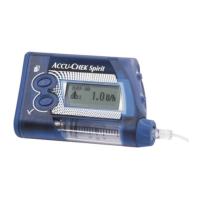
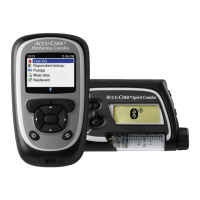
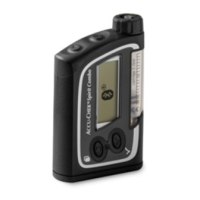
The Accu-Chek Insight Insulin Pump is a medical device designed for continuous insulin delivery, primarily for individuals requiring basal and bolus insulin. The pump holds an insulin cartridge and is pre-programmed to deliver basal insulin continuously to maintain stable blood glucose levels. When carbohydrates are consumed, the user or carer enters the carbohydrate amount into the handset, which then calculates and advises an additional amount of bolus insulin to be delivered.

Usage Features:

The pump is attached to the body via a thin, flexible infusion set, which includes a cannula inserted into the skin of the abdomen or buttock. The cannula is secured with an adhesive dressing. The pump can be operated independently or via a handset, which communicates with the pump using Bluetooth® technology.

Pump Navigation and Handset:

The pump features several buttons for navigation and control:

  • Back/Quick Bolus Keys: These keys have identical functions in most situations. They can move to the previous entry field (back), cancel a setting, stop a function, start Quick Bolus programming, set the Quick Bolus amount, cancel a bolus, move to the status screen (double click), and stop repetitive STOP mode warnings.
  • Up Key (▲): Moves up in a menu screen, increases a setting, and provides access to the quick info screen.
  • OK Key: Moves to the next menu level, confirms a setting, and starts a function.
  • Down Key (▼): Moves down in a menu screen, decreases a setting, and provides access to the quick info screen.
  • Zoom Key: Enlarges or reduces characters on the display.
  • Key Lock: Can be disengaged by pressing the Up and Down keys simultaneously.

Handset Interface:

The handset displays various information and menu options:

  • Title Bar: Shows handset information.
  • Power On/Off Button: Controls the power of the handset.
  • Scroll Bar: Appears when there is more information than fits on the screen.
  • Menu Selections: Includes options like Meter, Bolus, Pump, My Data, Communication, and Settings.
  • Pump Communication Icon: Indicates when the handset and pump are communicating.
  • Go to Status Screen: Navigates to the Status Screen for detailed pump information.
  • Go to Quick Notes Screen: Navigates to the Quick Notes Screen.

Status Screen:

When paired with the pump, the Status screen displays the pump's status and information from the most recent valid blood glucose test. Touching either the Pump Status or blood glucose (bG) Status portion of the screen allows viewing a full-screen version. Key elements of the Status Screen include:

  1. Pump Status: Indicates if the pump is running or stopped.
  2. Communication Icon: Shows if the handset and pump are communicating.
  3. Basal Icon: Indicates an active basal rate profile or temporary basal rate.
  4. Basal Rate: Displays the basal rate in units per hour. For temporary basal rates, it also shows the percentage value of the active basal rate time block.
  5. Bolus Type Icon: Indicates the type of active bolus.
  6. Bolus Insulin Remaining: Shows the amount of bolus insulin remaining for the active bolus.
  7. Bolus Time Remaining: Displays the time remaining for an extended or multiwave bolus.
  8. Bolus Progress Bar: Visually represents the amount and duration of the active bolus (not visible if no bolus is being delivered).
  9. Cartridge Level: Shows the number of insulin units remaining in the cartridge.
  10. Pump Battery Level: Shows the remaining charge of the pump battery.

Giving Insulin at School (Example Scenario):

A key worker or young person will need to give a bolus of insulin daily when blood glucose is greater than 14 mmols/L or when consuming carbohydrates. The process involves:

  1. Preparation: Prepare the finger pricker as instructed, ensuring hands are washed and dried.
  2. Test Strip Insertion: Place the handset on a flat surface, turn it on, and insert the test strip into the slot.
  3. Blood Application: Touch a blood drop against the front edge of the yellow window of the test strip. The "Analyzing" screen appears once enough blood is applied.
  4. Result Display: The blood glucose result appears on the display.
  5. Information Entry: Enter the child's information, meal time, carbohydrates consumed, and any relevant health events as advised by a healthcare professional or parent.
  6. Bolus Delivery: Select "Next" and then "OK" to deliver the bolus. If the young person is not eating, carbohydrates should be entered with a value of 0g.

Setting Temporary Basal Rates:

Temporary basal rates are set when the child or young person undertakes exercise. This helps maintain blood glucose levels by decreasing basal insulin alongside snacks. The pump can remain attached during exercise but should be removed during contact sports to prevent injury and pump damage.

  1. Access Basal Settings: From the Main Menu, select "Pump," then "Basal."
  2. Select Temporary Basal Rate: Choose "Temporary Basal Rate."
  3. Select Basic TBR: Select "Basic TBR" or a named preset one.
  4. Set Percentage and Duration: Set the percentage and duration of the Basic TBR, then select "Next" and "OK."
  5. Status Screen Update: The meter displays the Status screen with the current TBR information.

Stopping and Resuming Insulin Delivery:

  • To Suspend: From the Pump status screen, press the OK key to access the Main Menu. Navigate to "Stop pump" and press OK. The "Pump stopped" screen appears, allowing disconnection of the infusion set.
  • To Resume: From the Pump stopped screen, press the OK key to access the Main Menu. Navigate to "Start pump" and press OK. The "RUN" screen appears, and the pump resumes insulin delivery.

Maintenance Features:

The pump includes warnings and error messages to alert users to potential issues. These are accompanied by an audible alarm that sounds continuously until addressed. The alarm can be silenced by pressing the Back/Quick Bolus key twice.

Warnings (W messages):

  • W31 Cartridge Low: Change the cartridge before it's empty.
  • W32 Battery Low: Replace the battery as soon as possible.
  • W33 Invalid Time/Date: Set the time and date.
  • W36 TBR Cancelled: Put the pump into RUN if necessary, ensure cancellation was intended, and program a new Temporary Basal Rate.
  • W38 Bolus Cancelled: Put the pump into RUN if necessary, ensure cancellation was intended, and program a new bolus.

Maintenance Messages (M messages): These require immediate action and will put the pump in PAUSE or STOP mode.

  • M21 Cartridge Empty: Insert a new cartridge.
  • M22 Battery Empty: Insert a new battery.
  • M23 Automatic Off: Indicates no pump key was pressed during the specified period for Automatic off. The pump will be in STOP mode.
  • M24 Occlusion: Insulin cannot flow freely. Change the complete infusion set. If the message recurs, change the cartridge.
  • M26 Cartridge Change Not Completed: The cartridge change process was interrupted. Repeat the cartridge change.

Errors (E messages): These mean the pump will stop delivering insulin until the problem is resolved.

  • E6 Mechanical Error: Refer to the User Guide or contact Accu-Chek Insulin Pump Careline.
  • E7 Electronic Error: Refer to the User Guide or contact Accu-Chek Insulin Pump Careline.
  • E10 Rewind Error: Refer to the User Guide or contact Accu-Chek Insulin Pump Careline.

Accu-Chek Insight Specifications

General IconGeneral
Device TypeInsulin Pump
DisplayColor touchscreen
ConnectivityBluetooth
ManufacturerRoche Diabetes Care
Reservoir Capacity200 units
Bolus Increment0.1 U
Battery TypeAAA alkaline
Water ResistanceIPX8 (protected against continuous immersion in water)
Bolus OptionsStandard bolus, extended bolus, multiple bolus
Battery LifeUp to 30 days

Related product manuals