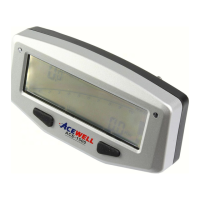
Thanks for purchsaing an Acewell ATV/Motorcycle/Scooter computer. This
manual is specifically designed for ACE-325X/395X-XX series. The ACE-325X
does not have any extra LED indicator. The ACE-395X-XX series has 4-8 LED
indicators. ACE-395X-XX has aluminum CNC cases and ACE-39XX has plastic
housing. Different model has different LED indicators; all other functions are the
same. You may find that the photo has a set of LED indicators different from your
computer; the photo is for reference only.
ATV/Motorcycle Computer
ACE-325X/395X-XX series User's Manual
www.acewell-meter.com English
FEATURES
SPE
C
I
FI
CA
TI
ONS
PANEL DESCRIPTIONS
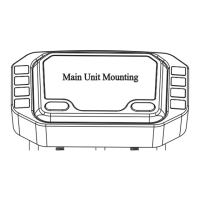
INSTALLATION & PARTS
Main Unit Mounting
Speed Sensor & Magnet Mounting
RPM Sensor Mounting
Fixing Screw Nut
Rubber Pad
Washer
Spring Washer
Attention:
1.Align the center of the magnet to
either of the sensor marking line
or the end of the sensor.
2.Installing the sensor parallel to
the vibration direction creates
optimal anti-vibration effect.
3.Make sure the gap between the magnet
and the sensor is within 8mm.
Max8mm
Vibration Direction
sensor
Max8mm
Vibration Direction
sensor
CDI
Ignition Coil
RPM-INPUT
Either One
2-5 Turns
Power Input: 12VDC.
Speed Sensor: Reed Sensor or Hall Sensor
Tachometer Input: CDI or Ignition-coil signal.
Temperature Sensor: Thermo Sensor
Wheel Circumference setting: 1mm - 3999 mm (1 mm increment)
Operation Temperature: -10
℃
- +80
℃
(inner housing)
Storage Temperature: -25
℃
- +85
℃
(Inner housing)
Dimensions:
130x78x30.5mm (ACE-395X-XX)
125x78x28.5mm (ACE-395X), 95.2x72x27mm (ACE-3250)
E
13
10R-022812
Left-Direction Indicator/Green
Main-Beam Headlamp/Blue
Right-Direction Indicator/Green
Hazard Warning/ Red
Parking/Green
Direction Indicator/Green
Engine Oil / Red
Neutral Gear /Green
Reverse Gear /Red
Drive Gear /Green
Engine coolant temperature/ Red
P
D
R
N
Rear Fog Lamp/Amber
Trailer Flashers/Green
Engine "Not In Use"/Red
1. Tachometer Scale
2. Bar Tachometer
3. 1st row: Current & Max.
Speedometer
4. 2nd row display: Other functions
5. RESET Button
6. MODE Button
8. Thermometer Bar
7. Fuel Bar
9. RPM warning Indicator
10. Temperature Warning
Indicator
Displays bar-graphic tachometers, speedometer, bar fuel meter, bar
thermometer and one of other functions at the same time.
Optional bar-graphic tachometer scale of 8,000rpm or 16,000 rpm
for different bikes.
Allows end user to adjust odometer when the odometer is less than
30 km, after that the odometer is always stored in memory even
when the power is off.
The main unit built-in 4-8 LED indicators for different purpose
application.
Three options fuel meter input resistance 100, 250 and 510£[ are
available.
Universal speed sensing circuit for reed sensor and hall sensor.
Includes bracket, RPM sensing wire, speed sensor, thermo sensor,
fitting kits and wiring harness.
Water resistance, vibration (10G) and mechanical shock (100G)
resistances tested.
1 Second
1 Minute
9999H59'
0:00'00"- 99:59'59"
Riding Time
Total Time
SPECIFICATIONS
2.3-300.0KM/h (187.5M/h)
MAX 2.3-300.0KM/h (187.5M/h)
AVG 2.3-300.0KM/h (187.5M/h)
0.0-999.9 Km (624.9 Miles)
0.0 - 999999 Km (0.0- 624999 Miles)
250-8,000 or 500-16,000 rpm
Bar Tachometer
Odometer
Trip Meter 1&2
Maximum Speed Meter
Speed Meter
SymbolFUNCTION
250/500 rpm
1 Km or Miles
0.1 Km or Miles
0.1 KM/H or MPH
0.1 KM/H or MPH
0.1 KM/H or MPH
INCREMENTS
± 50PPM
±1% or
± 0.1(KPH/MPH)
±0.1%
± 0.1%
± 50PPM
ACCURACY
Average Speed Meter
±1% or
± 0.1(KPH/MPH)
±1% or
± 0.1(KPH/MPH)
TT
RT
ODO
TRIP 1&2
AVG
MAX
Digital Tachometer
RPM
100-19,900rpm
100 rpm
Shift Warning
Maximum Tachometer
MAX
RPM
RPM
100-19,900rpm
100-19,900rpm
100 rpm
100 rpm
Clock
0:00'00"- 23:59'59"
1 Second /1 Minute
± 50PPM
Temperature
+50℃-160℃/ 122 - 320
+50℃-160℃/ 122 - 320
1℃/
1℃/
±
1℃/
±
1℃/
MAXMax. Temperature
℃
℉
/
℉
℉
℉
℉
℉
℉
Bar Thermometer
1-7 Bar-graphic
Bar Fuel Meter
V
8.0-25.0 Volt
0.1V
Voltage Meter
100, 250, 510Ohm or Off
1. Signal intensity from ignition coil is dependent on vehicle type.
2. Circles 2-5 turns around ignition coil, with more turns creating steadily stronger signal, fewer turns creating weaker signal.
3. The RPM circuit is suitable for most bikes, however partial bikes' signal maybe too strong, if the RPM looks like
much more than actual RPM and unstable, please serial connect the attached 1M Ohm resistor to solve it
.
1.
2.
3.
4.
5.
6.
7.
8.
9.
10.
We have several speed sensors; the unit includes one of them or not
speed sensor in case the model has to be connected to gear box to get
speed signal.
Reed Speed Sensor and Magnet: Please refer to the above drawings.
Hall Effective Speed Sensor S3 and Magnet:
1.This is universal sensor for ATV rear wheel installation or
motorcycle front wheel installation as if you purchase a
relative speed sensor holder.
2.Find a part can rotate to install magnet and a location can
install sensor and the sensor can be aligned to the magnet.
3.Align the center of the magnet to center of side face of the sensor.
4.Make sure the gap between the magnet and the sensor is within 5mm.
Specific Hall sensors:
The sensor such as Honda CRF, XR…etc. can replace original sensor
cable and fix it at the original position.
Thermo Sensor and Sensor Tube:
1.The unit includes a water temperature sensor; you have to
purchase a suitable water pipe temperature sensor tube to install
the sensor easily.
2.Cut the water pipe, insert the temperature tube into the pipe and
secure it by attached pipe clamps.
3.Screw the sensor into the tube.