acousticamplification.com
5
8. Buffer Rear and Buffer Front buttons engage a buffer at the input (Buffer
Front) or at the output (Buffer Rear) of the LS6 lowering the impedance and
optimizing the signal for longer cable runs
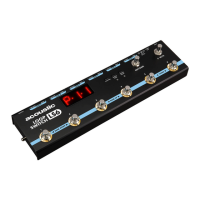
9. Edit/Save footswitch allows you to create, edit and save your loop
combination programs in the LS6
10. Mute footswitch fully silences the output of the LS6
11. Footswitches numbered 1 through 6 activate/deactivate individual loops
(Live mode) or custom combinations of loops (Program mode). Pressing
select footswitches at the same time will activate Bank Up, Bank Down
and Tuner functions.
• In Program mode, pressing footswitches 1 + 2 together will navigate down
one bank from the current bank, while pressing 2 + 3 together will navigate
up one bank.
• In any mode, pressing footswitches 5 + 6 together will activate the LS6
internal tuner. This will mute the output of the LS6 and bring up a tuner on
the LED Display.
Navigating and Programming the LS6
There are two modes for the LS6, Program Mode (default start-up mode of the LS6)
and Live Mode, which can be selected from the “Live/Prog” button on the front of
the LS6. In this section we will review each mode and its features.
Program Mode:
In Program mode, you can create, save, edit and recall up to 36 custom patches
that are arranged into 6 banks. When in Program mode, the LED display will show
the letter “P” before the selected bank and patch numbers. For example, if bank 3
patch 5 is selected, the display will read P-3-5.
To create a Patch in Program mode:
• First, navigate to the bank and patch you would like to edit using
the footswitches
– Simultaneously press footswitches 1 + 2 to navigate down a bank, 3 +
4 to navigate up a bank, then an individual footswitch numbered 1-6 to
select the patch within that bank.
– Once on the chosen patch, hit the Edit/Save footswitch once. This
engages edit mode and the LED display will show the letter “E” followed
by the selected bank and patch numbers. For example, if bank 1 patch 1
is selected then the display will now read E-1-1.
– Now use footswitches 1-6 to turn on or off the loops you would like
arranged in the selected patch.
 Loading...