EasyManua.ls Logo

Action 6008 - User Manual

Action 6008
2 pages
Print Icon
To Next Page IconTo Next Page
Loading...
General Safety Information
1. Always carefully read, thoroughly understand and follow the pump operating instructions. Use this pump correctly and with
care for the purpose for which it is intended. Failure to do so may cause damage or personal injury, and will void the
warranty. Please retain instructions for future reference.
2. Contact your chemical or fluid supplier to check for compatibility with pump prior to installation and operation.
3. Prior to use, always carefully and thoroughly read and understand the OSHA information contained in the MSDS sheet
supplied for the chemical which is to be pumped.
4. Wear protective clothing (goggles, face mask, long sleeves, long pants, gloves, aprons, etc) as set forth in the OSHA
Safety Data Sheet when pumping any hazardous chemicals.
5. When using flammable liquids, pump containers should be grounded to avoid static electricity.
6. Any pump used for transferring flammable liquids must be stored in a ventilated area after use.
7. Pump should be washed out before it is used since processing lubricants may contaminate the fluids.
8. Prior to use, inspect your pump thoroughly verifying its proper assembly.
9. If pump is removed from drum, it should be thoroughly rinsed in a liquid that is compatible with the pump.
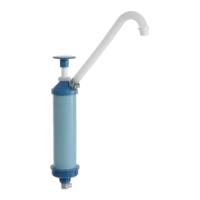
Operating Instructions & Parts Manual for Model 6008
This pump is designed to fit 5, 15, 30 & 55 gallon drums with 3/4" and 2" threaded openings, and also 2-5/8"
flexspout openings for 5-gallon pails. The extension tubes included can reach the bottom of a 55 gallon
drum. The pump is adjustable to pump 2, 4, 6 or 8 oz per stroke. It has a polypropylene exterior body and polyethylene
internal parts. The pump is commonly used for pumping water, water-based liquids and detergents.
Specifications
Flow rate per stroke. . . . . . . . . . . . . . . . . . . . . . . . . 2, 4, 6 or 8 oz
Mounting. . . . . . . . . . . . . . . . . . . . . . . . . . . . . . . . .5 gal. flex 2-5/8"
Inlet. . . . . . . . . . . . . . . . . . . . . . . . . . . . . . . . . . . . . 1/2"
Outlet. . . . . . . . . . . . . . . . . . . . . . . . . . . . . . . . . . . .1/2"
Bung Adapter. . . . . . . . . . . . . . . . . . . . . . . . . . . . . 2" & 3/4" PP
Suction Tube (Length & Material). . . . . . . . . . . . . . .32" PE
Packing Gland. . . . . . . . . . . . . . . . . . . . . . . . . . . . . PE
Wetted Parts. . . . . . . . . . . . . . . . . . . . . . . . . . . . . . PE & PP
Viscosity. . . . . . . . . . . . . . . . . . . . . . . . . . . . . . . . . .1000 cps
Max. Temp. . . . . . . . . . . . . . . . . . . . . . . . . . . . . . . 140°F
Revised 04/01/2004
using hose clamp (Ref. No. 20).
2. Attach discharge spout (Ref. No. 15)
1. Check to see if all parts are present.
Installation
nut.
pump leaks at the top replace packing
Normal maintenance is not required. If
Maintenance
supplier.
compatibility, contact your chemical
fluid. For questions about chemical
compatible with both the pump and
thoroughly in liquid that is
3. If pump is removed from drum, rinse
15) to prevent dripping.
(Ref. No. 16) on end spout (Ref. No.
2. When finished pumping, place cap
leakage.
Tighten only enough to preventNOTE:
top of pump.
tighten packing nut (Ref. No. 2) on
If slight leakage should occur, simply
flowing on second or third upstroke.
operation. Liquids should begin
1. The pump is now ready for
Operation
down.
snap off making sure to hold pail
pail, pull towards side of pail and
4. To remove pump with adapter from
snap over the other side.
Insert tube extension into side, then
and remove diaphragm (Ref. B).
3. Remove cap on FLEXSPOUT closure
13). Tightly secure adapter.
threads at bottom of pump (Ref. No.
2. Screw adapter (Ref. No. 14) on male
flexspout closures.
designed to fit senior (metal ring)
1. This adapter (Ref. No. 14) is
PAIL ADAPTER INSTALLATION
spigot.
stand to the side or in back of the
operating the pump, you should
rotated to desired location; when
8. Entire pump head (Ref. No. 4) can be
drum.
No. 18) can be cut to fit specific
7. For various size drums, tubing (Ref.
to limit pump stroke.
(Ref. No. 9 or Ref. No. 11) over rod
top grip (Ref. No. 1) and slide tubing
6. To adjust pump delivery, unscrew
tighten.
5. Insert pump into opening and hand
10).
and secure with hose clamp (Ref. No.
4. Attach extension tubing to (Ref. A)
17) and two clamps (Ref. No. 20).
by using tube connector (Ref. No.
3. Join two lengths of extension tubing
Exploded parts view on reverse side
Question and Answer IconNeed help?

Do you have a question about the Action 6008 and is the answer not in the manual?

Summary

Pump Specifications

General Safety Information

Pump Installation Guide

Check Parts Availability

Verify all components are present before proceeding with installation.

Attach Discharge Spout

Connect the discharge spout using the provided hose clamp.

Assemble Extension Tubing

Connect two extension tube lengths using the tube connector and clamps.

Connect Tubing to Pump

Attach extension tubing to the pump inlet and secure with a hose clamp.

Insert Pump into Drum

Insert the pump into the drum opening and hand-tighten for initial seating.

Adjust Pump Stroke Volume

Modify pump stroke by repositioning the restriction clip on the piston rod.

Cut Dip Tube to Length

Adjust the dip tube length to match the specific drum depth.

Position Pump Head

Rotate the pump head for optimal spigot placement during operation.

Pail Adapter Installation

Adapter Design for Flexspout

Adapter is designed for senior (metal ring) flexspout closures.

Attach Pail Adapter

Screw the adapter onto the male threads at the bottom of the pump.

Prepare Flexspout Closure

Remove the cap and diaphragm from the FLEXSPOUT closure.

Insert Tube Extension

Insert tube extension into the flexspout side and snap over.

Remove Pump from Pail

Pull adapter sideways and snap off, holding the pail down.

Pump Operation

Initiate Pumping

Liquids should flow on the second or third upstroke; tighten packing nut for minor leaks.

Prevent Dripping After Use

Place the spout cap on the end of the discharge spout when finished pumping.

Pump Maintenance

Overview

This document describes the Model 6008 pump, designed for dispensing liquids from various drum and pail sizes.

Function Description:

The Model 6008 pump is a manual pump primarily used for dispensing water, water-based liquids, and detergents. It is designed to fit 5, 15, 30, and 55-gallon drums with 3/4" and 2" threaded openings, as well as 5-gallon pails with 2-5/8" flexspout openings. The pump features an adjustable stroke, allowing for dispensing volumes of 2, 4, 6, or 8 ounces per stroke. Its construction includes a polypropylene exterior body and polyethylene internal parts, ensuring compatibility with a range of liquids. The pump's design incorporates extension tubes that can reach the bottom of a 55-gallon drum, ensuring efficient emptying of containers.

Important Technical Specifications:

  • Flow Rate per Stroke: Adjustable to 2, 4, 6, or 8 oz.
  • Mounting: Compatible with 5-gallon flex 2-5/8" openings, and 2" & 3/4" PP bung adapters for drums.
  • Inlet/Outlet: 1/2" diameter.
  • Suction Tube: 32" length, made of PE (Polyethylene).
  • Packing Gland: Made of PE.
  • Wetted Parts: Made of PE (Polyethylene) and PP (Polypropylene).
  • Viscosity: Handles liquids up to 1000 cps.
  • Maximum Temperature: 140°F.

Usage Features:

General Safety Information:

  • Users must read, understand, and follow all operating instructions to prevent damage, personal injury, and to maintain warranty validity.
  • Compatibility with the chemical or fluid to be pumped should be verified with the supplier.
  • Prior to use, users must thoroughly read and understand the OSHA information provided in the MSDS sheet for the chemical being pumped.
  • Appropriate protective clothing (goggles, face mask, long sleeves, long pants, gloves, aprons, etc.) as specified in the OSHA Safety Data Sheet must be worn when handling hazardous chemicals.
  • When pumping flammable liquids, pump containers must be grounded to prevent static electricity.
  • Any pump used for transferring flammable liquids must be stored in a ventilated area after use.
  • The pump should be washed out before its initial use, as processing lubricants may contaminate fluids.
  • Before use, the pump should be thoroughly inspected for proper assembly.
  • If the pump is removed from a drum, it must be thoroughly rinsed with a liquid compatible with the pump.

Installation:

  1. Verify that all parts are present.
  2. Attach the discharge spout (Ref. No. 15) using a hose clamp (Ref. No. 20).
  3. Join two extension tube lengths using a tube connector (Ref. No. 17) and two clamps (Ref. No. 20).
  4. Attach the assembled extension tubing to (Ref. A) and secure it with a hose clamp (Ref. No. 10).
  5. Insert the pump into the container opening and hand tighten.
  6. To adjust the pump's delivery volume, unscrew the top grip (Ref. No. 1) and slide the tubing (Ref. No. 9 or Ref. No. 11) over the rod to limit the pump stroke.
  7. For different drum sizes, the tubing (Ref. No. 18) can be cut to achieve a custom fit.
  8. The entire pump head (Ref. No. 4) can be rotated to a desired location. When operating, the user should stand to the side or in back of the spigot.

Pail Adapter Installation (for 5-gallon pails with flexspout closures):

  1. The adapter (Ref. No. 14) is designed for senior (metal ring) flexspout closures.
  2. Screw the adapter (Ref. No. 14) onto the male threads at the bottom of the pump (Ref. No. 13) and secure it tightly.
  3. Remove the cap from the FLEXSPOUT closure and remove the diaphragm (Ref. B). Insert the tube extension into one side, then snap it over the other side.
  4. To remove the pump with the adapter from the pail, pull towards the side of the pail and snap it off, ensuring the pail is held down.

Operation:

  1. Once installed, the pump is ready for operation. Liquids should begin flowing on the second or third upstroke.
  2. If slight leakage occurs, the packing nut (Ref. No. 2) on top of the pump should be tightened, but only enough to prevent leakage.
  3. When pumping is complete, place the cap (Ref. No. 16) on the end of the spout (Ref. No. 15) to prevent dripping.
  4. If the pump is removed from the drum, it should be thoroughly rinsed in a liquid compatible with both the pump and the fluid. For chemical compatibility questions, contact the chemical supplier.

Maintenance Features:

  • Normal maintenance is not required for this pump.
  • If the pump leaks at the top, the packing nut should be replaced.

Action 6008 Specifications

General IconGeneral
BrandAction
Model6008
CategoryWater Pump
LanguageEnglish

Related product manuals