●
Video quick setup screen
●
Press SETUP button to go to quick setup
●
Select recording options
●
Use SETUP/MODE button to choose option
●
Press ON/OFF to confirm setting option
●
Video quick setup screen
●
Press SETUP button to go to quick setup
●
Select video resolution and recording speed
●
Use SETUP/MODE button to choose option
●
Press ON/OFF to confirm setting option
●
Video quick setup screen
●
Press SETUP button to go to quick setup
●
Select image quality
●
Use SETUP/MODE button to choose option
●
Press ON/OFF to confirm setting option
●
Video quick setup screen
●
Press SETUP button to go to quick setup
●
Select WiFi connectivity
●
Use SETUP/MODE utton to choose option
●
Press ON/OFF to confirm setting option
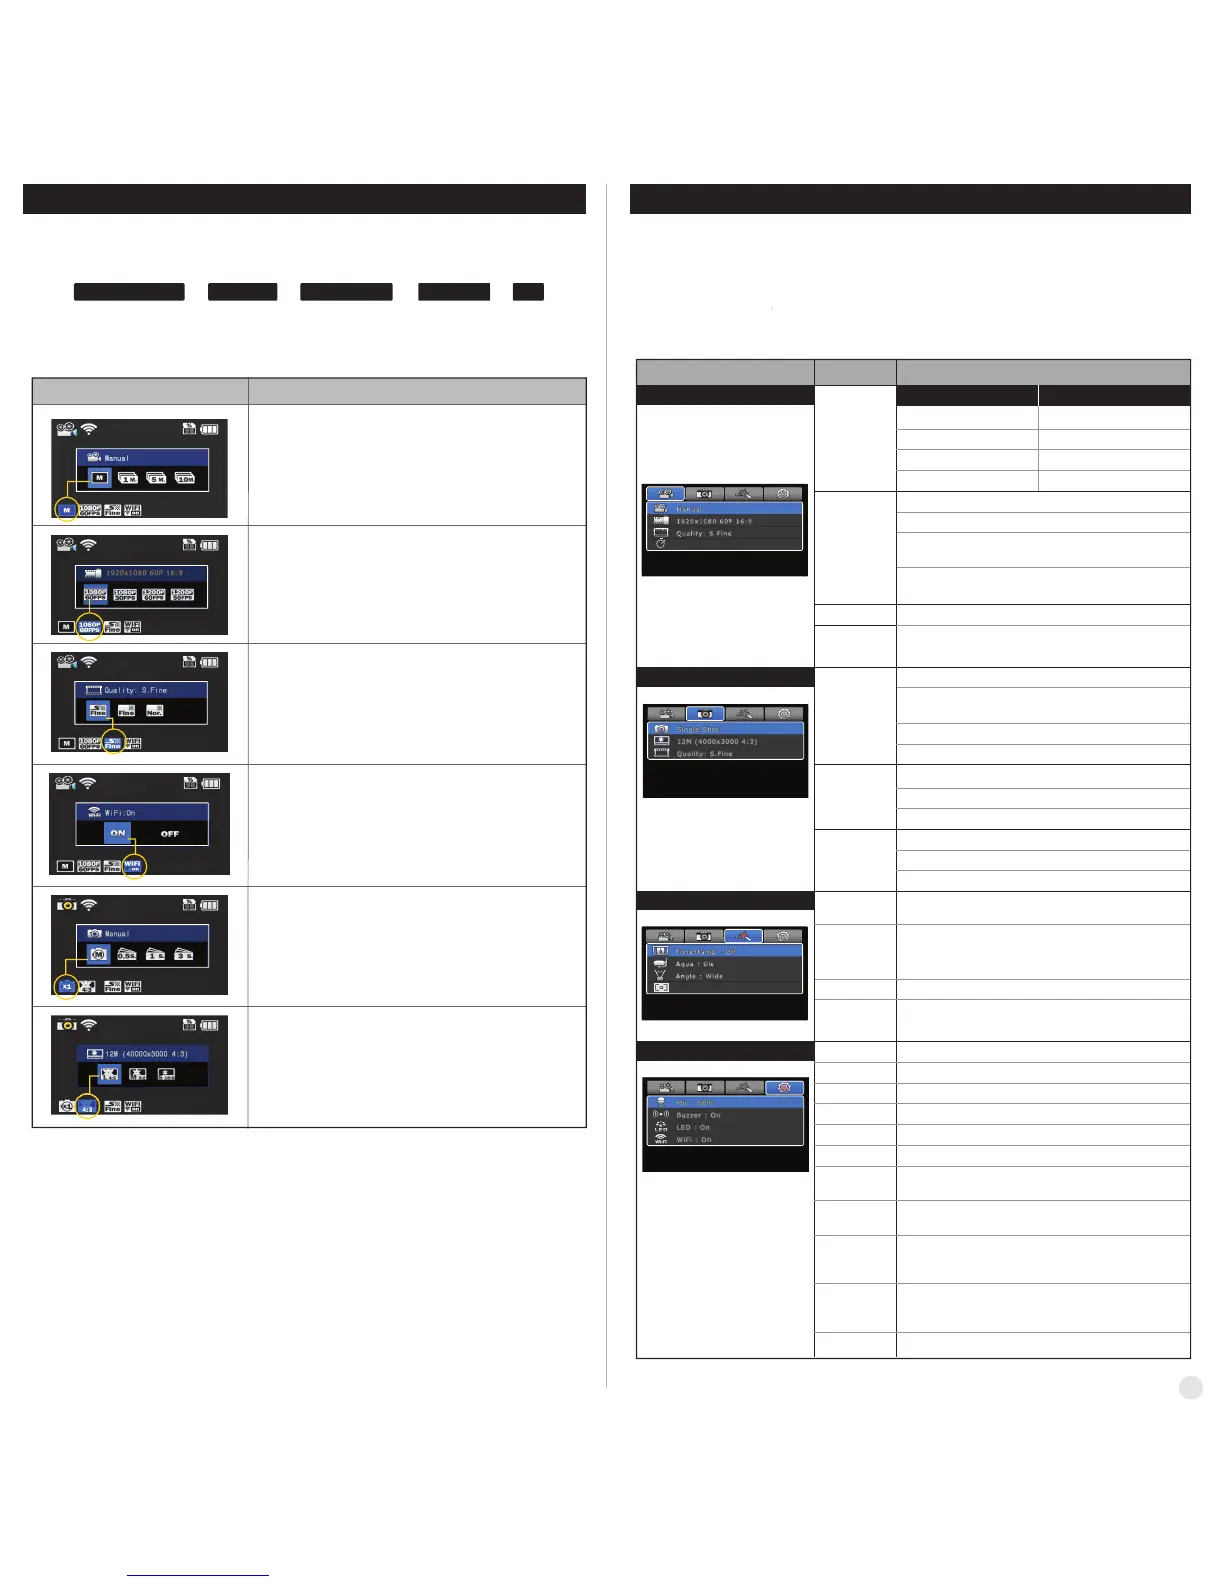
8. Quick setup
1. Press SETUP button to select quick setup options on bottom of the screen.
2. Quick setup mode changes as
( recording option → resolution → image quality → wifi on/off → exit ) in turn.
3. Select the quick setup option and press ON/OFF button to adjust setting option.
4. In setting option, press SETUP and MODE button to choose setting option.
5. Press ON/OFF button to confirm setting option.
Quick setup screen Operation
●
Photo quick setup screen
●
Press SETUP button to go to quick setup
●
Select photo shooting option
●
Use SETUP/MODE button to choose option
●
Press ON/OFF to confirm setting option
●
Photo quick setup screen
●
Press SETUP button to go to quick setup
●
Select image size
●
Use SETUP/MODE button to choose option
●
Press ON/OFF to confirm setting option
●
Without entering user setting menu, user can adjust various quick setups in live screen.
●
User can select basic settings and detailed setting options through user setup menu.
9. User setup menu
Resolution
Recording
option
Image quality
Auto rec
1080p 60fps, 30fps
1200p 60fps, 30fps
720p 120fps, 60fps, 30fps
480p 240fps
Manual
Super Fine / Fine / Normal
off / 0 / 5 / 10 sec. (starts recording automatically
0, 5 or 10 seconds after switching on camera)
Timer 1min, 5min, 10min, 30min
Multi file REC. 1min, 5min, 10min, 30min
(record consecutive video files of setup time)
Time lapse 1sec, 3sec, 5sec, 10sec, 30sec
(captures each image of setup time and save as video file)
1080p 50fps, 25fps
1200p 50fps, 25fps
720p 100fps, 50fps, 25fps
480p 200fps
Function Sub menu Description
Recording
option
Manual
Burst 11 photo images in one second
Timer 5sec, 10sec
Time lapse 0.5sec, 1sec, 3sec, 5sec, 10sec, 30sec
(captures each image of setup time and save as photo)
On / Off . Shows current time in recorded file
On / Off .
When the camera is shooting underwater, select
'aqua scene on' to give more vivid color images in the scene
Resolution
12M (4000 x 3000) 4:3
8.5M (3648 x 2432) 3:2
7.2M (3648 x 2052) 16:9
FOV
AE Metering
Mic. Volume
Buzzer
LED
WiFi
TV Out
Time
Format
Default Setting
Auto LCD Off
Auto Power Off
Info
Aqua scene
Time stamp
Wide (standard) / Medium / Narrow Field of View
Center (standard) / Average / Spot
Image
quality
Super Fine
Normal
Fine
Video
Photo
Effect
Settings
Off, 30%, 60%, 100%
Buzzer On / Off
Shows current firmware version
LED On / Off
WiFi On / Off
NTSC / PAL
Set current time (YYMMDD:HHMM)
Yes / No.
Memory card format
Yes / No
Turn back all settings to default
Yes / No
LCD will automatically turn off in 30sec when there is
no operation
Yes / No
The camera will automatically turn off in 3min when there
is no operation.
1. Press SETUP button and hold for 2 seconds to enter user setup menu.
2. User setup menu is divided into four categories (video, photo, effect, settings)
3. Press SETUP button to move category.
4. Press MODE button to enter the sub-menu.
5. Press ON/OFF button to select and confirm setting option within sub-menu.
NTSC PAL
1
3
Auto rec: O
Auto rec: O
AE Metering: Center
AE Metering: Center
 Loading...