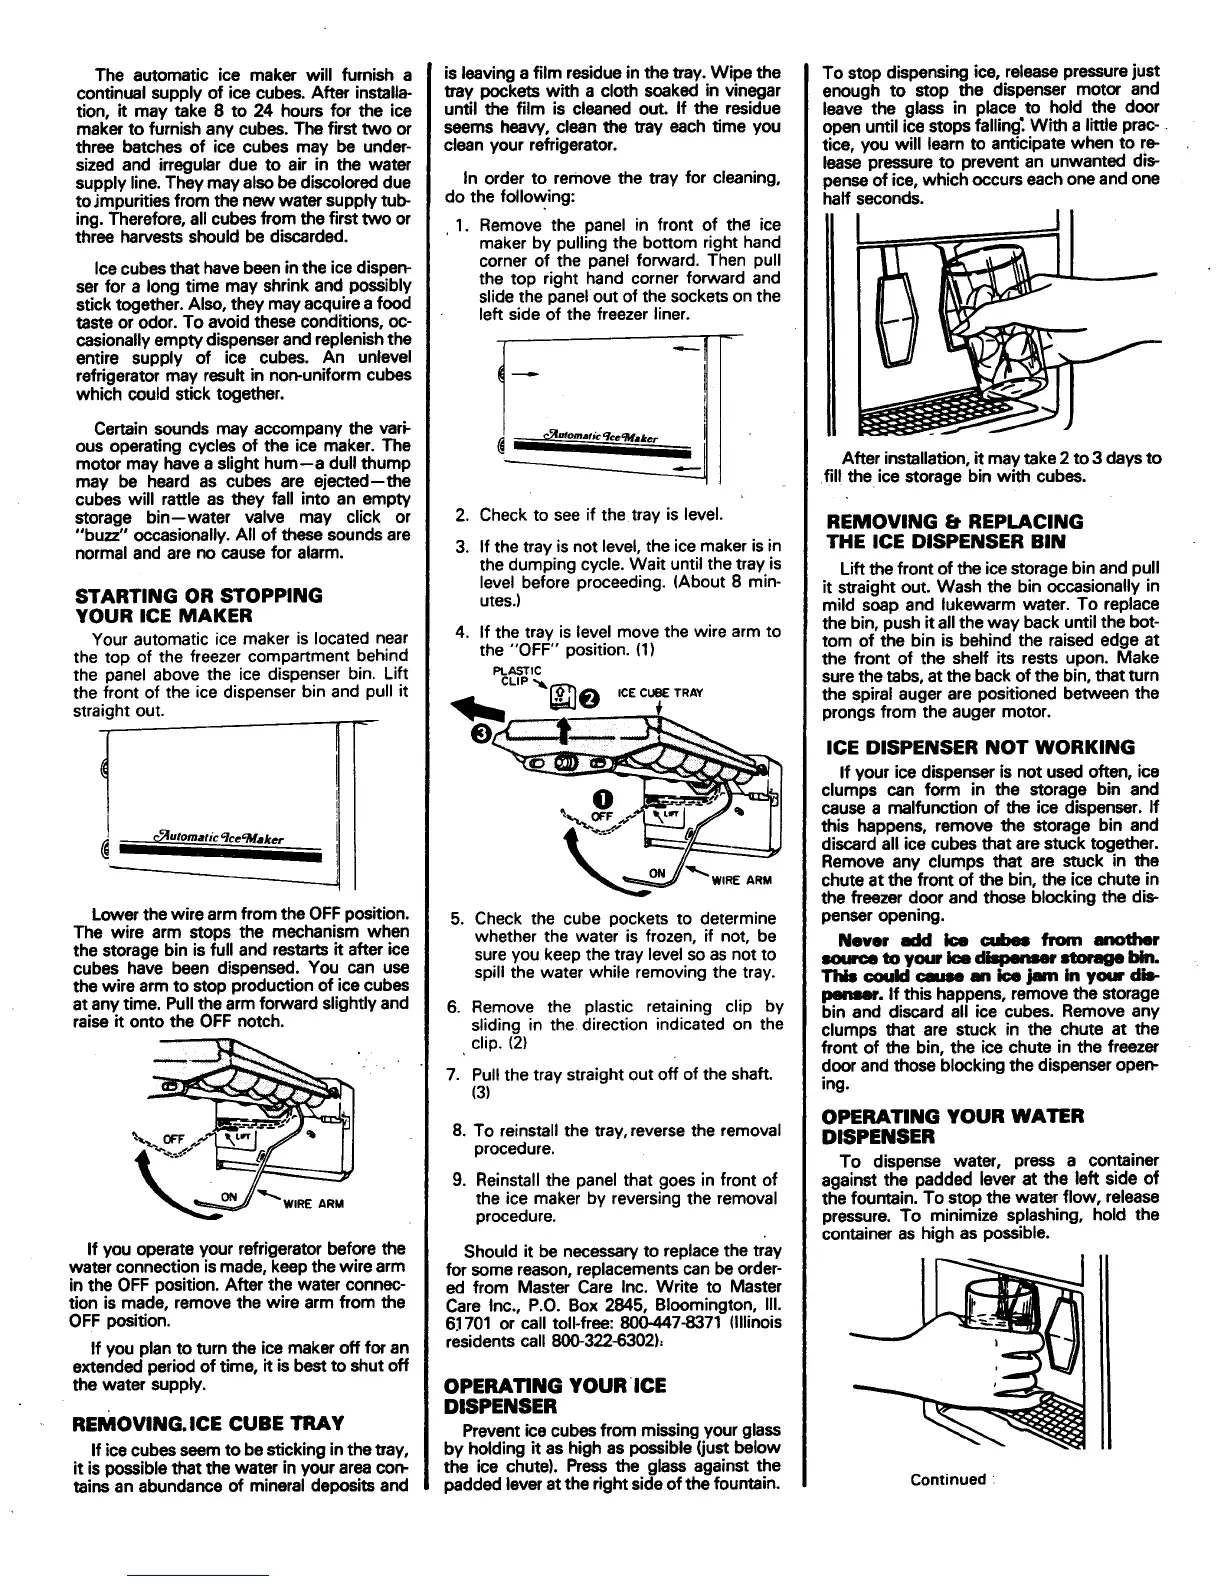
The automatic ice maker will furnish a isleaving a film residue in the tray. Wipe the To stop dispensing ice, release pressurejust
continual supply of ice cubes. After installa- tray pockets with a cloth soaked in vinegar enough to stop the dispenser motor and
tion, it may take 8 to 24 hours for the ice until the film is cleaned out. If the residue leave the glass in place to hold the door
maker to furnish any cubes. The first two or seems heavy, clean the tray each time you open untilice stops falling: With a little prac-
three batches of ice cubes may be under- clean your refrigerator, tice, you will learn to anticipate when to re-
sized and irregular due to air in the water lease pressureto prevent an unwanted dis-
supply line.They may also be discolored due In order to remove the tray for cleaning, pense of ice, which occurs each one and one
to jmpurities from the new water supplytub- do the following: half seconds.
ing. Therefore, allcubes from the first two or .1. Remove the panel in front of the ice
three harvests should be discarded, maker by pulling the bottom right hand
Ice cubes that havebeen in the ice dispen- corner of the panel forward. Then pull
ser for a long time may shrink and possibly the top right hand corner forward and
sticktogether. Also, they may acquirea food slide the panelout of the sockets on the
taste or odor. To avoid these conditions, oc- left side of the freezer liner.
casionallyempty dispenserand replenishthe _ -
entire supply of ice cubes. An unlevel
refrigeratormay result in non.uniform cubes
which could stick together.
Certain sounds may accompany the vari- __.*er
ous operating cycles of the ice maker. The
motor may have a slight hum--a dull thump -- After installation, it maytake 2 to 3 daysto
may be heard as cubes are ejectad--the _ fill the ice storage bin with cubes.
cubes will rattle as they fall into an empty
storage bin--water valve may click or 2. Check to see if the tray is level. REMOVING 1_ REPLACING
"buzz" occasionally.All of these sounds are
normal and are no cause for alarm. 3. If the tray isnot level, the ice maker is in THE ICE DISPENSER BIN
the dumping cycle. Wait untilthe tray is Lift the front of the icestorage binand pull
level before proceeding. (About 8 min- it straight out. Wash the bin occasionally in
STARTING OR STOPPING utes.) mild soap and lukewarm water. To replace
YOUR ICE MAKER the bin, push it allthe way back untilthe bet-
Your automatic ice maker is located near 4. If the tray is level move the wire arm to tom of the bin is behind the raised edge at
the top of the freezer compartment behind the "OFF" position. (1) the front of the shelf its rests upon. Make
the panel above the ice dispenser bin. Lift _._-nc surethe tabs,at the back of the bin, that turn
the front of the ice dispenser bin and pull it CLIP ,_k_ O ICECUBETRAY the spiral auger are positioned between the
straight out. _ ___._._f.__._ " -- prongs from the auger motor.
ICE DISPENSER NOT WORKING
If your ice dispenser is not used often, ice
clumps can form in the storage bin and
cause a malfunction of the ice dispenser. If
t this happens, remove the storage bin and
__ __discardallicecubesthatarestucktogether.
Remove any clumps that are stuck in the
chute at the front of the bin, the ice chute in
the freezer door and those blocking the dis-
Lower the wire arm from the OFF position. 5. Check the cube pockets to determine penser opening.
The wire arm stops the mechanism when whether the water is frozen, if not, be Never add ice cubes from another
the storage bin is full and restarts it after ice sureyou keep the tray level so as not to m=u,rceto your km diqxmmw storage bin.
cubes have been dispensed. You can use spill the water while removing the tray. _ could ¢aulm an ice jam in your dis-
the wire arm to stop production of icecubes pemmr. If this happens, remove the storage
at any time. Pullthe armforward slightlyand 6. Remove the plastic retaining clip by bin and discard all ice cubes. Remove any
raise it onto the OFF notch, sliding in the direction indicated on the clumps that are stuck in the chute at the
"_ '. , clip. (2) front of the bin, the ice chute in the freezer
i _ ' 7. Pull the tray straight out off of the shaft, door and those blocking the dispenseropen.
.___ (3) ing.
OPERATING YOUR WATER
• 8. To reinstall the tray,reverse the removal DISPENSER
.._- _ procedure. To dispense water, press a container
9. Reinstallthe panel that goes in front of against the padded lever at the left side of
_r""WlRE ARM the ice maker by reversingthe removal the fountain. To stop the water flow, release
procedure, pressure. To minimize splashing, hold the
container as high as possible.
If you operate your refrigeratorbefore the Should it be necessaryto replace the tray
water connection is made, keep the wire arm forsome reason, replacements can be order-
in the OFF position. After the water connec- ed from Master Care Inc. Write to Master
tion is made, remove the wire arm from the Care Inc., P.O. Box 2845, Bloomington, III.
OFF position. 6.1701 or call toll-free: 800-447-8371 (Illinois
If you plan to turn the ice maker off for an residents call 800-322-6302);
extended period of time, it is best to shut off
the water supply. OPERATING YOURICE
DISPENSER
REMOVING. ICE CUBE TRAY Prevent ice cubes from missing your glass
If ice cubes seem to be sticking inthe tray, by holding it as high as possible (just below
it is possiblethat the water in your area con- the ice chute). Press the glass against the
tains an abundance of mineral deposits and padded lever at the rightside of the fountain. Continued
 Loading...