2.
When you first operate your dispenser or 5. Let hot dishes cool before putting into sL,_R_LS
after reconnectingwater to your refrigerator, refrigeratoror freezer. __, ._ _ ....
air will escape from the dispenser for a few I_ili_minutes before water begins to flow. Draw 6. Cover liquids, if uncovered, the unit ..,_ .
10 glasses of water and empty them in the must work longer. ""
kitchen sink.This will insurecomplete filling , ._'_"_'_
m
of the reservoirwith fresh water. 7. Clean refrigerator condenser coils at
least twice a year.
SPILL TRAY
Do not discard water into the grille at the CLEANINGbottom of the fountain. This is a spill area,
not a drain. Normal spillswill be evaporated ,A,
in the recessed area below the spill shelf s_
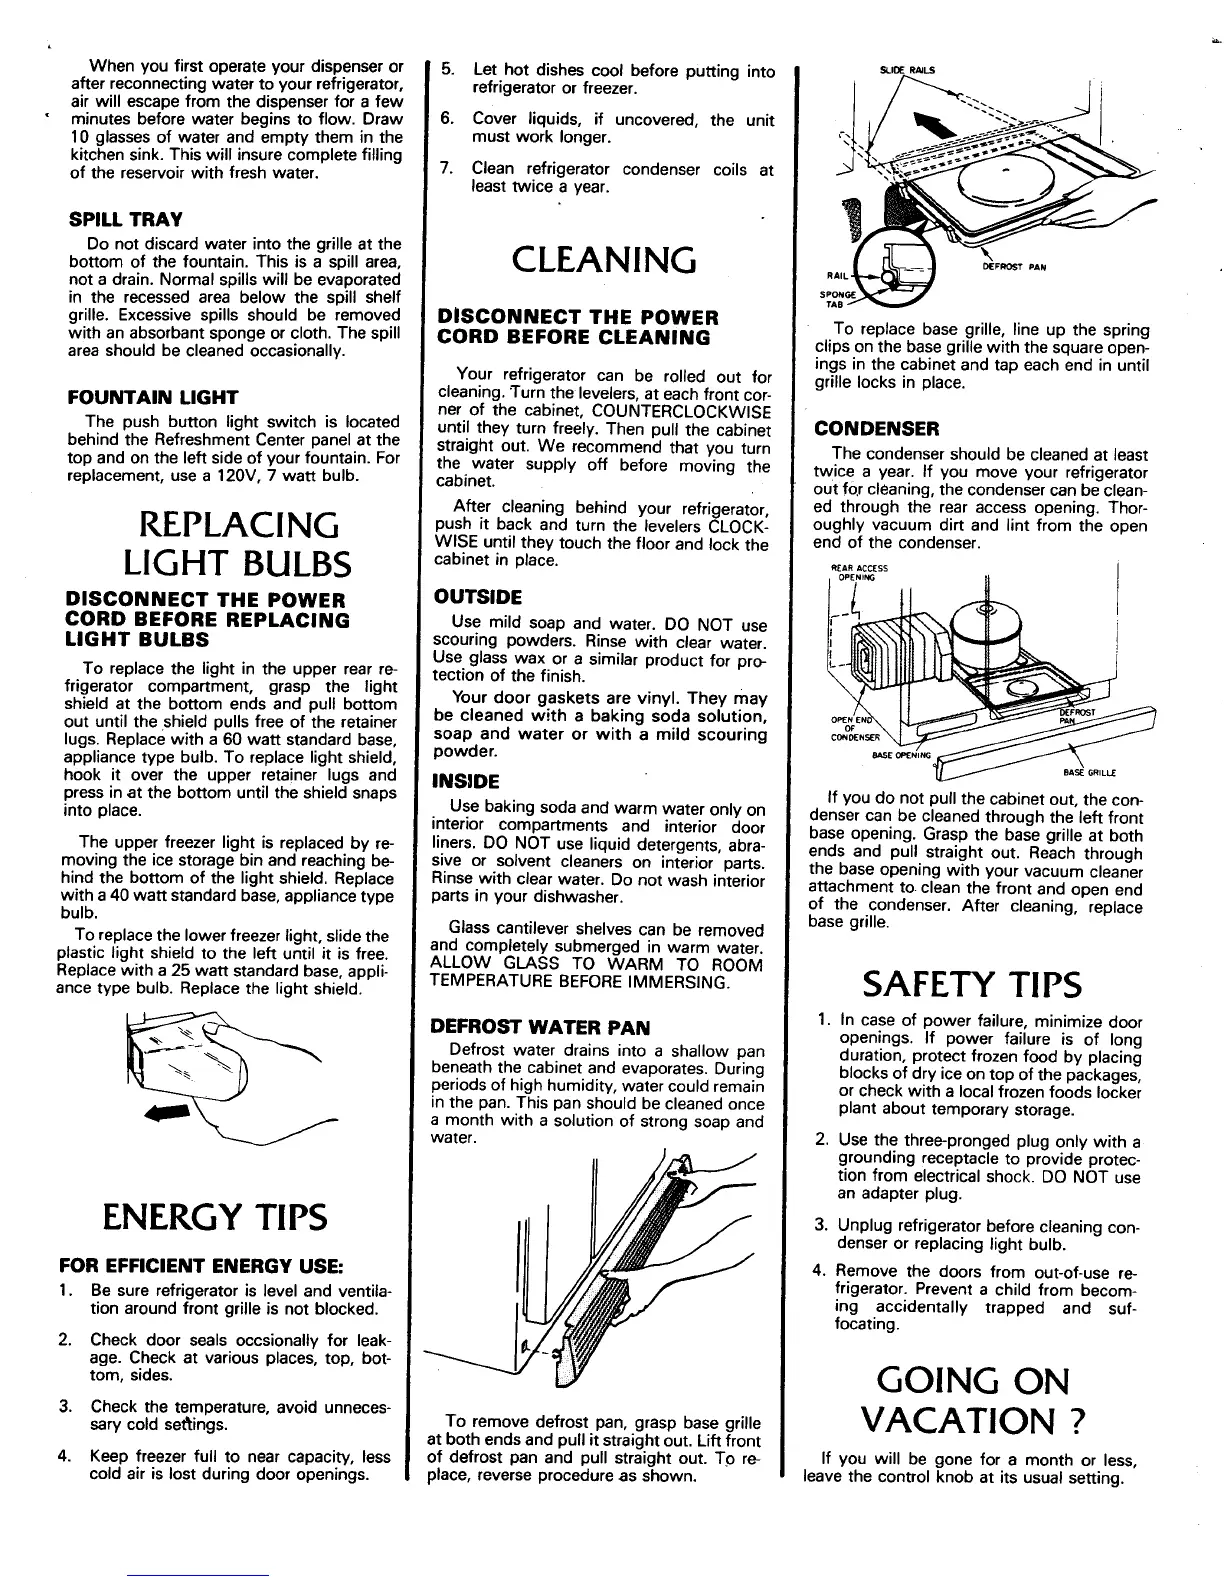
grille. Excessive spills should be removed DISCONNECT THE POWER To replace base grille, line up the spring
with an absorbent sponge or cloth. The spill CORD BEFORE CLEANING clips on the base grille with the square open-
area should be cleaned occasionally, ings in the cabinet and tap each end in until
Your refrigerator can be rolled out for grille locks in place.
FOUNTAIN LIGHT cleaning. Turn the levelers, at each front cor-
ner of the cabinet, COUNTERCLOCKWISE
The push button light switch is located until they turn freely. Then pull the cabinet CONDENSER
behind the RefreshmentCenter panelat the straight out. We recommend that you turn The condenser should be cleaned at least
top and on the left side of your fountain. For the water supply off before moving the twice a year. If you move your refrigerator
replacement, use a 120V, 7 watt bulb. cabinet, out f0.rcleaning,the condensercan be clean-
After cleaning behind your refrigerator, ed through the rear access opening. Thor-
REPLACING pushit back and turn the levelers CLOCK- oughly vacuum dirt and lint from the open
WISE until they touch the floor and lock the end of the condenser.
LIGHT BULBS cabinet in place.
R[o_R AtC_GESS
o,.°ONN,CT..,.ow. ou =o, li
CORD BEFORE REPLACING Use mild soap and water. DO NOT use I_ _
LIGHT BULBS scouring powders. Rinse with clear water.
Use glass wax or a similar product for pro-
To replace the light in the upper rear re- tection of the finish.
frigerator compartment, grasp the light
shield at the bottom ends and pull bottom Your door gaskets are vinyl. They may
out until the shield pulls free of the retainer be cleaned with a baking soda solution, o_._
lugs. Replace with a 60 watt standard base, soap and water or with a mild scouring
appliance type bulb. To replace light shield, powder. =sE ,,
hook it over the upper retainer lugs and INSIDE
press inat the bottom untilthe shieldsnaps If you do not pullthe cabinet out,the con-
into place. Use bakingsoda and warm water only on denser can be cleaned through the left front
interior compartments and interior door base opening. Grasp the base grille at both
The upper freezer light is replaced by re- liners. DO NOT use liquid detergents, abra- ends and pull straight out. Reach through
moving the ice storagebin and reaching be- sive or solvent cleaners on interior parts, the base opening with your vacuum cleaner
hind the bottom of the light shield. Replace Rinse with clear water. Do not wash interior attachment to.clean the front and open end
with a 40 watt standardbase, appliancetype parts in your dishwasher, of the condenser. After cleaning, replace
bulb. Glass cantilever shelves can be removed base grille.
To replace the lower freezer light, slide the and completely submerged in warm water.
plastic light shield to the left until it is free. ALLOW GLASS TO WARM TO ROOM
Replace with a 25 watt standard base, appli- TEMPERATURE BEFOREIMMERSING. SAFETY TIPS
ance type bulb. Replace the light shield.
DEFROST WATER PAN 1. In case of power failure, minimize door
openings. If power failure is of long
Defrost water drains into a shallow pan duration, protect frozen food by placing
beneath the cabinet and evaporates. During blocks of dry ice on top of the packages,
periods of high humidity, water could remain or check with a local frozen foods locker
in the pan. This pan should be cleaned once plant about temporary storage.
a month with a solutionof strongsoap and
water. 2. Use the three-pronged plug only with a
grounding receptacle to provide protec-
tion from electricalshock. DO NOT use
an adapter plug.
ENERGYTIPS IL 3. Unplug refrigerator before cleaning con-
denser or replacing light bulb.
FOR EFFICIENT ENERGY USE: 4. Remove the doors from out-of-use re-
1. Be sure refrigerator is level and ventila- frigerator. Prevent a child from becom-
tion around front grille is not blocked. _ ing accidentally trapped and suf-
focating.
2. Check door seals occsionally for leak-
age. Check at various places, top, bot-
tom, sides. GOING ON
3. Check the temperature, avoid unneces-
sary cold settings. To remove defrost pan, grasp base grille VACATION
at both ends and pull it straight out. Lift front
4. Keep freezer full to near capacity, less of defrost pan and pull straight out. TO re- If you will be gone for a month or less,
cold air is lost during door openings, place, reverse procedureas shown, leave the control knob at its usual setting.
 Loading...