EasyManua.ls Logo

Advantage SportsRack tiltAWAY User Manual

Advantage SportsRack tiltAWAY
5 pages
To Next Page IconTo Next Page
Page #1 background imageLoading...
Page #1 background image
Heininger Holdings, LLC - 2222 Queen Street Bellingham, WA 98229-4753
Ph: 360.756.2411 Toll Free: 888.722.5240 Fax: 360.756.2414
Version 150301
tiltAWAY Bike Carrier Assembly Instructions
To ensure the best service and satisfaction from your Advantage® SportsRack
tilt
AWAY, please
read and follow all instructions, recommendations, and warnings. Heininger Holdings, LLC is not
responsible for damage or injury due to misuse of the
tilt
AWAY product. And we always want to
hear from you about our products and service. Contact us at info@heininger.biz.
VERIFY ALL PARTS ARE INCLUDED IN
PACKAGE:
8 Saddle Straps
1 Hex Keys
1 Hitch Bolt with lock washer
1 Pivot Bolt with 2 washers and 1 nut
1 Clevis Pin attached to the foot on
the rack with snap pin
1 Clevis Pin attached to the arms on
the rack with snap pin
Assembling Your
tilt
AWAY Bike Carrier
To attach the foot (see receiver insert diagram below) to the upright. Slide a washer onto the
pivot bolt then slide it through the foot and upright. Put on the second washer on and then
secure the nut tightly. Adjust the bike carrier upright to be
perpendicular with the foot and insert the Clevis Pin in hole
above the lower bolt. Once the Clevis Pin is completely
inserted, secure it with the snap pin.
When you raise the arms of the bike rack to a 90 degree angle
with the upright and then insert the attached Clevis pin into the
hole, secure it with the snap pin. (Not shown)
Question and Answer IconNeed help?

Do you have a question about the Advantage SportsRack tiltAWAY and is the answer not in the manual?

Advantage SportsRack tiltAWAY Specifications

General IconGeneral
CategoryAutomobile Accessories
Tilt FeatureYes
FoldableYes
MaterialSteel
TypeBike Rack
Hitch Compatibility2 inch receiver
FinishBlack Powder Coated

Summary

BEFORE YOU BEGIN

Attaching Foot to Upright

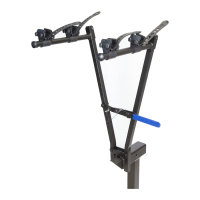
Secure the foot to the upright using a pivot bolt, washer, nut, and then insert the clevis pin.

Securing Bike Arms

Raise bike arms to 90 degrees and secure them to the upright with the clevis pin and snap pin.

Connecting Your tiltAWAY bike rack to Vehicle

Hitch Connection Steps

Guide to inserting the rack into the hitch, feeding washers, and aligning the bolt and anti-wobble device.

Securing Hitch Bolt

Ensure the hitch bolt is tightened securely for safe operation of the bike carrier.

Securing Upright and Arms

Insert clevis pin and snap pin to secure upright and arms in the correct position.

Tilted Operation and Storage

How to tilt the carrier away and lower arms for storage, securing with clevis pins.

Placing Bicycles on Your tiltAWAY Bike Carrier

Saddle Adjustment and Tightening

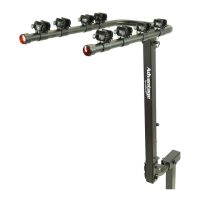
Position bikes in saddles, adjust saddle rotation, and tighten using the hex key.

Rules of the Road on the Use of Your Advantage tiltAWAY

Care and Maintenance

Regular Inspections and Cleaning

Monthly checks of fasteners, cleaning with soap/water, and avoiding car washes.

Lubrication and Storage

Lubricate T-handle shaft for smooth operation and lower arms when not in use.

Warning!

2 Year Limited Liability Warranty Policy

Related product manuals