Do you have a question about the Advantage SportsRack V-Rack 1011 and is the answer not in the manual?
Confirm all listed parts are included in the V-Rack package before proceeding with installation.
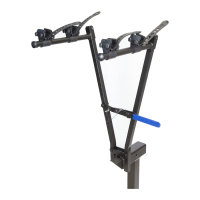
Align and slide the V-Rack jaws over the 2" x 2" receiver hitch insert tube.
Engage the connection lever and attach the rubber straps to the bike cradles.
Insert the security pin and bridge pin through the hitch for proper locking.
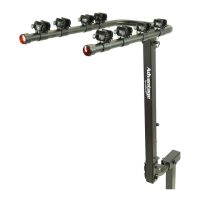
Place bikes on the carrier and secure them using the provided rubber straps.
Pass the coiled red security strap through wheels and frames to secure bikes.
Crucial safety guidelines and operational warnings for using the V-Rack.
Details and pricing for available spare parts and replacement items.
Guidance on washing, storing, and lubricating the V-Rack for longevity.
Explanation of the V-Rack's limited warranty, coverage, and terms.
The Advantage SportsRack V-Rack is a unique and robust 2-bike carrier designed for secure transportation of bicycles on vehicles equipped with a 2" x 2" receiver hitch. This manual provides comprehensive instructions for its installation, use, and maintenance, ensuring optimal performance and user satisfaction.
The primary function of the V-Rack is to securely transport up to two bicycles on the rear of a vehicle. It achieves this by clamping onto the 2" x 2" insert, often referred to as a "Stinger-Tube," of a standard receiver hitch. The design emphasizes a strong clamping force to stabilize the bikes during transit, ensuring they remain firmly in place. The V-Rack is engineered to accommodate a maximum weight limit of 26 kg (57 lbs) for the carried bicycles. Its structure includes supporting arms and cradles that hold the bike frames, along with rubber-like straps to further secure the bikes within these cradles. A coiled, red security strap is also provided to offer an additional layer of security, passing through the wheels and frames of the bikes. For convenience and protection when not in use, the V-Rack comes with a storage/carry bag.
The V-Rack's installation process is straightforward, beginning with the alignment of the V-Rack with the 2" x 2" insert tube. It requires approximately 1.5 inches of clamping space on the insert tube for proper and secure attachment.
Proper care and maintenance are vital to prolong the life and ensure the continued safe operation of the Advantage SportsRack V-Rack.
Heininger Holdings, LLC offers a range of spare parts and replacements to ensure the longevity and functionality of the V-Rack:
These features collectively ensure that the Advantage SportsRack V-Rack is a reliable, user-friendly, and durable solution for transporting bicycles, backed by clear instructions and available support for maintenance and parts.
| Type | Bike rack |
|---|---|
| Capacity | 2 bikes |
| Material | Steel |
| Mounting | Hitch Mount |
| Weight | 25 lbs |