4.0 PREPARE GENTEEL FOR LANCING
PREPARATION: Clean the surface of Genteel and other testing supplies.Verify Contact Tip is securely affixed
to Nozzle.
4.1 Prime Genteel: Press the Push Cap to prime the PetTest/Genteel, device clicks if done correctly.
4.2 Remove Nozzle: Twist counterclockwise and pull gently to remove.
4.3 Insert a Lancet: While the PetTest/Genteel is primed, insert either a Blue Butterfly or PetTest Maroon lancet into
Shuttle and the #1 Blue Contact Tip to start the test. Carefully twist off the protective cover from lancet and put aside.
(The PetTest Maroon Twist Top lancets are 6 steps more aggressive than the Blue Butterfly Touch lancets.)
Note: You want to use the thickest Contact Tip that gets the right amount of blood with little to no discomfort.
Contact Tips going from thickest to thinnest: #1 Blue #2 Yellow, #3 Green, #4 Clear, #5 Orange, #6 Violet.
NOTE: Different test sites may require a different Contact Tip.
4.4 Replace Nozzle: Line up the Nozzle Slots with the Front End Tabs. Gently push together and rotate clockwise
into place.
5.0 PERFORM BLOOD DRAW
Wash hands with soap and water. Clean test site. Have your meter and test strip ready to wick up your blood sample.
5.1 Place Genteel on skin: Pick your test site from the diagram in 3.0 at the top right. Make sure you have a seal
between Contact Tip and skin by gently and flatly holding the device perpendicular to the skin. Do not press Genteel
forcibly into the skin, as this can cause pain during testing.
NOTE: Hold Genteel like a pen, with index finger on the Activation Button.
5.2 Press Activation Button: Using gentle pressure, hold down the Activation Button for at least 4 seconds, or until
you see a blood drop form.
NOTE: With your finger over the Activation Button, the plunger will rise slowly to the halfway point, but not fully extend
(you should not see the red Vacuum Indicator).
5.3 Release Activation Button: BEFORE pulling Genteel away from your skin, lift your finger off the Activation Button.
Pull Genteel away from the skin. If done out of order, blood drop may smear.
NOTE: Hold Activation Button longer to get a larger blood drop. If no blood is produced, choose the next thickest
Contact Tip in order depending on the lancet and body site chosen.
5.4 Test Blood Sugar: Apply the meter’s test strip to the blood drop and follow the instructions for the test strips and
meter.
5.5 Remove Lancet: Prime Genteel again (see 4.1) and remove Nozzle (see 4.2). Carefully insert lancet needle into
its protective cap. Once needle is safely in its protective cap, remove the lancet.
5.6 Lancet Disposal: Safely dispose of the used lancet according to local laws for Sharps disposal.
6.0 CLEANING GENTEEL
6.1 Surface cleaning: Before every use, wipe the outside of the device with a clean damp cloth.
IMPORTANT: If the Push Shaft rises past its halfway point—while holding the Activation Button, this may be a vacuum
leak caused by dirt or other contaminants inside Genteel. If you experience this vacuum loss symptom—perform (6.2).
If symptom persists—perform (6.3). If cleaning doesn't resolve vacuum leak, call customer support +1 (866) 373-2824.
6.2 Quick Clean (inside):
6.2.1 Remove Piston Assembly: De-prime Genteel by pressing Activation Button. Twist Piston Assembly base
counter-clockwise until you can pull it out of the Vacuum Tube.
6.2.2 O-ring Wipe: Wipe the O-ring on the Piston Assembly with your clean finger to remove surface dirt or other
contaminants.
6.3 Deep Clean (inside):
6.3.1. Remove Piston Assembly: Repeat step 6.2.1
6.3.2. Flush Vacuum Tube: Run fast moving, warm water through the Vacuum Tube and out the Nozzle while
repeatedly pressing the Activation Button.
6.3.3. Flush Piston Assembly: While running the Piston Assembly under fast-moving, warm water repeat 6.2.2.
6.3.4. Dry: Let Genteel air dry thoroughly. Do not reassemble Genteel with moisture in the Vacuum Tube.
6.3.5. Reassemble: Put Piston Assembly back inside the Vacuum Tube and twist base clockwise until it locks into
place securely. Verify device functions as intended.
Rev. 04/2021
800-01001C
1
2
3
6
8
9
10
12
11
13
14
7
4
E
B
F
A
D
C
BASE OF TAIL
(shave area to
create a
sufficient seal)
UPPER LIP
INNER EAR
NEAR NAIL
PAW PADS
ELBOW
CALLUSES
(for bigger dogs)
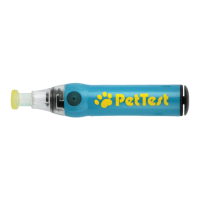
1.0 PETTEST / GENTEEL PARTS
(1) Contact Tip
(2) Nozzle
(3) Nozzle Slots
(4) Lancet
(5) Shuttle
(6) Front End Tabs
(7) Front End
(8) Activation Button
(9) Hole In Activation Button
(10) Vacuum Tube
(11) Push Shaft
(12) Vacuum Indicator
(13) Push Cap
(14) Piston Assembly
2.0 GATHER SUPPLIES NEEDED
With clean hands, gather supplies
needed for testing:
(A) PetTest/Genteel Lancing Device
(B) Contact Tip Card
(contains 6 Contact Tips)
(C) Advocate Twist Top or
Butterfly Touch Lancets
(D) Alcohol (not included)
to clean contact tip
(E) Clean, damp cloth (not included)
for cleaning Genteel's surface)
(F) Meter and test strips
3.0 TESTING SITES FOR DRAWING BLOOD
Cats have one testing site while dogs have up to six to
choose from.
Having a pet with diabetes can be stressful. It takes a dedicated owner to manage their pet’s blood sugar, requiring
time and money. Here at PetTest®, we are pet owners ourselves and stand behind our products with excellent service
and competitive pricing. Search for the PetTest® page in your Facebook search bar.You will nd blogs written by
owners with diabetic pets, photos of our customers’ pets, plus other valuable information. You can also nd promo
codes for great pricing on all our PetTest products.
The Pain-Free Blood Glucose Monitoring System
User Instructions for the Genteel
®
Lancing Device
Distributed By
Diabetic Supply of Suncoast, Inc.
PO Box 2102, Vega Alta, PR 00692
1-866-373-2824 / www.ShopPetTest.com
(24 hours a day / 7 days a week)
Follow us on:
Facebook.com/PetTest
Health Solutions for Pets
STOP! If you need troubleshooting assistance or more help
with your Genteel blood draw experience,
PLEASE DO NOT WAIT TO CONTACT US.
WE ARE HERE TO HELP!
For more information visit www.ShopPetTest.com/Genteel
Email us at sales@shoppettest.com
Call our
24/7 support line at +1 (866) 373-2824
For products and service visit www.shoppettest.com | Email us at sales@shoppettest.com | 1 (888) 469-3579
5