Wrist Blood Pressure
Monitor
Wrist Blood Pressure
Monitor
KD-7902
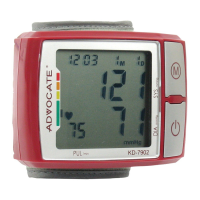
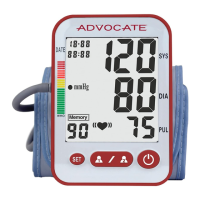
Name of Each Part
Function Description
Specification
Measuring Procedures
Based on oscillometric method and silicon integrate pressure sensor technology, blood pressure and heart rate can be
measured automatically and non-invasively which helps to ease the operation. New blood pressure classification indicator
visually indicates user’s blood pressure category, 120 memories with date and time display. These memories are stored in
two groups with a capacity for 60 readings each. The pulse and irregular heart beat (if any) can be indicated.
1. Model: KD-7902
2. Machine size:87.2mm×64mm×30.7mm
3. Cuff size: 140mm x 195mm
4. Weight: 108g (excluding batteries)
5. Measuring method: oscillometric
method, automatic air inflation
and measurement
6. Memory volume: 2×60 times
7. Power source: AAA×2 batteries
8. Blood pressure measuring range:
0-295mmHg
9. Measuring accuracy: ±3mmHg
10. Heart pulse rate range: 40-180 per minute
11. Environmental temperature for using: -5 ~ +40°
c
12. Environmental humidity for using: <80%
13. Environmental temperature for storage: -20~+55°
c
14. Environmental humidity for storage: <95%
15. Environmental pressure: atmosphere pressure
16. Battery life: Approx.1 month with normal usage
a. Open battery cover located in the back
left side of the monitor.
b. Load two “AAA” size batteries. Please
pay attention to polarity
c. Close the battery cover.
*
When LCD shows battery symbol it
means you must change the batteries at
once. Rechargeable batteries with a voltage
of 1.2V are not suitable for this product.
*
Take out all the batteries if the device
will not be used for a long time to avoid
battery leakage and relevant damage.
1. Battery Loading
The equipment, the batteries and cuff used in it can be
disposed as industrial rubbish at the end of their usage, or
according to local regulations.
a. Once you install the batteries, the LCD will display the time
and date. (See picture1)
2. Clock Mode
b. To exit the Clock Adjusting Mode when you nish, press the “ ” button and the number will
stop twinkling. (See picture 2-2 & 2-3)
c. When you change the batteries, you need to readjust the clock.
a. Be sure to place the wrist cuff on bare skin of left wrist, and place sphygmomanometer on the
center of wrist. (See picture)
b. Place wrist cuff 1~2cm above wrist joint.
c. Close Wrist cuff, make sure your wrist does not feel tension. Don’t close it too tight. (Otherwise
the measurement will not be precise).
d. Keep up right position at the same level of your heart. (See gure)
e. To give greater stability to the arm is advisable to put the plastic box that comes with the meter
below the wrist. (See gure)
3. Placement of the Wrist Band and
Accurate Position for the Measurement
Operation Guide
Color Coded
Indicator
“START” Button/Clock Adjusting
Diastolic
“MEM” Button/Clock Setting
Pulse
3. Clock Adjusting
a. When the machine is in the Clock Mode, press the “ “
and “ M “ buttons at the same time and release. The machine
enters the Clock Adjusting Mode. The month will twinkle rst.
(See picture 2). Press the “M“ button continuously to adjust the
number, once you have the correct month number press the
“ “ button, the day will start twinkling (See picture 2-1) adjust
the day with the “M” button and than press the “ “ to go to the
time and repeat the same procedure.
Systolic
2. Clock Mode
Once you install the batteries, the LCD will display the time and date. (See picture 1)
3. Clock Adjusting
a. When the machine is in the Clock Mode, press the “ O “ and “ M “ buttons at the same time
and release. The machine enters the Clock Adjusting Mode. The month will twinkle first.
(See picture 2). Press the “M“ button continuously to adjust the number, once you have the
correct month number press the “ O “ button, the day will start twinkling (See picture 2-1)
adjust the day with the “M” button and than press the “ O “ to go to the time and repeat the
same procedure.
Picture 2 Picture 2-1
b. To exit the Clock Adjusting Mode when you finish, press the “O” button and the number
will stop twinkling. (See picture 2-2 & 2-3)
c. When you change the batteries, you need to readjust the clock.
Picture 2-2 Picture 2-3
2. Placement of the Wrist Band and Accurate Position for the Measurement
a. Be sure to place the wrist cuff on bare skin of left wrist, and place sphygmomanometer on
the center of wrist. (See picture)
b. Place wrist cuff 1~2cm above wrist joint.
c. Close Wrist cuff, make sure your wrist does not feel tension. Don’t close it too tight.
(Otherwise the measurement will not be precise).
Prohibition:
This product cannot be used on infants.
This product can not be used on other uses than blood pressure measuring
d. Keep up right position at the same level of your heart. (See figure)
e. To give greater stability to the arm is advisable to put the plastic box that comes with the
meter below the wrist. (See figure)
3.
Measuring Process
a. After your body is in a comfortable position, press the “O” button. After a long “beep”,
BPM will verify itself, and LCD will display all automatically. See picture 3.
b. Then you will see on screen "U1" or “U2” indicating the Group of memory in which the
2. Clock Mode
Once you install the batteries, the LCD will display the time and date. (See picture 1)
Picture 1
3. Clock Adjusting
a. When the machine is in the Clock Mode, press the “ O “ and “ M “ buttons at the same time
and release. The machine enters the Clock Adjusting Mode. The month will twinkle first.
(See picture 2). Press the “M“ button continuously to adjust the number, once you have the
correct month number press the “ O “ button, the day will start twinkling (See picture 2-1)
adjust the day with the “M” button and than press the “ O “ to go to the time and repeat the
same procedure.
Picture 2 Picture 2-1
b. To exit the Clock Adjusting Mode when you finish, press the “O” button and the number
will stop twinkling. (See picture 2-2 & 2-3)
c. When you change the batteries, you need to readjust the clock.
2. Clock Mode
Once you install the batteries, the LCD will display the time and date. (See picture 1)
Picture 1
3. Clock Adjusting
a. When the machine is in the Clock Mode, press the “ O “ and “ M “ buttons at the same time
and release. The machine enters the Clock Adjusting Mode. The month will twinkle first.
(See picture 2). Press the “M“ button continuously to adjust the number, once you have the
correct month number press the “ O “ button, the day will start twinkling (See picture 2-1)
adjust the day with the “M” button and than press the “ O “ to go to the time and repeat the
same procedure.
b. To exit the Clock Adjusting Mode when you finish, press the “O” button and the number
will stop twinkling. (See picture 2-2 & 2-3)
c. When you change the batteries, you need to readjust the clock.
Picture 2-2 Picture 2-3
2. Placement of the Wrist Band and Accurate Position for the Measurement
a. Be sure to place the wrist cuff on bare skin of left wrist, and place sphygmomanometer on
the center of wrist. (See picture)
b. Place wrist cuff 1~2cm above wrist joint.
c. Close Wrist cuff, make sure your wrist does not feel tension. Don’t close it too tight.
(Otherwise the measurement will not be precise).
Prohibition:
This product cannot be used on infants.
This product can not be used on other uses than blood pressure measuring
d. Keep up right position at the same level of your heart. (See figure)
e. To give greater stability to the arm is advisable to put the plastic box that comes with the
meter below the wrist. (See figure)
3. Measuring Process
a. After your body is in a comfortable position, press the “O” button. After a long “beep”,
BPM will verify itself, and LCD will display all automatically. See picture 3.
b. Then you will see on screen "U1" or “U2” indicating the Group of memory in which the
Prohibition:
*
This product cannot be used on infants
*
This product cannot be used on other uses than blood pressure measurement
35104_wrist BPM 7902B manual.indd 1 8/12/09 11:46:07 AM