Note: you can turn the LED lighting on and off when photo shooting
or video recording.
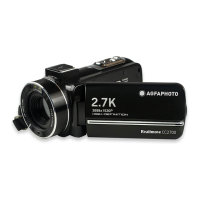
3. Using the camcorder
This section
s you understand how to y all the features of the
camcorder.
To record videos, first
ss the Mode button to switch to video mode.
The corres
icon will then in the left corner of
the screen.
1. According to the image dis
yed on the screen, first st the shot
focus and then
ss the Record / OK button to start a video recording.
A red dot icon will then blink at the t
of the screen indicating that video
recording is in
ss.
2. To
se it, ss the shutter button once and then ss it again to
resume recording. To st
recording definitively, ss the Record/OK
button only once.
3. Video files are automatically saved to the memory card once their
recording is finished. It is better to set the video mode settings
before
recording, the following
s give ex tions about the various
settings for the video mode.
3.1 Scene
The camcorder has a mult
choice of set scenes for you to t the
shooting to the environment in which you find yourself.
1. In video mode,
ss the Menu button to dis y its configuration menu.
2. Then
ss the / Down buttons to select this setting.
3. Press the OK button to enter the submenu.
4. Press the
/ Down Button to select a scene from the following tions:
Auto / Night / Portrait / Landsc
/ Backlight / S t / Party / Beach / High
Sensitivity / Cancel.
5. Finally
ss the OK button to save and return to the vious menu.
3.2 Resolution
The camcorder has a mult
choice of video resolution. The higher the
resolution, the s
the video and the larger the document, the more
ce it occ s on the memory card.
1. In video mode,
ss the Menu button to dis y its configuration menu.
2. Then
ss the / Down buttons to select this setting.
 Loading...