Do you have a question about the AirTV Player and is the answer not in the manual?
Choose the best antenna type and place it optimally for signal reception.
Find tower locations and manage cable/wireless interference for better signals.
Rescan for OTA channels if reception issues occur.
Connect the AirTV Player to your TV via HDMI and to the internet via Ethernet or WiFi.
Activate the remote control by pulling the plastic battery tab.
Follow prompts for setup, including logging into Sling TV and Google accounts.
Connect your Over-the-Air (OTA) antenna to the AirTV Adapter using a coax cable.
Connect the AirTV Adapter to the AirTV Player using the provided USB extension cable.
Scan for local channels by following the on-screen prompts.
This document outlines the setup and usage of the AirTV Player and AirTV Adapter, designed to integrate over-the-air (OTA) television channels with streaming services. The system allows users to access local broadcast channels without a cable subscription, enhancing their entertainment options.
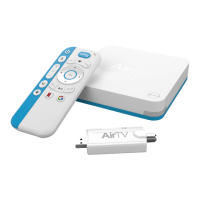
The AirTV Player serves as the central hub for your entertainment. Its primary function is to connect to your television and provide access to streaming services like Sling TV and Google, in addition to integrating OTA channels. To begin using the AirTV Player, you first need to connect it to your television. This is achieved by using the included HDMI cable, plugging one end into the AirTV Player and the other into an available HDMI port on your TV. Once connected, the next step is to provide power to the device. The AirTV Player comes with a power cable; simply connect it to the player and then to a power outlet. Upon successful power connection, a light on the front of the AirTV Player will illuminate, indicating it's ready for the next steps.
Internet connectivity is crucial for the AirTV Player to function fully, especially for streaming services and software updates. You have two options for connecting to the internet. The first is to use an Ethernet cable. If your router is nearby, you can connect an Ethernet cable from your router directly to the Ethernet port on the AirTV Player. This provides a stable and often faster internet connection. Alternatively, during the on-screen setup process, you will be prompted to connect to your WiFi network. This wireless option offers more flexibility in placement if your router isn't close to your TV.
Once the AirTV Player is connected to your TV, power, and internet, the on-screen setup process will guide you through the initial configuration. This involves following prompts to set up your preferences, log in to your Sling TV and Google accounts (or create new ones if needed), and prepare the device for use. The remote control is essential for navigating these menus and controlling the AirTV Player. Before you start, make sure the remote is ready by pulling the plastic tab from the battery compartment. This activates the pre-installed batteries, allowing you to use the remote immediately.
The AirTV Adapter is the component that enables the reception of OTA channels. It works in conjunction with an external antenna (sold separately) to capture broadcast signals. To set up the AirTV Adapter, you first need to connect it to your AirTV Player. This can be done directly by plugging the adapter into a USB port on the AirTV Player, or by using the included USB extension cable for more flexible placement. Once connected to the AirTV Player, the AirTV Adapter needs to be connected to your OTA antenna. This connection is made using a coax cable (not included), which runs from your antenna to the AirTV Adapter.
The placement of your OTA antenna is critical for optimal channel reception. The manual provides "Antenna Tips" to help you find the best location in your home. Generally, higher placements and locations free from obstructions like walls, furniture, or trees tend to yield better signal quality. Once the antenna is in place and connected to the AirTV Adapter, the system is ready to scan for available channels. During the on-screen setup, or through the settings menu, you will be prompted to initiate a channel scan. This process identifies and saves all the local broadcast channels that your antenna can receive. After the scan is complete, you can start watching live OTA channels directly through your AirTV Player interface.
Maintenance and troubleshooting are also addressed in the document. If you encounter issues with channel reception, such as missing channels or poor signal quality, the manual suggests several steps. First, ensure your coax cable is of good quality and properly connected. Sometimes, a longer cable with a slight coil can improve signal quality. Second, be mindful of interference from other wireless devices. Keeping your antenna away from WiFi routers or other devices that emit radio signals can prevent noise that might disrupt your TV signal. Third, if you've adjusted your antenna or suspect an issue, performing a channel rescan is recommended. This allows the system to re-evaluate and update the list of available channels. If, after following these steps, you still don't see all your expected OTA channels, the manual directs you to AirTV.net/Help for further assistance.
A convenient feature of the AirTV Player is its remote control locator. If you misplace your remote, simply press the "Remote" button on the AirTV Player itself, and your remote will begin beeping, making it easier to find. This small but useful feature enhances the user experience by addressing a common household frustration.
The AirTV system is designed with accessibility in mind. The AirTV Player is equipped with features for people with hearing and sight impairments. These accessibility features can be activated during the initial setup process or accessed later through the "Accessibility" section within the Settings menu. For more detailed information on these features, users can visit AirTV.net/Accessibility or contact customer support directly.
In summary, the AirTV Player and AirTV Adapter provide a comprehensive solution for integrating live local television with streaming content. The setup process is straightforward, involving connecting the devices to your TV, power, and internet, followed by an on-screen guided configuration. The system emphasizes optimal antenna placement for channel reception and offers troubleshooting tips for common issues. With features like remote control location and accessibility options, the AirTV system aims to deliver a user-friendly and inclusive entertainment experience.
| Storage | 8 GB |
|---|---|
| Operating System | Android TV |
| Resolution | Up to 4K UHD |
| Remote | Included |
| Wi-Fi | 802.11ac |
| Manufacturer | AirTV |
| Model | AirTV Player |
| Type | Set-top box |
| Processor | Quad-core |
| Connectivity | Wi-Fi, Ethernet |
| Ports | HDMI, USB, Ethernet |
| Supported Services | Sling TV, Netflix |
| Remote Control | Bluetooth |
| Power Source | AC Adapter |