EasyManua.ls Logo

Aiwa CA-DW50 User Manual

Aiwa CA-DW50
44 pages
To Next Page IconTo Next Page
Page #1 background imageLoading...
Page #1 background image
CD CARRY COMPONENT SYSTEM
CA-DW50
© 2003 Sony Corporation
3-261-564-31(1)
Question and Answer IconNeed help?

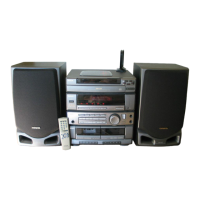
Do you have a question about the Aiwa CA-DW50 and is the answer not in the manual?

Aiwa CA-DW50 Specifications

General IconGeneral
TypeStereo System
ManufacturerAiwa
ModelCA-DW50
TunerAM/FM
CD PlayerYes
Speakers2-way
EqualizerGraphic Equalizer
Cassette DeckDouble cassette deck with auto-reverse

Summary

Important Safety Precautions

General Warning and Safety Instructions

Follow all operating and safety instructions carefully for installation, use, and servicing to prevent electric shock or injury.

Installation and Environmental Guidelines

Avoid water, moisture, and heat sources. Ensure proper ventilation and place unit on a stable surface.

Operating Instructions and Warnings

Object Entry, Liquid Spills, and Power Handling

Do not insert objects or liquids. Operate unit using specified power sources and protect the power cord.

Lightning Protection and Maintenance

Unplug during storms. Clean with a damp cloth; avoid liquid cleaners.

Damage Requiring Professional Service

Refer to qualified personnel for damaged cords, liquid spills, malfunctions, or dropped units.

Power Supply Options

Using AC House Current

Connect the unit to an AC outlet using the supplied AC cord for operation.

Using Batteries

Insert eight R20 (size D) batteries for battery operation; replace when dim.

Speaker Connections

Positioning and Connecting Speakers

Slide speakers into guide brackets and connect cords to R/L terminals. Ensure correct polarity.

Remote Control Usage

Remote Control Operation Guide

Insert batteries, understand operational range, and use buttons for power and function selection.

Remote Control Troubleshooting

Ensure no obstructions and avoid direct sunlight for optimal remote control performance.

Tuner Operation and Reception

Selecting Bands and Stations

Press RADIO/BAND to select FM/AM and use TUNING UP/DOWN to find stations.

Improving Radio Reception

Extend the rod antenna for FM and position the unit optimally for AM reception.

Auto Search Tuning

Press and hold TUNING buttons to automatically search for stations.

FM Stereo and AM Noise Reduction

Use MODE button for MONO reception on FM with noise, or reduce high-pitched sound on AM.

Changing AM Tuning Interval

Adjust AM tuning interval to 9 kHz or 10 kHz step as needed.

Presetting Radio Stations

Storing and Recalling Stations

Select a station, press MEMORY, then use numbered buttons to store and recall up to 15 stations per band.

Clearing Preset Stations

Select a preset number and press and hold MEMORY to clear it.

Sound Adjustment Features

Volume Control and Equalizer Modes

Adjust volume using VOL buttons. Select ROCK, POP, or JAZZ equalizer modes for different sound profiles.

T-BASS System

Activate the T-BASS system to enhance low-frequency sound realism.

CD Playback Operations

Loading and Starting CD Playback

Press CD to turn on, CD OPEN to load disc, and PRESET to start playback.

Controlling CD Playback

Use MEMORY to stop, PRESET to pause, and TUNING buttons to search tracks.

Direct Track Selection

Use numbered buttons on the remote to directly select and play tracks on the CD.

CD Disc Compatibility Notes

Avoid irregular CDs, multiple discs, touching the lens, and ensure CD-R/RW compatibility. Do not attach labels.

Programmed CD Playback

Programming and Playing Tracks

Store up to 30 tracks by selecting and pressing MEMORY. Play the programmed sequence.

Clearing Programmed Tracks

Clear the entire program by pressing MEMORY in stop mode until 'M' disappears.

Sleep Timer Functionality

Setting and Checking the Sleep Timer

Set timer by pressing REPEAT/SLEEP to flash "30", then use TUNING buttons for time. Check remaining time.

Canceling the Sleep Timer

To cancel the sleep timer, display the remaining time and press TUNING buttons until OFF is shown.

Tape Playback and Insertion

Inserting and Playing Tapes

Insert tape with exposed side down. Press PLAY to start, STOP to end, PAUSE to pause.

Continuous Tape Playback

Enable continuous play between deck 1 and deck 2 for uninterrupted listening.

Recording from CD or Tuner

Preparing and Starting Recording

Insert tape into deck 1, select source (CD/Tuner), and press RECORD to begin.

Recording Specific CD Tracks

Program desired tracks first, then press RECORD to capture them.

Pausing and Erasing Recordings

Use PAUSE to temporarily stop recording and RECORD button again to erase.

Tape Dubbing Operations

Preparing and Executing Tape Dubbing

Insert tapes into decks, select dubbing speed (high/normal), and press PLAY to copy.

Stopping and Preventing Accidental Erasure

Press STOP to halt dubbing. Break cassette tabs to prevent accidental erasure.

Microphone Mixing and Input

Using the Microphone Input

Connect a microphone to the MIC jack and adjust MIC VOL. Avoid howling by holding mic away from speakers.

Maintenance and Cleaning

Cleaning the Unit Cabinet and Lens

Wipe cabinet with a damp cloth. Clean lens gently with a cotton swab and cleaning fluid.

Cleaning Tape Heads

Use a head cleaning cassette every 10 hours of use to maintain tape head performance.

Related product manuals