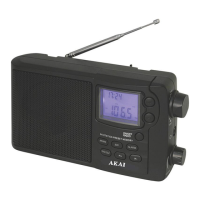
APR-2418
Portable AM/FM/SW Radio with Alarm Clock.
INSTRUCTION MANUAL
Please read this instruction manual carefully and familiarize yourself with your new Radio before
using it for the first time. Please retain this manual for future reference.
LOCATION OF CONTROLS
1. LCD Display
2. Tuning UP
3. Set Button
4. Volume Knob
5. MW/FM Band Button
6. SW Band Button
7. Snooze / Sleep Button
8. Headphone output
9. NOT USED
10. Preset Memory +
11. Power On/Off Button
12. Preset Memory M -
13. Alarm Button
14. Battery Compartment
15.
Speaker
16. Skip – Button
17.
Mode Button (Tuner/Clock/Alarm)
18.
Tuning K nob
19.
FM Antenna
20.
Handle
21.
Power Cord
CONNECTING TO POWER
Before switching on make sure that the voltage of your electricity supply is the same as that
indicated on the rating plate.
For your own safety read the following instructions carefully before attempting to connect this
unit to the mains.
MAINS (AC) OPERATION
This unit is designed to operate on AC 230V 50Hz current only. Connecting it to other power
sources may damage the unit.
Caution
To prevent electric shock disconnect from the mains before removing cover. No user serviceable
parts inside. Refer servicing to qualified service personnel.
Safety Precaution
Do not allow this unit to be exposed to rain or moisture.
Mains Supply: AC230Volts / 50Hz - AC
This symbol means that this unit is double insulated. An earth connection
is not required.
POWER SUPPLY
Remove the Radio carefully from the box, retaining the packaging for future use.
Please read this instruction book carefully before operating this unit.
AC Power Operation
Connect the AC Power Cord to your AC household mains outlet and switch on the main supply.
Make sure the voltage is compatible.
Battery Operation
Remove
mains lead from the unit for battery operation.
Open the Battery Compartment at the back of the radio and insert four UM3
batteries
following the polarity diagram shown inside the battery compartment.
Batteries should be removed from the compartment if the unit is not to be used for some time.
Flat batteries should be removed from the unit to avoid leakage
RADIO OPERATION
Antenna
For FM reception there is a built-in telescopic FM antenna (19) at the rear of the unit. Extend the
antenna and move it around to obtain the best reception.
For MW / SW reception the signals are picked up through a built-in ferrite antenna. You may
have to orient the unit to obtain the best reception.
• Press the Power ON/OFF Button (11) to power ON the unit.
• Choose the radio wave band (MW, FM or SW) using the BAND Button (5 or 6).
• Search for the station of your choice using the Tuning knob (18).
• To switch off the radio, press the Power button (11) to OFF.
Store Radio Stations manually
This unit can store 120 stations (8 FM, 8 MW and 80 SW)
• Tune the desired station as explained above.
• Pres
s the SET button (3) to enter in preset mode
• The icon “CH” flash and appear in the display
• Press the M+ or M - buttons to choose the preset number, from 1 to 20 (AM/MW)
and from 1 to 8 (SW).
• Press the SET button (3) to confirm the memory setting.
Store Radio Stations automatically
Keep pressed Keep pressed the SET button (3) 3 seconds and the Radio will be stored in
the memory sequentially
CLOCK AND ALARM OPERATION
SETTING THE CLOCK
Make sure the POWER switch is set to the 'Off' position. The time or alarm time
cannot be set or adjusted while the unit is 'On'.
• Press the SET button (3) and the display will show the minute 00 will flash and press
Tune +/- to select the minute.
• Press the SET button (3) again to confirm setting, then the Display will show 00:00 and
the first 00 will flash, then press Tune +/- to select the correct hours.
• Press the SET button (3) again to confirm setting, then the Display will show 24H will
flash, then press Tune +/- to select the 12H or 24H.
• Press the SET button (3) to confirm the clock setting,
EN EN
 Loading...