This document provides program documentation for Akai Professional's MPD2 Series (MPD218, MPD226, MPD232) and MPK2 Series (MPK225, MPK249, MPK261) controllers when used with Bitwig Studio. It outlines how to set up and operate these controllers for various functions within the Bitwig Studio environment, including track-mixing, clip- and scene-launching, and controlling device parameters.
Installation & Setup
To begin using your Akai controller with Bitwig Studio, you must first install a "script" file and then select your controller within Bitwig Studio's Preferences.
- Move the script file: Transfer the downloaded script file to the appropriate directory for your operating system:
- Windows:
[your user directory]\My Documents\Bitwig Studio\Controller Scripts\
- Mac OS X:
[your user directory]/Documents/Bitwig Studio/Control Scripts/
- Connect and power on: Connect your controller's USB port to your computer and ensure the controller is powered on.
- Open Bitwig Studio: Launch the Bitwig Studio application.
- Access Preferences: In Bitwig Studio, navigate to the Options menu and select Preferences.
- Detect controllers: Click the Controllers tab, then click Detect available controllers. Bitwig Studio will automatically identify and recognize your connected controller.
- Close Preferences: Click OK to close the Preferences window.
- Load Bitwig program: Select and load the "Bitwig" program on your controller.
Important Note for Program Selection: Each time you use your controller with Bitwig Studio, you must select the "Bitwig Studio" program on the controller. To do this:
- Press the Preset button. The display on your controller will show the current program name (flashing).
- Turn the Data Dial to browse through the list of available programs.
- Select the Bitwig program, and then press the Data Dial to confirm.
Operation
The following sections detail the operation of each supported controller within Bitwig Studio. Remember to always select and load the "Bitwig" program on your controller as described above before use.
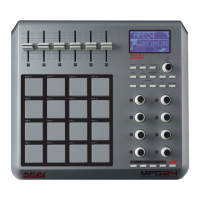
MPD218 Operation
The MPD218 offers pads and knobs for controlling Bitwig Studio.
- Pads: Press the pads to play the active instrument track. Use the Pad Bank button to switch between different pad banks, expanding the range of playable notes or triggers.
- Knobs: The knobs control macros or parameters of the active track, with their function depending on the currently selected control bank. Use the Ctrl Bank button to cycle through the control banks:
- Control Bank A: Knobs 1-6 control Macros 1-6 of the current device.
- Control Bank B: Knobs 1-6 control Parameters 1-6 of the current device.
- Control Bank C: Knobs 1-6 control Parameters 7-12 of the current device.
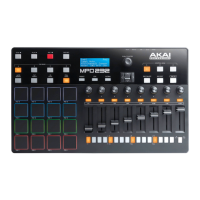
MPD226 Operation
The MPD226 provides transport controls, pads, knobs, faders, and switches for comprehensive control in Bitwig Studio.
- Transport Buttons (Stop, Play, Record): These buttons perform standard transport functions:
- Stop: Stops playback or recording.
- Play: Starts playback or recording.
- Record: Record-arms the active track(s).
- Pads: The pads can play MIDI notes or launch clips/scenes, depending on the current mode. Use the switches in Control Bank A to select the mode:
- Instrument Mode: Pads play MIDI notes on the active track. If the track's instrument is a Drum Machine, pads corresponding to an instrument for that note will light up.
- Clip Mode: Pads act as a 4x4 Clip Launcher. A pad's color indicates the clip's state:
- Green: Clip is playing.
- Amber: Clip exists but is not playing.
- Red: Clip is recording.
- Off: No clip in that slot.
Use Pad Bank to change the scene of clips triggered: Pad Bank A (Scenes 1-4), Pad Bank B (Scenes 5-8), Pad Bank C (Scenes 9-12).
- Scene Mode: Pads trigger scenes (columns of clips). Each pad corresponds to a scene (e.g., Pad 1 triggers Scene 1).
- Knobs: Control parameters based on the current control bank. Use Ctrl Bank to cycle:
- Control Bank A: Knobs 1-4 control Macros 1-4 of the primary device.
- Control Bank B: Knobs 1-4 control the Pan knobs of tracks (e.g., Knob 1 for Track 1 Pan).
- Control Bank C: Knobs 1-4 control the Send for Effect Track 1 of tracks (e.g., Knob 1 for Track 1 Send Level).
- Faders: Control parameters based on the current control bank. Use Ctrl Bank to cycle:
- Control Bank A: Faders 1-4 control the first 4 macros of the current device.
- Control Bank B: Faders 1-4 control the Volume faders of tracks (e.g., Fader 1 for Track 1 Volume).
- Control Bank C: Faders 1-4 control the Send for Effect Track 2 of tracks (e.g., Fader 1 for Track 1 Send Level).
- Switches: Select modes or enable/disable track parameters based on the current control bank. Use Ctrl Bank to cycle:
- Control Bank A: Selects pad mode:
- Switch 1: Instrument Mode.
- Switch 2: Clip Mode (switches between Tracks 1-4 and 5-8).
- Switch 3: Scene Mode.
- Switch 4: Toggles notifications on/off.
- Control Bank B: Record-arms or -disarms tracks (e.g., Switch 1 for Track 1).
- Control Bank C: Mutes or unmutes tracks (e.g., Switch 1 for Track 1).
MPD232 Operation
The MPD232 offers similar functionality to the MPD226 but with an expanded set of controls.
- Transport Buttons (Stop, Play, Record): Same as MPD226.
- Pads: Same as MPD226, including Instrument Mode, Clip Mode (4x4 Clip Launcher with color indicators), and Scene Mode. Pad Bank A (Scenes 1-4), Pad Bank B (Scenes 5-8), Pad Bank C (Scenes 9-12). Use switches in Control Bank A to select the mode.
- Knobs: Control parameters based on the current control bank. Use Ctrl Bank to cycle:
- Control Bank A: Knobs 1-8 control Macros 1-8 of the primary device.
- Control Bank B: Knobs 1-8 control the Pan knobs of tracks (e.g., Knob 1 for Track 1 Pan).
- Control Bank C: Knobs 1-8 control the Send for Effect Track 1 of tracks (e.g., Knob 1 for Track 1 Send Level).
- Faders: Control parameters based on the current control bank. Use Ctrl Bank to cycle:
- Control Bank A: Faders 1-8 control the first 8 macros of the current device.
- Control Bank B: Faders 1-8 control the Volume faders of tracks (e.g., Fader 1 for Track 1 Volume).
- Control Bank C: Faders 1-8 control the Send for Effect Track 2 of tracks (e.g., Fader 1 for Track 1 Send Level).
- Switches: Select modes or enable/disable track parameters based on the current control bank. Use Ctrl Bank to cycle:
- Control Bank A: Selects pad mode or controls clip window/device chain:
- Switch 1: Instrument Mode.
- Switch 2: Clip Mode (switches between Tracks 1-4 and 5-8).
- Switch 3: Scene Mode.
- Switch 4: Toggles notifications on/off.
- Switch 5: Shifts the "clip window" up by one scene (4x4 area of clips).
- Switch 6: Shifts the "clip window" down by one scene.
- Switch 7: Selects the previous device in the active track's device chain.
- Switch 8: Selects the next device in the active track's device chain.
- Control Bank B: Record-arms or -disarms tracks (e.g., Switch 1 for Track 1).
- Control Bank C: Mutes or unmutes tracks (e.g., Switch 1 for Track 1).
MPK225 Operation
The MPK225 integrates transport controls, pads, knobs, and switches for Bitwig Studio.
- Transport Buttons (Stop, Play, Record): Same as MPD226.
- Pads: Same as MPD226, including Instrument Mode, Clip Mode (4x2 Clip Launcher with color indicators), and Scene Mode. Pad Bank A (Scenes 1-4), Pad Bank B (Scenes 5-8), Pad Bank C (Scenes 9-12), Pad Bank D (Scenes 13-16). Use switches in Control Bank A to select the mode.
- Knobs: Control parameters based on the current control bank. Use Ctrl Bank to cycle:
- Control Bank A: Knobs 1-8 control Macros 1-8 of the primary device.
- Control Bank B: Knobs 1-8 control the Pan knobs of tracks (e.g., Knob 1 for Track 1 Pan).
- Control Bank C: Knobs 1-8 control the Send for Effect Track 1 of tracks (e.g., Knob 1 for Track 1 Send Level).
- Switches: Select modes or enable/disable track parameters based on the current control bank. Use Ctrl Bank to cycle:
- Control Bank A: Selects pad mode:
- Switch 1: Instrument Mode.
- Switch 2: Clip Mode (for Tracks 1-4).
- Switch 3: Clip Mode (for Tracks 5-8).
- Switch 4: Scene Mode.
- Control Bank B: Record-arms or -disarms tracks (e.g., Switch 1 for Track 1).
- Control Bank C: Mutes or unmutes tracks (e.g., Switch 1 for Track 1).
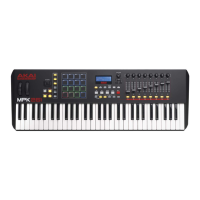
MPK249 & MPK261 Operation
The MPK249 and MPK261 offer extensive control with transport buttons, pads, knobs, faders, and switches.
- Transport Buttons (Stop, Play, Record): Same as MPD226.
- Pads: Same as MPD226, including Instrument Mode, Clip Mode (4x4 Clip Launcher with color indicators), and Scene Mode. Pad Bank A (Scenes 1-4), Pad Bank B (Scenes 5-8), Pad Bank C (Scenes 9-12), Pad Bank D (Scenes 13-16). Use switches in Control Bank A to select the mode.
- Knobs: Control parameters based on the current control bank. Use Ctrl Bank to cycle:
- Control Bank A: Knobs 1-8 control Macros 1-8 of the primary device.
- Control Bank B: Knobs 1-8 control the Pan knobs of tracks (e.g., Knob 1 for Track 1 Pan).
- Control Bank C: Knobs 1-8 control the Send for Effect Track 1 of tracks (e.g., Knob 1 for Track 1 Send Level).
- Faders: Control parameters based on the current control bank. Use Ctrl Bank to cycle:
- Control Bank A: Faders 1-8 control the first 8 macros of the current device.
- Control Bank B: Faders 1-8 control the Volume faders of tracks (e.g., Fader 1 for Track 1 Volume).
- Control Bank C: Faders 1-8 control the Send for Effect Track 2 of tracks (e.g., Fader 1 for Track 1 Send Level).
- Switches: Select modes or enable/disable track parameters based on the current control bank. Use Ctrl Bank to cycle:
- Control Bank A: Selects pad mode or controls notifications:
- Switch 1: Instrument Mode.
- Switch 2: Clip Mode (for Tracks 1-4).
- Switch 3: Clip Mode (for Tracks 5-8).
- Switch 4: Scene Mode.
- Switches 5-7: No function.
- Switch 8: Toggles notifications on/off.
- Control Bank B: Record-arms or -disarms tracks (e.g., Switch 1 for Track 1).
- Shift + Switch: Selects tracks (e.g., Shift + Switch 1 selects Track 1).
- Control Bank C: Mutes or unmutes tracks (e.g., Switch 1 for Track 1).
- Shift + Switch: Solos or unsolos tracks (e.g., Shift + Switch 1 solos/unsolos Track 1).
- DAW Control Buttons: These dedicated buttons perform specific functions:
- Up (^): Shifts the "clip window" up by one scene (the 4x4 area of clips available in Clip Mode).
- Down (v): Shifts the "clip window" down by one scene.
- Left (>): Selects the previous device in the active track's device chain.
- Right (<): Selects the next device in the active track's device chain.
This documentation provides a comprehensive guide to integrating your Akai MPD2 and MPK2 series controllers with Bitwig Studio, enhancing your workflow for music production and performance.