8
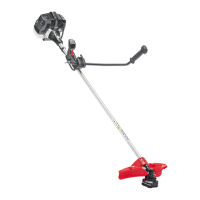
WARNING! Your machine may be equipped with an
electrical protection device that stops the motor automatically
if it is overloaded. If this happens, wait a few minutes before
starting it again and press the reset button (no. 15 fig. A), if
present.
Start off slowly and follow the instructions below carefully:
- Before starting to operate the machine, make sure that the work area is free
of rocks, debris, lines and other foreign objects.
- Start the machine before approaching the grass to be cut.
- Cut the grass by swinging the machine from right to left and proceed slowly
keeping the trimmer inclined forwards at an angle of about 30
O
(Fig. F).
- High grass should be cut in layers, always beginning from the top. (Fig. G).
- Do not cut damp or wet grass.
- Do not overload your machine.
- Avoid wearing the line out quickly by knocking against hard objects (stones,
walls, fences etc.). Use the edge of the guard to keep the machine at the right
distance (only where Fig. H is present).
- Watch out for kickbacks and blade reactions in the event of impact with hard
objects.
- To prevent damage to the extension cable, never pass the machine over the
extension cable while the machine is running; make sure it is always in a safe
position behind your back.
REPLACING THE TRIMMING DEVICE (FIG. I)
WARNING! Only use original spare parts for replacement.
1) Disconnect the machine from the mains supply.
2) Turn the machine upside down with the guard facing upwards.
3) Replace the trimming device in the following manner:
- Cutting head with manual spool unit: take the spoolholder (1)
firmly in one hand and with the other take hold of the spool (2). Press the
spool down (3) and then turn it counter-clockwise (4). Extract the empty
spool and clean the inside of the spoolholder carefully, making sure all the
soil and grass deposits are removed. Then insert the new spool (5) into the
spoolholder (1), making sure the latches are aligned with the vents, and
press the spool down (6). Then turn the spool clockwise until it locks (7).
Make sure that the spool is fastened securely. Restore the line length by
repeating the operations described in the chapter STARTING AND
STOPPING THE MACHINE.
- Cutting head with professional manual spool: to assemble the
cutting head, install the flange (5), if any, on the shaft and tighten the spool
by turning it clockwise or counter-clockwise all the way, as shown in fig. I.
To change the line, loosen the knob (1) and extract the spool (2), being
careful not to misplace the parts shown in fig. I. Insert 2 pieces of nylon cord,
2 mm diameter and 3 m long into the holes in the reel (3) and wind them
onto the reel in an anti-clockwise direction. Refit the assembly by following
the instructions in reverse order.
- Cutting head with automatic spool unit: hold the spoolholder (1)
firmly in one hand and with the other remove the spool cover (2) by turning
it counter-clockwise. Then remove the empty spool, clean the inside of the
spoolholder and the cover carefully, making sure that you do not lose the
spring. Insert the new spool into the spool cover and thread the ends of the
lines into the holes (3) in the cover. Reposition the spring. Then insert the
cover with the spool into the spoolholder and rotate the cover with the spool
clockwise until it locks. Restore the line length by repeating the operations
described in the chapter STARTING AND STOPPING THE MACHINE.
- Cutting head with professional automatic spool: to mount the
cutting head, open it by pressing the knob and the two side tabs. Install the
flange (5) on the shaft and fasten the top (1) with the nut and washer, using
the supplied wrench. Close the spool making sure that the line ends are fed
through the appropriate slots (2). Adjust the length of the cutting line by
performing the operations described in the Start and Stop chapter. To
change the line, open the cutting head as explained above, being careful
not to misplace any parts. Fold in two a 2-mm diameter, 6-m length of line
and loop it onto the spool (3). Wind the line clockwise and reinstall the spool
threading the line ends through the two bushings (4).
- Cutting head with disposable line: see Fig. I.
- Dual-line cutting head: Install the flange (5) on the shaft. Loosen the
knob (1) and fasten the top (1) with the nut and washer, using the supplied
wrench. Tighten the knob again after threading the lines as described in the
Start and stop chapter.
- Cutting head with 'Full-Automatic' spool: grasp the spool holder
(1) tight with one hand (or with the special tool fig. A-(14) if supplied), and
with the other hand remove the cowling (2), rotating it counter-clockwise.
Then remove the empty spool and clean the inside of the spool holder
thoroughly. Insert the new spool/cowling set in the spool holder and rotate
it clockwise until it is securely fastened. Adjust the length of the cutting line,
repeating the operations described in the Start and Stop chapter.
- Cutting head with plastic blades:
- disassembly: grasp the spool holder tight with one hand (or with the special
tool fig. A-(14) if supplied), and with the other hand remove the disk, rotating
it counter-clockwise (4).
- assembly: insert the disk in the spool holder and rotate is clockwise until
it is securely fastened.
- Cutting head with star-shaped metal blade (if provided):
Install the flange (5) on the shaft. Hold the shaft tight by inserting the tip of
a screwdriver in the appropriate slot, and assemble the blade and other
components as shown in fig. I.
WARNING! Do not use makeshift trimming systems by re-
using worn originals. Use only approved replacements. The
use of line with different characteristics to those of the original
can permanently damage the machine as well as annulling the
terms of the guarantee.
MAINTENANCE
WARNING! Before carrying out any maintenance
operations, disconnect the machine from the power supply.
The line cutting blades (if supplied) may cause deep cuts.
- Regular cleaning and maintenance of your machine will ensure efficiency
and prolong the life of your machine.
- After each session, clear the spool, the spoolholder and the guard of grass
and mulch. If you are using the professional manual spool,
loosen the knob all the way and remove the spool to obtain
access to the area that requires cleaning.
- Whilst trimming, keep the motors ventilation vents clean and free of grass.
- Clean the machine with a soft brush or cloth.
- Do not spray or wet the appliance with water.
- Do not use detergents or solvents as these could ruin the machine. The
plastic parts can easily be damaged by chemical agents.
- If the line cutting blade breaks, have it replaced by contacting an authorised
service centre.
TROUBLESHOOTING
If the machine vibrates:
- disconnect the machine from the mains.
- disassemble the spool unit (if it can be replaced).
- clean the spool carrier carefully and remove any grass or other material
left on this unit. If vibration persists after reassembling, replace the
spool unit with a new one.
If the machine does not start:
- check the electrical connections
- Check the extension cord or change the power socket.
- check the main switch in the house.
- check that the overload protection reset button, if any, is pressed.
If cut is poor and the machine performance decreases:
- adjust the cutting device length.
CAUTION! If after the above checks the machine does not work correctly or
in case of malfunctions different from those listed, have it checked by an
authorised service centre. Always refer to the machine model and serial number
indicated on the data plate or in the attached sheet.
8755340.p65 26/02/02, 16.008
 Loading...