Silent Electric
1. Put the toilet in the selected position.
2. Using the holes in the base as a guide, mark the positions for the 3 bolt holes on the mounting surface.
3. Remove the toilet and drill 3 vertical holes, with a diameter of 9 mm (0.35"), through the mounting surface.
4. Apply the white silicone sealant to the outer rim of the bottom base.
5. Put the toilet on its place and tighten the fastenings securely. If you are not using self-locking nuts, use nutlocking compound.
6. Use the sealant around the base, towards the oor.
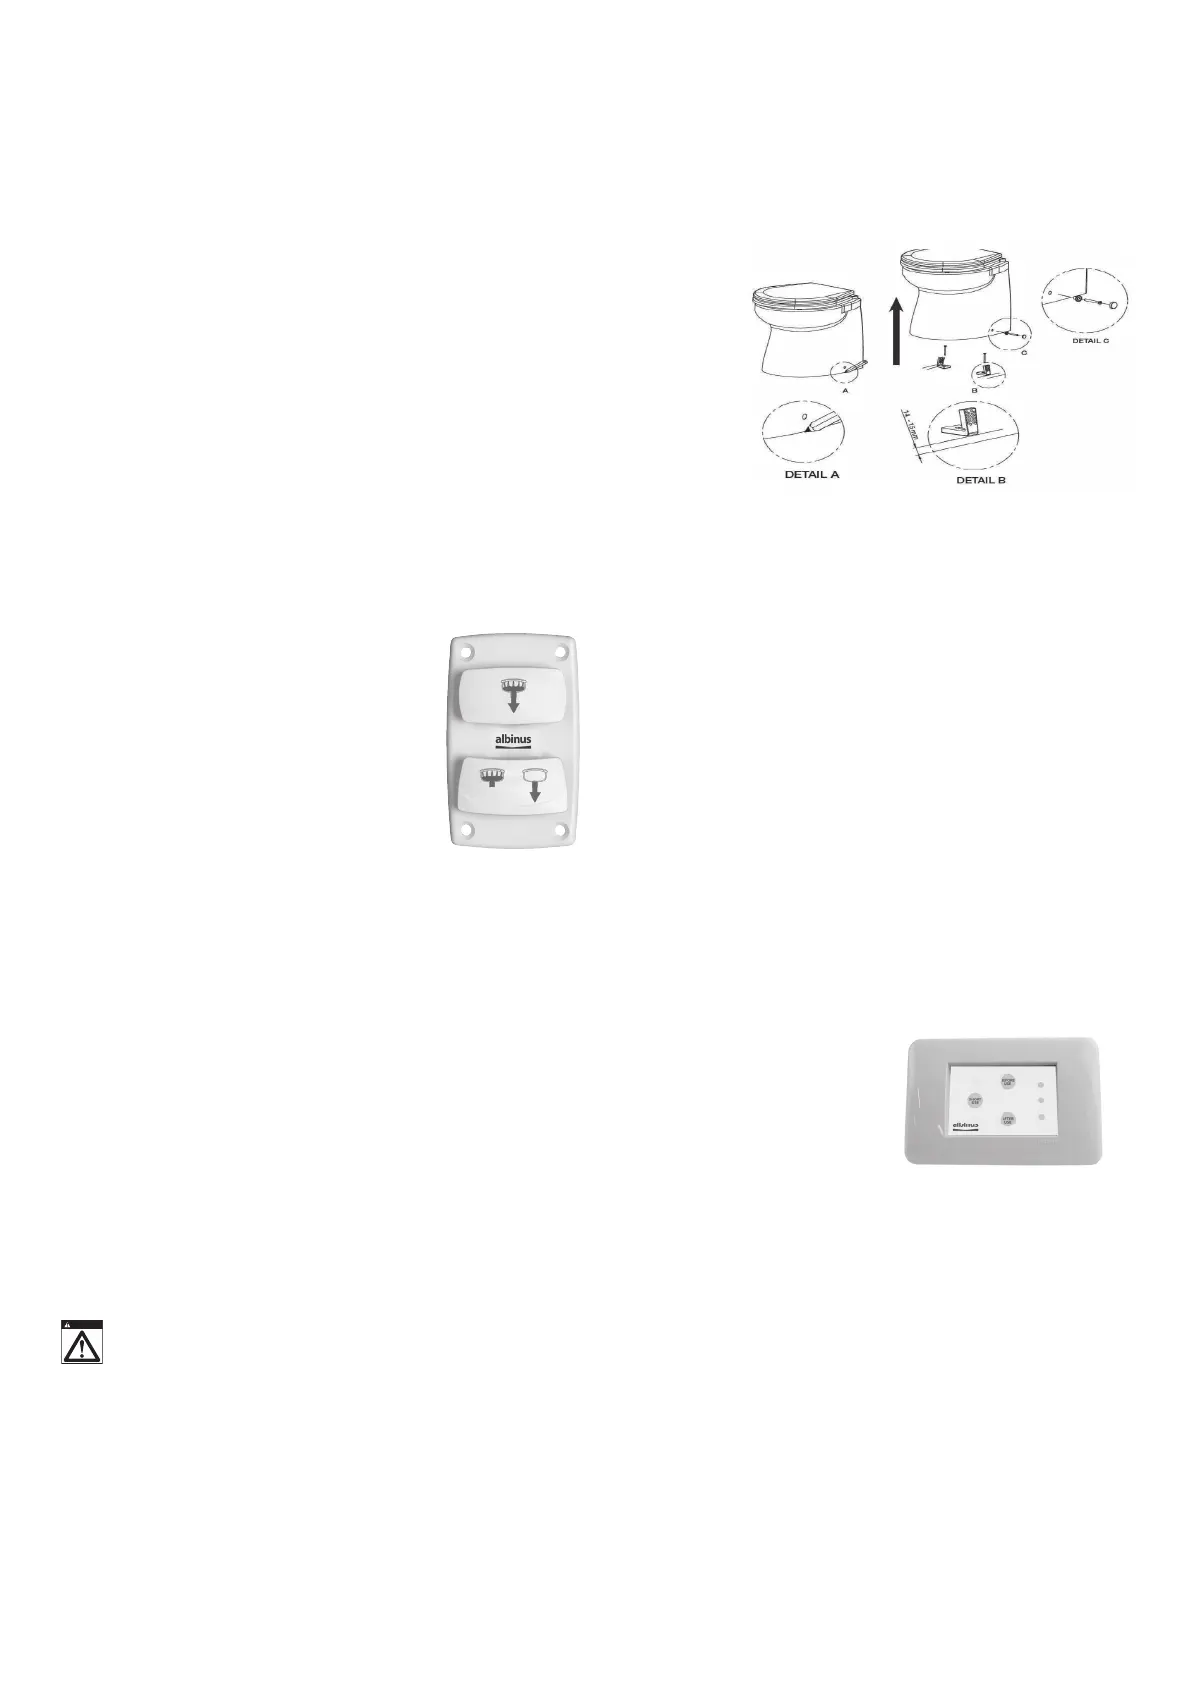
Silent Premium & Design Silent Electric
1. Put the toilet in the selected position.
2. Using the two holes in the toilet and the outer edge of the toilet base as guide, mark the
location of the holes and trace a bit of the outer edge of the base
3. Remove the bowl.
4. Re-draw a new parallel line approximately 14 – 15 mm (approx 0.6") in from the line you drew in
step 2.
5. Put the assembly bracket on the oor, with the slot horizontal.
6. Mark the middle position of the slot and drill a Ø 5 mm (0.2") hole for each bracket.
7. Tighten the bracket by using the enclosed Ø 6,2 mm (¼ ") screws. (Ensure that they are not too
long for your installation )
8. Put the toilet back in the selected place.
9. Put the one plastic sleeve in each assembly hole on the toilet.
10. Secure the toilet by using the Ø 4,7 mm (⁄") screws. As the bracket has a lot of small holes, you
can make a small nal position adjustment.
11. Put the screw cover on the screw head.
12. Use the sealant around the base, towards the oor.
Operating instructions
Correct operation of the toilet is essential for your and comfort.
Note that the Silent Electric, Design Silent Electric and Silent Premium toilets are designed to have the bowl empty when not in use.
Silent Electric toilets and Design Silent Electric toilets
with Control Panel Rocker Switch (07-66-025)
Control panel
The panel controls the rinse and the discharge, by two
buttons.
• Button 1, One function, discharge and rinse.
• Button 2, Two functions, Rinse toilet OR discharge
toilet.
First use
1. Use control panel as described above.
2. Do not put anything in the toilet unless it has not
pasted through your body, except toilet paper.
Normal Use
1. Before use, ensure that there is enough water in the bowl to prevent the
toilet paper becoming compacted at the bottom of the bowl.
2. If the bowl is empty, rinse the toilet with button 2 “Rinse".
3. Use good quality soft RV-grade toilet paper, but do not use more than
necessary.
4. After use, ush the toilet with button 1.
5. Afterwards, discharge the toilet with button 2 "Discharge" until the bowl
is empty, Always leave the bowl empty to minimize odour and spillage.
Silent Premium toilets with Digital Control Panel (07-66-024).
Control panel
3 function control panel; Before use – after use – short use and trimmer to
regulate the ow
Short Use Button
1. The Short Use button is intended mainly for only liquid waste, where there
is no risk of solid waste sticking to the toilet bowl
2. Pressing the Short Use button switch will automatically both rinse and
discharge the toilet, leaving the bowl empty.
Before Use Button
1. The Before Use function will ll the toilet bowl with water prior to use,
wetting the sides so that solids will not soil the sides of the bowl or toilet
paper becomes compacted at the bottom of the bowl.
2. Activating the Before Use button lls the bowl with water, prior to
use. Important! For optimum operation, the water level should be
about 5 cm (2") above the discharge hole. The amount of water can
be adjusted by truning the trimming shafts at the back of the control
panel. A clockwise turn on the trimmer shaft will increase the ow of
water and a counter-clockwise
turn will reduce the ow of water.
After Use Button:
1. The After Use function discharges
the contents of the bowl, leaving
the bowl empty.
Cleaning
Regularly ushing with clean water is one of the most e ective methods to keep the toilet clean and odor-free
• To clean the bowl, use any liquid or cream ceramic cleaner
• To clean the rest of the toilet, including the seat and lid, use a nonabrasive
liquid cleaner. Polish with a dry cloth only.
• To disinfect the toilet, use a liquid disinfectant diluted in accordance with
the manufacturer’s instructions. It is possible to apply it to all parts of the
toilet using a sponge or soft brush as necessary.
• After applying any cleaning or disinfecting agent, always ush well. DO NOT
ALLOW THESE AGENTS TO STAND IN THE SYSTEM because strong detergents
stay on the inside of the system and burn through the rubber seals of the
pump, invalidating the warranty
.
WARNING
NOTE: Do not put any of the following into the toilet: Sanitary Towels, Wet Strength Tissues, Cotton Wool, Cigarettes, Matches, Chewing Gum or any solid
objects, Petrol, Diesel, Oil, Solvents of any kind or water that is more than hand warm.
The toilet is rated to macerate toilet paper and organic waste only. Do not put anything, other than toilet paper, in the toilet unless it has passed through your
body!
2
 Loading...