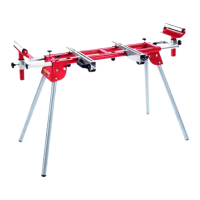
UMFl600
Assembly
Vl. Assembly instructions
The
Mitre Saw Stand should be assembled
completely before use.
Proceed
as
follows:
1. Legs, Fig.34
.
Place the
product
upside down on the
ground.
.
Press the spring
bolt
(D)
and keep it in
position.
.
Slightly unfold the leg
(1.1)and
release
the spring bolt. Unfold the leg further
until
the spring
bolt snaps in
position.
.
Repeat the
same action for the other 3 legs.
.
Turn over the
product
and
place
it onto the
ground.
Ensure the
legs
stand correctly
on an even and stable
ground.
A WARNING! Always
ensure
the
bolts of four legs snap in
position
before using
the
producUplacing
the Mitre Saw
Stand on the
ground.
2. lnstalling
the support brackets
(Fig.
5)
.
Ensure the handle
(2.3)
is
disengaged.
.
Hook the front end onto the sliding frames
and then
place
the support bracket
(2)
onto the
product.
A WARNING! Danger of clamping finger when
pushing
han-
dles downward!
.
Push the rear end downward to hook it
onto the sliding frames.
.
Push the handle
(2.'1
)downward
to secure the support bracket in
position.
.
Repeat the
same action
for the
other support bracket.
3. Installing
the roller supports
(Fig.
6)
.
Align and insert the
mast of the roller support
(4)
into the mounting tube
(5).
.
Hold the roller
support on the desired height and tighten the
star
knob
screw
(long)
(6)
to secure it in
position.
.
Repeat the
assembly for the other roller support.
.
Fix the star-knob screws
(3)
into the
threads of the Mitre Saw Stand.The work-
piece
support
can be
adjusted in its
length and height by lowering the star-knob
screws
(3
and 6).
4. Fitting
a
machine
(Fig.
7)
/
Several bench machines can be fitted to
your
universal Mitre Saw Stand by adjusting
the
support brackets
(2)
in its distance to the mounting holes
of
your
device.
.
Position
your
Mitre Saw onto the support brackets
(2).
.
Fasten the Mitre
Saw to
the
support brackets by using 4 hexagon bolts, 4 lock wash-
ers, 4 spring washers
and
4 hexagon nuts
(supplied).
.
Tighten the screws firmly with an
open-end
wrench
(wrench
size 10 mm).
.
Set the support
brackets
(2)
with the
assembled Mitre Saw onto the universal Mitre
AFTER SALES SUPPORT
E support@scheppach.com.au
MODEL: UMF1600 PRODUCT CODE: 42929 0612017
11
a @ 1300 855 831
 Loading...