Do you have a question about the Aleko AS 1300 and is the answer not in the manual?
Lists components for dual gate openers and their mounting hardware.
Details the various bolts, nuts, washers, and clips included in the kit.
Lists components for single gate openers and their mounting hardware.
Details the various bolts, nuts, washers, and clips included in the kit.
Lists various optional accessories available for the gate openers.
Lists essential tools required for installation and maintenance procedures.
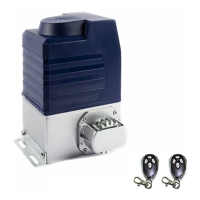
Details technical parameters like voltage, power, speed, weight, and dimensions.
Highlights key operational characteristics and functionalities of the gate openers.
Illustrates the general setup and component placement for a single gate opener.
Shows a specific layout for gates that open outwards from the property.
Illustrates the installation layout and component placement for dual gates opening outwards.
Guidance on determining the correct placement of post brackets for optimal gate opener leverage.
Details how to find the proper mounting position using a provided chart.
Connecting the gate bracket and post bracket assembly to the opener unit.
Positioning the opener level with the gate's horizontal cross member for correct installation.
Ensuring correct distance between gate and opener in open and closed positions.
General instructions for attaching mounting hardware to the gate and post.
Marking hole points on gate and bracket for precise adjustment during installation.
Drilling holes through the post and gate at marked points for hardware.
Securing post bracket assemblies to the gate posts using bolts and nuts.
Attaching gate brackets to the gates using bolts and nuts.
Trimming excess bolt length after tightening nuts.
Fastening the opener to the post bracket assembly using clevis pins and hairpin clips.
Mounting the control box securely, at least 100 cm above ground, for protection.
Routing the first gate opener's power and control cable into the control box.
Connecting second opener, alarm lamp, and other cables to the control box.
Detailed wiring diagram for Actuator 1 and Actuator 2 connections to the control board.
Wiring diagrams for accessories like alarm lamps, batteries, photocells, push buttons, etc.
Specific terminal connections for Master (Gate 1) and Slave (Gate 2) actuators.
Instructions for wiring Alarm Lamp, Battery, Photocell, Push Button, Loop Detector, Exit Wand, and Electric Lock.
Procedure for programming a new remote control to the gate opener system.
Process to clear all previously learned remote control codes from the opener.
Configuring the system for single or dual gate operation modes.
Designating one gate opener as master and the other as slave in a dual system.
Adjusting the time delay between master and slave gate opening.
Adjusting the time delay between master and slave gate closing.
Setting force for obstruction reversal and gate operation based on gate weight.
Setting the maximum time the motor runs per cycle for safety.
Enabling or disabling the photocell safety feature for obstruction detection.
Configuring the delay before the gate automatically closes after opening.
Adjusting the duration of the initial slow opening/closing phase for smoother operation.
Adjusting FRP to achieve soft stop functionality during gate movement.
Resetting all control board settings to their default factory values.
Explains symbols on the digital display indicating gate opener operation status.
Procedure for adjusting the limit switch on the first gate opener actuator.
Procedure for adjusting the limit switch on the second gate opener actuator.
Instructions on using the remote control for opening, closing, and stopping the gate.
Procedure for manually opening the gate in case of power failure or system malfunction.
Attaching the Push-To-Open bracket to the gate post as the first step.
Connecting the gate bracket assembly to the opener unit for push-to-open gates.
Leveling and temporarily securing the opener assembly for push-to-open gates.
Reiteration of standard pull-to-open installation steps applicable here.
Specific wiring connections for push-to-open gate configurations.
Instructions for cleaning the actuator shaft and lubricating gate hinges.
Verifying installation stability and tightening hardware periodically.
Important considerations for inspection, service, and voltage verification.
Diagnosing problems with power supply, AC input, and motor operation.
Troubleshooting arm connection, installation, or gate weight issues.
Addressing obstruction sensing, low force settings, or short motor running times.
Resolving issues with photocell settings or obstruction detection during closing.
Checking for faulty limit switches or shorted wires affecting gate position.
Step-by-step guide for initial single or dual gate configuration.
Guide for setting up master and slave gate opener roles in a dual system.
Adjusting the time delay between master and slave gate opening.
Adjusting the time delay between master and slave gate closing.
Configuring the stall force for the first gate opener actuator.
Configuring the stall force for the second gate opener actuator.
Setting the maximum motor running time for motor 1.
Setting the maximum motor running time for motor 2.
Configuring the photocell safety function for obstruction detection.
Setting the automatic closing time for the gate opener.
Adjusting the duration of the soft start phase for smoother operation.
Setting the fast running period to achieve soft stop functionality.
Resetting all control board settings to their default factory values.
| Brand | Aleko |
|---|---|
| Model | AS 1300 |
| Category | Gate Opener |
| Language | English |